background image

10

OWNER’S MANUAL

NEUTON

 PUMP MODULE

1) 

A control panel penetration/bushing will need to 
be inserted to accommodate the BAS and/or zone 
sensor wiring . Installer should determine optimal 
positioning per final installation orientation . The 
use of a knockout punch is recommended for 
penetration(s) . Install bushing .

NOTE: 

Take care to keep the inside of the control 

panel free of metal shavings when installing hole .

2) 

Mount unit to an appropriate bracing system . The 
pump module can be mounted in any position that 
allows the pump shaft to be oriented horizontally 
while not allowing the terminal box be oriented 
in a downward position (See 

Figure 3

) . See the 

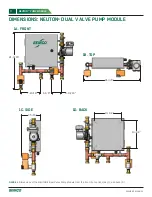
dimensional drawings in 

Figures 1D and 2D 

for the 

dimensions between the four (4) mounting holes 
for each configuration . At a minimum, 12” should 
be added to the width and 8” to the depth shown 
to allow reasonable service access to the pump 
and the valves and to allow for a full swing of the 
electrical panel door .

3) 

Disconnect the o-rings that are attached to the unit 
and place on each pipe connection (See 

FIgure 4

) .

INSTALLATION & WIRING

RECEIVING & INSPECTION

Upon delivery, confirm that the quantity and model(s) received matches the Bill of Lading . If there is any discrepancy, 
immediately notify SEMCO LLC . 

Inspect the packages for signs of damage . If damage is suspected, contact SEMCO immediately . If no visible damage 
is apparent, the unit should be properly stored until installation .

FIGURE 3. 

Acceptable (A, B, E) and unacceptable (C, D) mounting orientations .  Note that orientation C can be utilized provided that 

the pump motor is field rotated to an acceptable position (E) .

A

B

C

D

4) 

Make pipe connections . See the dimensional 
drawings in 

Figures 1A and 2A 

for the dimensions 

between pipes . All piping connection ports on 
NEUTON are 1” female National Pipe Tapered 
(NPT) swivel half-union adapters with face gasket 
designed to connect to standard 1” male National 
Pipe Tapered fittings (NFT) to be provided by the 
installing contractor . Tighten the swivel nut by hand 
and then gently snug with pliers (1/8 to ¼ turn) for a 
leak-free joint .  Do not over-tighten or you may cut 
the gasket and cause a leak .

5) 

WARNING!  

Air in the system will damage the pump: 

air must be completely eliminated from the pump 
module and chilled beam loop using a vent at the 
high point . The actuator control valves must be 
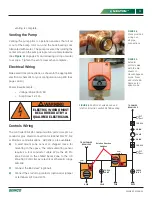
manually opened to facilitate filling the system (See 

Figure 5

) . After the system is filled, the valve should 

be returned to automatic operation . Be sure the 
knob has “popped” out to the engaged position to 
return to automatic mode . See 

Figure 6

 for position 

of valve knob and rotation direction switch after 

E

Summary of Contents for Semco NEUTON

Page 1: ...PROACTIVE CONTROL 1ST COST SAVINGS ENERGY SAVINGS OWNER S MANUAL CONTROLLED CHILLED BEAM PUMP MODULE...

Page 2: ...the prior written permission of SEMCO LLC Patent pending SEMCO and the SEMCO logo are registered trademarks of SEMCO LLC All other trademarks are registered to their respective companies ZS Pro is ow...

Page 3: ...RODUCTION CONFIGURATIONS NEUTON4 Dual Valve Pump Module NEUTON2 Single Valve Pump Module CLOSED CLOSED TO BEAMS FROM BEAMS Utilized as only cooling or only heating 2 pipe primary system supply return...

Page 4: ...F primary loop water temperatures to optimal 58 F or 100 F chilled beam discharge temperatures which prevents cooling mode condensation and heating season heat stratification Each NEUTON can control u...

Page 5: ...modulate as required to achieve the desired beam supply water temperature setpoint After a default time delay if the space cooling setpoint is not achieved or if it is exceeded beyond the deadband pa...

Page 6: ...valve 5 Chilled water return 6 Hot water supply 7 Zone loop return connection 8 Chilled water supply 9 Hot water return 10 Zone supply water connection 11 Pete s plugs for pressure and flow measuremen...

Page 7: ...h zone sensor and BAS if used On board controls specifically developed and optimized for chilled beam zone control plug and play All pipe connections use swivel half union adapters with face gasket de...

Page 8: ...E DIMENSIONS NEUTON4 DUAL VALVE PUMP MODULE 7 5 16 10 1 2 10 1 2 21 9 16 7 11 16 4 1 8 3 13 16 21 3 8 1A FRONT 1C SIDE 1D BACK 1B TOP FIGURE 1 Dimensions of the NEUTON 4 Dual Valve Pump Module from th...

Page 9: ...SIONS NEUTON2 SINGLE VALVE PUMP MODULE FIGURE 2 Dimensions of the NEUTON 2 Single Valve Pump Module from the front A top B side C and back D 20 3 4 17 1 2 4 1 8 7 11 16 3 13 16 10 1 2 10 1 2 7 5 16 2A...

Page 10: ...repancy immediately notify SEMCO LLC Inspect the packages for signs of damage If damage is suspected contact SEMCO immediately If no visible damage is apparent the unit should be properly stored until...

Page 11: ...n rung 103 See pages 12 13 Power Requirements Voltage 208 230 1 60 Amp Draw 1 2 FLA WARNING ELECTRIC WIRING MUST BE CARRIED OUT BY A QUALIFIED ELECTRICIAN Controls Wiring The controller RS 485 communi...

Page 12: ...AUTO S S BY OTHER THAN SEMCO REMOVE FACTORY JUMPER IF TERMINALS ARE USED 0 10VDC MODULATING SIGNAL TO WATER PUMP 2 10VDC MODULATING SIGNAL TO CW VALVE ELECTRICAL SCHEMATIC NEUTON 4 Dual Valve Pump Mod...

Page 13: ...VIDED FOR EXTERNAL AUTO S S BY OTHER THAN SEMCO REMOVE FACTORY JUMPER IF TERMINALS ARE USED 0 10VDC MODULATING SIGNAL TO WATER PUMP 2 10VDC MODULATING SIGNAL TO WATER VALVE ELECTRICAL SCHEMATIC NEUTON...

Page 14: ...n the green LED is lit the zone is in an occupied state The ZS Pro Zone Sensor is designed for integration with the I O Zone 583 DDC controller Communications are established using the Rnet communicat...

Page 15: ...ter to the local equipment for maintenance and commissioning Mounting Dimensions Standard 4 x 2 electrical box using provided 6 32 x 1 2 mounting screws The ZS Pro sensor is designed for integration w...

Page 16: ...d values page 18 The sensor is in a timed override See To override the schedule page 17 The sensor s buttons are locked either because the control program specifies it or because a user locked them at...

Page 17: ...ne in an occupied state for a length of time specified in the control program s Increment field 2 Press the button to incrementally increase the time The maximum length of time that you can override t...

Page 18: ...Press the or button to adjust the value 2 Wait until the display returns to the home screen before you press any other buttons NOTE If the control program specifies that the value is not editable you...

Page 19: ...ne Sensor and after limits applied by BAS Effective setpoint in use by controller BAV AV 21 DEV 2402 occ_htg_sp_1 Setpoint Cooling Unoccupied Setpoint Status of unoccupied cooling setpoint read from t...

Page 20: ...t temperature desired for water temperature in cooling mode Factory setting is 60 F BAV AV 4 DEV 2402 chw_max_temp_1 Cooling Minimum pump output Cooling Minimum pump output Note 0 100 pump demand is s...

Page 21: ...his point if the SEMCO wall mount Zone Sensor is not opted BAV AV 326 DEV 2402 bas_space_3_ temp_1 Space 4 RH from BAS BAS writes the space RH to this point if the SEMCO wall mount Zone Sensor is not...

Page 22: ...AS comm input BAV AV 132 DEV 2402 zone_1_enth_1 zone 1 grains zone grains calculated based on the temperature and RH input from selectable the Zone Sensor or BAS comm input BAV AV 133 DEV 2402 zone_1_...

Page 23: ..._rh_5_1 Zone Temp 1 BAV AV 701 DEV 2402 zone_temp_1_1 Zone Temp 2 BAV AV 702 DEV 2402 zone_temp_2_1 Zone Temp 3 BAV AV 703 DEV 2402 zone_temp_3_1 Zone Temp 4 BAV AV 704 DEV 2402 zone_tmp_4_1 Zone Temp...

Page 24: ...DEV 2402 schedule_1 shutdown from BAS If this point is ON all signals are forced to OFF or 0 demand BBV BV 12 DEV 2402 shutdown_bas_1 Use BAS Inputs If this point is ON space temp and RH values are r...

Page 25: ...d allowing a drop of water to escape Tighten the vent screw when complete No flow movement in actuator Check valve and actuator replacement to ensure valve and actuator are aligned properly Valve and...

Page 26: ...0 10 Volt signal for this orientation is 0 volts NOTE The orientation of the notches on the center post at 9 00 6 00 and 3 00 o clock This is the proper orientation of the valve to the actuator at a 0...

Page 27: ...the actuator is misaligned With the actuator removed from the valve Push in on the knob rotate it as far as it will go in the clockwise direction Remove the black knob and re insert it as shown in Fig...

Page 28: ...ks of SEMCO LLC All other trademarks are registered to their respective companies SEMCO is a global leader in air management We specialize in the design and manufacture of a wide range of air climate...

Reviews: