BENEFITS
Helps provide relief from allergy, asthma and respiratory
illness.
Helps clear a smokey environment quickly, so everyone
can work and relax together.
Helps reduce the time and money spent cleaning and
redecorating. Prevents damaging black dust from
staining walls, upholstery and window coverings.
Helps reduce tobacco, cooking and pet odors.
Revitalizes the air with healthy negative ions.
Improves indoor air quality for a fresher, more
comfortable environment, year-round.
HOW IT WORKS
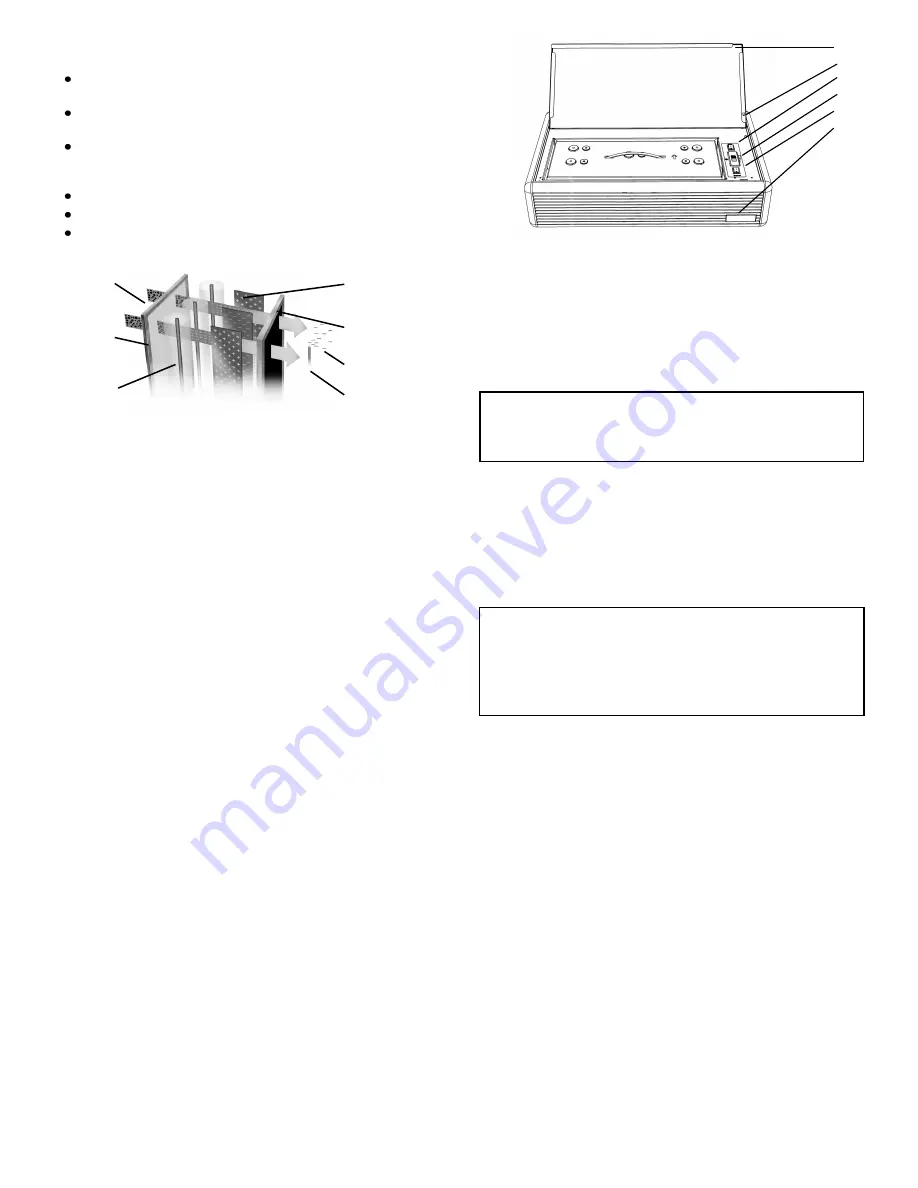
Dirty air is drawn in through the front grill and passes through
a 4-stage filtering system.
The Prefilter consists of aluminum mesh and a close knit
polymesh. It prevents larger particles, lint and hair from
entering the collecting cell.
The next step is a 2-Stage Electrostatic Collecting Cell. Dirt
particles are charged with a high positive voltage by a series
of fine ionizing wires. The charged particles are drawn
through to the collecting plates where the dirt adheres to the
grounded plates, and remains until the cell is taken out and
washed. Removes particles down to 0.01 micron
(1/2,540,000 of an inch).
The air is then drawn through an Activated Carbon Odor &
Gas VOC (Volatile Organic Compound) Removal Filter to
help remove offensive odors and gases. Clean air is then
discharged out the top of the Air Cleaner.
Dual Negative Ionizer is located in the clean air stream.
Adding healthy negative ions to the air revitalizes the air
similar to that near a waterfall, spring, the ocean, or after a
rainfall. Studies have shown that negative ions have a
beneficial effect on human biochemistry, both physically and
mentally.
OPERATING INSTRUCTIONS
1. Remove the Air Cleaner from the box and check for
apparent damage. If your unit has any signs of damage,
immediately contact the store where the Air Cleaner was
purchased.
2. Keep the shipping carton in case the need arises to
store or transport the unit.
3. Remove all packaging from the unit. Choose a suitable
table or stand to allow unobstructed circulation from front
and top of unit. The unit performs best when the back is
against a wall. This enhances air circulation. To mount
unit on wall, refer to the Wall Mount Instructions.
4. Operate Air Cleaner at voltage shown on back of unit.
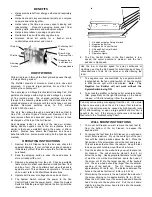
5. The System Switch controls the power to the Fan
Control Switch and the power board. When the System
Switch is
ON,
the green light behind the front grill will be
illuminated.
1
2
3
4
5
6
1 - Lid which activates Safety Interlock
2 - Negative Ion Emitter
3 - Negative Ion Control Switch
4 - 3-Speed Fan Control Switch
5 - System Switch
6 - Operation Lights
6. The Fan Control Switch in the front position is low
speed, the center position is medium, and the rear
position is high speed.
7. The negative ions are controlled by a separate switch
located behind the fan control switch. When the switch
is
ON
, the red light will be illuminated.
Note: The
Negative Ion Emitter will not work without the
System Switch being ON.
8. To access the prefilter, collecting cell or activated carbon
filter, press firmly on the right front dimple on the lid and
release. Lift the lid releasing it from the magnet.
WALL MOUNT INSTRUCTIONS
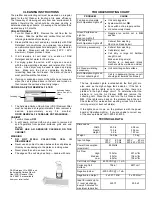
1. To mount Air Cleaner on wall, remove the rear feet (2)
from the bottom of the Air Cleaner, to expose the
keyhole slots.
2. To remove the feet from the Air Cleaner, you will need a
small, flat screwdriver. Pry up the center pin of the rear
foot until the head protrudes above the foot. Place the
flat portion of the screwdriver under the foot and pry up.
This will release the foot from the cabinet. Keep the feet
in case you wish to table mount the unit in future.
3. Find the location on the wall where you wish to place the
Air Cleaner. The unit should be placed 3 feet (1 m)
below the ceiling. Use appropriate fasteners for the type
of wall the unit will be mounted and insure the head of
the screw will fit into the larger opening of the keyhole
slot. The screw head should be larger than the smaller
opening of the keyhole. The Air Cleaner weighs
approximately 20 lbs (9 kg). The distance between the
holes in the cabinet bottom is 16 3/4 in (42.5 cm).
4. After placing the screws in the wall, adjust the amount of
the screw sticking out to approximately 1/8 in (.32 cm).
Place the Air Cleaner over the screw head and allow the
head to slip into the keyhole slot. Pull the unit down
slightly to allow the screw head to slide into the smaller
portion of the slot.
Use the low or medium speed for quiet, continuous or
nighttime use. Use the high speed for initial cleaning of heavy
concentrations of dirty air (i.e. smoke) or after leaving the
room.
1 Dirty Air
2 Prefilter
3 Ionizing
Section
4 Collecting Cell
Plates
5 Odor & Gas
Removal Filter
7 Negative Ions
and Clean Air
6 Ionizing Needle
You may notice arcing or snapping from the cell. It is normal
to hear some arcing when the unit is new or first turned on.
Arcing in the cell may also be caused by high humidity (over
80%), after washing, or when a large particle of dirt or hair is
caught in the cell. If the arcing is continuous and constant,
then refer to the Troubleshooting Chart.


