background image

2

Table of Contents

Important Information

A

Important Information  . . . . . . . . . . . . . . . . . . . . . . . . . . . . . . . . . . . . . . . . . . . . . . . . . . . . . . . . . . . . . . . . . . . . .2

B

Warnings and Cautions . . . . . . . . . . . . . . . . . . . . . . . . . . . . . . . . . . . . . . . . . . . . . . . . . . . . . . . . . . . . . . . . . . . .3

C

Parts   . . . . . . . . . . . . . . . . . . . . . . . . . . . . . . . . . . . . . . . . . . . . . . . . . . . . . . . . . . . . . . . . . . . . . . . . . . . . . . . . .4

D

Parts Diagram . . . . . . . . . . . . . . . . . . . . . . . . . . . . . . . . . . . . . . . . . . . . . . . . . . . . . . . . . . . . . . . . . . . . . . . . . . .7

E

Battery Charging  . . . . . . . . . . . . . . . . . . . . . . . . . . . . . . . . . . . . . . . . . . . . . . . . . . . . . . . . . . . . . . . . . . . . . . . . .8

F

Assembly  . . . . . . . . . . . . . . . . . . . . . . . . . . . . . . . . . . . . . . . . . . . . . . . . . . . . . . . . . . . . . . . . . . . . . . . . . . . . .10

G

Label Decoration . . . . . . . . . . . . . . . . . . . . . . . . . . . . . . . . . . . . . . . . . . . . . . . . . . . . . . . . . . . . . . . . . . . . . . . .18

H

Battery Installation  . . . . . . . . . . . . . . . . . . . . . . . . . . . . . . . . . . . . . . . . . . . . . . . . . . . . . . . . . . . . . . . . . . . . . .20

I

Battery Care and Disposal  . . . . . . . . . . . . . . . . . . . . . . . . . . . . . . . . . . . . . . . . . . . . . . . . . . . . . . . . . . . . . . . .21

J

Caring For Your Vehicle  . . . . . . . . . . . . . . . . . . . . . . . . . . . . . . . . . . . . . . . . . . . . . . . . . . . . . . . . . . . . . . . . . . .21

K

Rules For Safe Driving  . . . . . . . . . . . . . . . . . . . . . . . . . . . . . . . . . . . . . . . . . . . . . . . . . . . . . . . . . . . . . . . . . . .22

L

How to Operate Your Vehicle  . . . . . . . . . . . . . . . . . . . . . . . . . . . . . . . . . . . . . . . . . . . . . . . . . . . . . . . . . . . . . . .23

M

FCC Note (United States Only)  . . . . . . . . . . . . . . . . . . . . . . . . . . . . . . . . . . . . . . . . . . . . . . . . . . . . . . . . . . . . .24

N

Statement of Limited Warranty  . . . . . . . . . . . . . . . . . . . . . . . . . . . . . . . . . . . . . . . . . . . . . . . . . . . . . . . . . . . . .24

O

Problems and Solutions Guide  . . . . . . . . . . . . . . . . . . . . . . . . . . . . . . . . . . . . . . . . . . . . . . . . . . . . . . . . . . . . .25

• Your new vehicle requires adult assembly. Please set

aside at least 45 minutes for assembly.

• You must charge your battery for 18 - 30 hours before

you use your vehicle for the first time. We recommend
that you start charging your battery before beginning
assembly. Please see Battery Charging beginning on
page 8 for detailed instructions.

• Read this manual carefully for important safety informa-

tion and operating instructions before using your vehicle.
Keep this manual for future reference as it contains
important information.

• Use this vehicle ONLY outdoors. Most interior floor-

ing can be damaged by riding this vehicle indoors.
Fisher-Price

®

will not be responsible for damage to 

floors if the vehicle is used indoors.

• This vehicle is designed for use on: grass, asphalt and

other hard surfaces; on generally level terrain; and by
children 3 years of age and older.

• Make sure children know and follow these rules for safe

driving and riding:

- always sit on the seat.
- always wear shoes.
- only 2 (two) riders at a time.

• This vehicle has adjustable, play seat belts. Please 

note that the adjustable seat belts are designed to be 
a play feature only and do not function as protective
safety restraints.

A

• For safety reasons, your vehicle has been pre-set so 

that it will operate at low speed. You must remove the
high speed lock-out screw to allow operation of the 
vehicle at high speed. 
Please see page 23 for 
detailed instructions.

• To prevent damaging the motors and gears, teach 

your child to stop the vehicle before switching direction.
Do not tow anything behind the vehicle or overload it.
Do not exceed the maximum weight capacity of 
130 lb (59 kg).

• If you have any questions about your Power Wheels

®

vehicle, please call our toll-free service lines at 
1-800-348-0751 from 8 AM to 6 PM (EST) Monday
through Friday. Trained customer service representatives
are available to take your call in English or French.
Habla Español? Si usted tiene alguna pregunta ó 
necesita asistencia llame gratis 1-800-348-0755 para los
Estados Unidos. Tenemos representantes que hablan
español para atender su llamada.

• For your convenience, Power Wheels

®

maintains an

independently owned and operated Authorized 
Service Center Network with more than 400 authorized
service centers nationwide. The authorized service centers
will repair or replace parts under warranty at no extra
charge, and can perform non-warranty repairs for 
a minimal charge. To find the authorized service center
nearest to you, visit us on-line at www.powerwheels.com
or call 1-800-348-0751.

• If you would like to register your vehicle, please visit us 

on-line at www.powerwheels.com.

Summary of Contents for Barbie Dune Beetle B3162

Page 1: ...and Safety Scissors no tools included Use only with a Power Wheels 12 Volt Rechargeable Battery and a Power Wheels 12 Volt Charger both included Sound Box requires three AA LR6 alkaline batteries batt...

Page 2: ...o riders at a time This vehicle has adjustable play seat belts Please note that the adjustable seat belts are designed to be a play feature only and do not function as protective safety restraints A F...

Page 3: ...the wrong type battery or charger could cause a fire or explosion resulting in serious injury Use of Power Wheels components in products other than Power Wheels vehicles could cause overheating fire o...

Page 4: ...this product to the store Please identify all parts before assembly and save all packaging material until assembly is complete to ensure that no parts are discarded Metal parts have been coated with...

Page 5: ...5 Parts Steering Wheel Cap Steering Column Sound Box Cover Mirror Vase Sound Box Steering Wheel Short Seat Belt 2 Long Seat Belt Flower Left Right Running Boards Part not shown Label Sheet...

Page 6: ...ze 354 Small Diameter Cap Nut 2 354 For your convenience one extra 354 small diameter cap nut and one extra 8 x 3 4 screw are included Note Tighten and loosen all screws with a Phillips screwdriver Do...

Page 7: ...ong Seat Belt Strap 18 Short Seat Belt Strap 2 19 Steering Column 20 354 Cap Nut 2 21 8 x 3 4 Screw 14 22 8 x 13 4 Screw 4 23 6 x 1 Screw 2 Not Shown Left Running Board Label Sheet 7 Parts Diagram D 2...

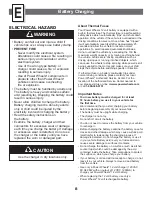
Page 8: ...he vehicle to resume normal operations To avoid repeated automatic shutdowns do not overload the vehicle by exceeding the 130 lbs maximum weight capacity or by towing anything behind the vehicle Avoid...

Page 9: ...battery is charged pull firmly on the charger connector to disconnect it from the battery Unplug the charger from the wall outlet The battery is now ready to be installed in your vehicle Please see t...

Page 10: ...ove the steering column before discarding the box Using safety scissors cut both cardboard retainers to remove the steering column from the box Throw away the box Steering Column Cardboard Retainers 1...

Page 11: ...against the bottom of the vehicle insert a 8 x 3 4 screw through the floor of the vehicle to secure the tab Tighten the screw Repeat assembly steps 2 and 3 to assemble the left running board to right...

Page 12: ...njury or ruin your product To avoid battery leakage Do not mix old and new batteries or batteries of different types alkaline standard carbon zinc or rechargeable nickel cadmium Insert batteries as in...

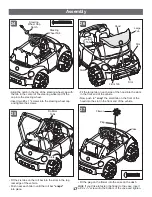
Page 13: ...on the windshield into the eight slots in the top front end of the vehicle Hint Begin by inserting a tab on one end of the windshield Now work your way around inserting the remaining seven tabs Push d...

Page 14: ...t belts through the slots in each side of the seat bottom Pull the short seat belts completely through the slots until the last T loop at the opposite end of the belt catches against the slot Note You...

Page 15: ...gh the hole in the upper steering linkage Hint You may need to wiggle the end of the steering column to fit it into the hole in the upper steering linkage Large Hole Steering Column Continue to slide...

Page 16: ...ng column 23 Cut the steering wheel labels 16 17 and 18 from the larger label sheet Now position the steering wheel labels as shown in the illustration around the steering wheel Hint These labels will...

Page 17: ...Now push to snap the small tab on the front of the hood into the slot in the front end of the vehicle 26 Fit the plug on the flower into the vase on the dash Hint If you d like to fasten the flower to...

Page 18: ...with a clean dry cloth to remove any dust or oils Place the labels exactly as shown in the illustrations For best results avoid repositioning a label once it has been applied to the vehicle After appl...

Page 19: ...Label Decoration Back Right Side View 19 1 23 34 13 32 3 4 10 4 26 31 8 5 22 Both sides of flower 35...

Page 20: ...ttery and will void your warranty Place your fingers between the top edge of the hood and the windshield Pull the top of the hood Lift the hood completely off the vehicle While pushing the battery cla...

Page 21: ...d manner Do not dispose of a lead acid battery in a fire The battery may explode or leak Do not dispose of a lead acid battery in your regular household trash The incineration landfilling or mixing of...

Page 22: ...d obstacles and have an accident Operate the vehicle only in the daytime or a well lit area 7 Do not allow your child to drive on sloped or inclined surfaces Restrict your child s driving to generally...

Page 23: ...mph The vehicle is designed to operate in low speed only in reverse Help your child practice steering to learn how far and how quickly to turn the steering wheel when driving in reverse 11 3 11 2 11...

Page 24: ...and found to comply with the limits for a Class B digital device pursuant to part 15 of the FCC rules These limits are designed to provide reasonable protection against harmful interference in a resid...

Page 25: ...drive up hills or run into fixed objects which can cause the wheels to stop spinning while power is still being supplied to the motors If a thermal fuse continually trips contact your local Power Whe...

Page 26: ...hours If you suspect that your battery is damaged as a result of overcharging contact your local Power Wheels authorized service center They can test the battery for you Battery is old and will not E...

Page 27: ...t pedal is pressed Loose wire or connector Check all wires around the motors and all connectors the vehicle won t run without to make sure they are tight a push Dead Spot on motor Contact your local P...

Page 28: ...emarks of Mattel Inc Fisher Price Inc a subsidiary of Mattel Inc East Aurora New York 14052 U S A 2003 Mattel Inc All Rights Reserved IMPORTANT DO NOT Return your Vehicle to the Store DO NOT use this...

Reviews: