22
INSTALLATION INSTRUCTIONS
Electrical connection
WARNING!
●
●
Electrical wiring must be done by qualified person(s) in accordance with all applicable
codes and standards and the unit must be grounded.
●
●
Turn off electricity at the service panel before wiring the unit.
●
●
A 120 volt, 60Hz AC-only electrical supply is required on a dedicated 20A branch
circuit. A time-delay fuse or circuit breaker is recommended.
●
●
Use only with range hood cord-connection kits that have been investigated and found
acceptable for use with this model range hood.
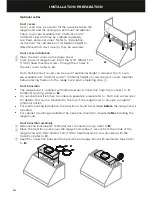
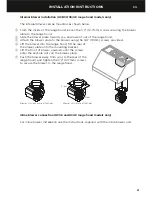
Range hood internal blower electrical connection (HCB30/36/48 models only)
1
Connect the plug present inside the range hood to the internal blower.
2
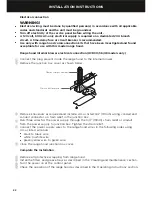
Remove the junction box cover as shown below.
3
Remove knockouts as required and install a cULus listed 3/4” (19mm) wiring conduit and
conduit connector or strain relief in the junction box.
4
Run three wires for the power supply through the 3/4” (19mm) strain relief or conduit
from the power supply to junction box. Tighten the strain relief.
5
Connect the power supply wires to the range hood wires in the following order using
cULus listed wire nuts:
●
●
black to black wire
●
●
white to white wire
●
●
green/yellow wire to green wire.
6
Close the range hood junction box cover.
Complete the installation
1
Remove all protective wrapping from range hood.
2
Install the filters and grease trays as described in the ‘Cleaning and maintenance’ section.
3
Turn the power on at the control panel.
4
Check the operation of the range hood as described in the ‘Operating instructions’ section.
Power supply conduit
From control panel
Summary of Contents for HC36 Shell
Page 2: ...English Page 1 29 Français Page 31 59 ...
Page 4: ......
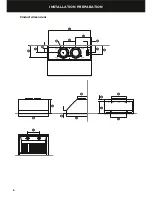
Page 10: ...8 INSTALLATION PREPARATION Product dimensions P O Q A B I C D S R K T E F M N G L J H ...
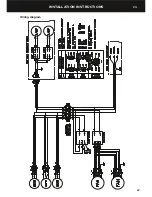
Page 25: ...23 INSTALLATION INSTRUCTIONS Wiring diagram EN ...
Page 32: ......
Page 34: ......
Page 55: ...53 Schéma de câblage INSTRUCTIONS D INSTALLATION FR ...
Page 62: ......
Page 63: ......

