background image


Step 1 Sand/Waterbox assembly

 
Your XL Series patio heater comes standard with an empty PVC Sand/Waterbox container which is preassembled 
to  the  heater  base.  Once  filled  with  sand  and  topped  off  with  water/windshield  washer  fluid,  this  weighted 
container will add approximately 30 Lbs. to the base of the heater providing extra stability and safety. 
 

Hardware Used

: None 


Disassemble the Sand/Waterbox container from the base

a) Please disassemble the 3) (tall) Leg support posts which are preassembled to the heater base by removing the 
bolt that secures each leg to the base. (Please take note of the position of the legs prior to disassembling as they 
will later need to be reassembled in the same manner.) 
 
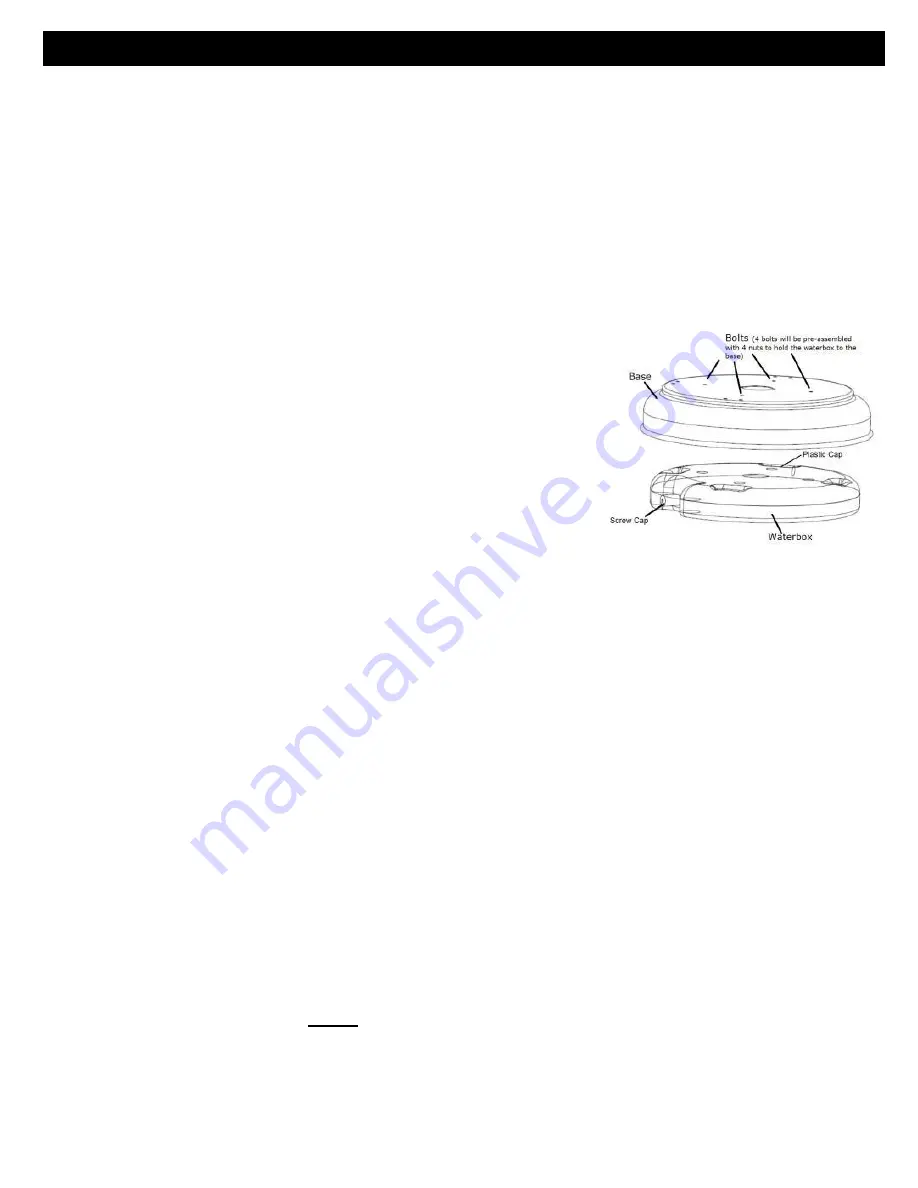
b) Please disassemble the Sand/Waterbox container (9B) from the   
Heater Base (9A) by removing the 4 Phillips Head bolts and nuts that   
secure the heater base to the container. (Note: Please keep removed   
hardware nearby for reassembly during Step 4.) 
 
 
c) Pry off the 2" cap on the top of the Sand/Waterbox container and 
fill the container with either sand or water/windshield washer fluid 
(or with sand then topped off with water/windshield washer fluid to add the   
maximum weight possible) then snap the 2" PVC cap back into place. 
 

NOTE

: DO NOT reinstall the Sand/Waterbox to the base until 

AFTER


completing Step 2 and Step 3 below. Please see Step 4 for instructions 
on reassembling the Sand/Waterbox to the base. 
 

Tip: When filling with sand, having a funnel will be helpful. 
 
Note: 

The  Sand/Waterbox  container  may  also  be  filled  with  water  (mild  weather  climates)  or  automotive 

windshield  washer  fluid  (cold  weather  climates)  however  the  added  weight  of  the  base  filled  with  water  or 
windshield washer fluid will only add approximately 18 Lbs. to the heater base as compared to 30 Lbs. when filled 
with sand and topped off with water (mild climates) or Windshield Washer Fluid (Cold Climates.) 
 

STEP 2: Install the 3) LPG Tank/Cylinder Hardware Brackets to the Heater Base 
 
Hardware Used: 

 
H: Qt 3) LPG Cylinder Brackets 
I: Qt 3) M8x25 Bolt (Preinstalled on Cylinder Brackets H) 
J: Qt 6) M6x12 Bolt 
K: Qt 6) M6 Flat Washer 
L: Qt 6) M6 Nut 
 

Note

: The 3) LPG Tank/Cylinder Hardware Brackets (H) are an important safety feature used to secure the 20lb 

cylinder tank to the base of the heater preventing the tank from becoming dislodged in the unlikely event that 
the heater were to be accidentally tipped over or moved. 
 

1)


Align the 2 holes in each of the 3) brackets with the holes in the base.   
(

Important:  Please  make  sure  that  the  brackets  (H)  are  positioned  on  the  base  with  the 

preinstalled M8x25 bolt heads (I) facing toward the outside edge of the base, with the flush 
side of the bracket facing inward, toward the middle of the base

See illustration on pg 9)


ASSEMBLY 


Summary of Contents for PH01-S XL Series

Page 1: ...91 61592 61593 61594 61595 61600 61601 Questions problems missing parts Before returning to your retailer call our customer service hotline at 1 866 985 7877 9 a m 6 p m EST Monday Friday or email at cservice welltraveled net ATTACH YOUR RECEIPT HERE Serial Number ______________ Purchase Date _____________ ...

Page 2: ...embly operation and maintenance of this patio heater General safety information is presented in the first few pages and is also located throughout this manual Keep this manual for future reference and to educate new users of this appliance This manual should be read in conjunction with the labeling on the appliance Safety precautions are essential when any mechanical or propane fueled equipment is...

Page 3: ...3 SAFETY INFORMATION ...

Page 4: ...4 SAFETY INFORMATION ...

Page 5: ... 6 Tank Housing 1 7 Post Support 1 8 Support Legs 3 pcs 9A Base 1 9B Sand Waterbox 1 pre assembled to base 10 LPG Cylinder Holder 3 11 Wheel Assembly 1 pc hardware is pre assembled to wheel assembly Some XL Series models include an optional table assembly which is to be installed immediately after Step 9 Please refer to page 12 for a list of table components and assembly instructions ...

Page 6: ...rdware Contents Packaged inside the top section of the Heater Carton Zip Lock Bag Hardware Contents Packaged inside the Heater Carton 4 PC Reflector Hardware Bag Packaged with the 4 Pc reflector panels HARDWARE CONTENTS ...

Page 7: ...stem is working properly If you do not hear any sparks please check to make sure the battery in installed in the correct direction and that it is fresh and fully charged Otherwise please refer to the troubleshooting guide on page 21 of this manual for further assistance Sand 25 Lbs for filling the Sand Waterbox Your Fire Sense XL Series patio heater comes standard with an empty PVC Sand Waterbox c...

Page 8: ... to the base until AFTER completing Step 2 and Step 3 below Please see Step 4 for instructions on reassembling the Sand Waterbox to the base Tip When filling with sand having a funnel will be helpful Note The Sand Waterbox container may also be filled with water mild weather climates or automotive windshield washer fluid cold weather climates however the added weight of the base filled with water ...

Page 9: ...nder bolts I from the brackets Step 3 Install Wheel Assembly to heater Base Hardware Used None Note All hardware used to complete Step 3 is already preassembled to the components 1 Locate Wheel Assembly 11 and 2 nuts bolts contained in plastic bag with Wheel Assembly Turn Base 9 so that holes for attachment of Wheel Assembly are facing you Align holes in Wheel Assembly with holes on Base Insert bo...

Page 10: ...terbox container c Allow the bottom of the Sand Waterbox to overhang the bench just enough to allow access to one of the four holes used for securing the 1st nut and bolt d Slide one of the hexagon nuts into the hexagon shaped hole in the bottom of the Sand Waterbox and hold it in place with your finger e With your other hand insert the bolt through the top of the base and using a Phillips Head sc...

Page 11: ... legs proceed to evenly tighten all 6 Bolts Nuts on the post support assembly with a wrench e Once the 6 Bolts Nuts on the post support assembly are tightly secured proceed to then use a wrench to evenly tighten each of the 3 leg support bolts to the base Step 7 Attach and secure the bottom section of the 2 pc post to the post support Hardware Used D Qt 4 M6x10 Bolt M Qt 4 M6 Lock Washer Attach th...

Page 12: ...s which include a table assembly Hardware Used None Some XL Series models include an adjustable drink table assembly which may be installed on the heater If you wish to install this feature please follow the instructions below no tools required for assembly FIG 1 Slide 1 piece part B over part A and up to the top of part A FIG 2 Insert part A through hole in part C FIG 3 Slide 1 piece part B over ...

Page 13: ...op of the Head Assembly 2 and hand tighten until secure c Remove the 4 M6x10 Bolts and 4 M6 lock Washers that come preassembled on the bottom of the burner head assembly d Hold the Head Assembly over the top of the Post and fully route the Gas Hose 3 down into the Post until it extends into the cylinder compartment e Rest the Head Assembly on the top of the Post and turn the head assembly until th...

Page 14: ... all 4 pieces of the Reflector which are wrapped in bubble wrap Unwrap and remove all pieces and peel off the protective blue plastic on each piece Locate 9 bolts and 9 cap nuts in the plastic bag Align the 3 outer pieces with the 1 center piece and place a bolt through the center hole on each piece as shown below Tighten castle nut on each bolt Next align the sides of each outer piece and the cen...

Page 15: ...g the heater on its wheels carefully and securely resting it into place on an angle which will allow you to complete the assembly Step 14 Connect the LP Hose and Regulator to the LP Cylinder Tank Hardware Used None With the bottom of the Tank Housing lifted up and resting on the Post Supports screw the Regulator 5 onto the Gas Hose 3 Do not cross thread Hand tighten securely Attach Regulator 5 to ...

Page 16: ...tion rating less than full input rating The pressure regulator and hose assembly supplied with the appliance must be used The installation must conform with local codes or in the absence of local codes with national fuel gas code ANSI Z223 1 NFPA54 natural gas and propane Installation Code CSA B149 1 or propane storage and handling code B149 2 A dented rusted or damaged propane cylinder may be haz...

Page 17: ...you must perform a complete leak test Caution Do not attempt to operate this appliance until you have read and understand all Safety Information in this manual and all assembly is complete and leak checks have been performed Before Turning Gas Supply ON 1 Your heater was designed and approved for OUTDOOR use only Do NOT use it inside a building garage or any other enclosed area 2 Make sure surroun...

Page 18: ... attempting to re light the heater If you experience any ignition problems please consult Troubleshooting on page 21 Caution Avoid inhaling fumes emitted from the heater s first use Smoke and odor from the burning of oils used in the manufacturing will appear Both smoke and odor will dissipate after approximately 30 minutes The heater should NOT produce thick black smoke When Heater is ON Emitter ...

Page 19: ... not be hung from the heater or placed on or near the heater 19 Any guard or other protective device removed for servicing the heater must be replaced prior to operating the heater 20 Installation and repair should be done by a qualified service person The heater should be inspected before each use and at least annually by a qualified service person 21 More frequent cleaning may be required as nec...

Page 20: ...own DO NOT apply to emitter screen or domes Storage Between uses Turn Control Knob OFF Disconnect LP source Store heater upright in an area sheltered from direct contact with inclement weather such as rain sleet hail snow dust and debris If desired cover heater to protect exterior surfaces and to help prevent build up in air passages Never leave LP cylinder exposed to direct sunlight or excessive ...

Page 21: ...oose connection Check all fittings Igniter fails Use stick lighter to manually light Gas pressure low with valve open full Replace cylinder or regulator New cylinder or 1st ignition Purge air from lines Cylinder valve on no gas flow Replace hose regulator assembly AAA battery behind igniter button is dead Replace with a new AAA battery Low burner flame Pressure is low Replace LPG tank Tank is low ...

Page 22: ...ter cap 2 Head Assembly 1 3 Gas Hose 1 pc attached to head assembly 4 Post Assembly 2 pcs 5 Regulator 1 6 Tank Housing 1 7 Post Support 1 8 Support Legs 3 pcs 9A Base 1 9B Sand Waterbox 1 pre assembled to base 10 LPG Cylinder Holder 3 11 Wheel Assembly 1 pc hardware is pre assembled to wheel assembly Some XL Series models include an optional table assembly which is to be installed immediately afte...

Page 23: ...RUCTIONS CONTAINED IN THIS MANUAL CAN RESULT IN SEVERE PROPERTY DAMAGE AND OR PERSONAL INJURY IN NO EVENT WILL WELL TRAVELED LIVING OR ITS DIRECTORS OFFICERS OR AGENTS BE LIABLE TO THE PURCHASER OR ANY THIRD PARTY WHETHER IN CONTRACT IN TORT OR ON ANY OTHER BASIS FOR ANY INDIRECT SPECIAL PUNITIVE EXEMPLARY CONSEQUENTIAL OR INCIDENTAL LOSS COST OR DAMAGE ARISING OUT OF OR IN CONNECTION WITH THE SAL...

Reviews: