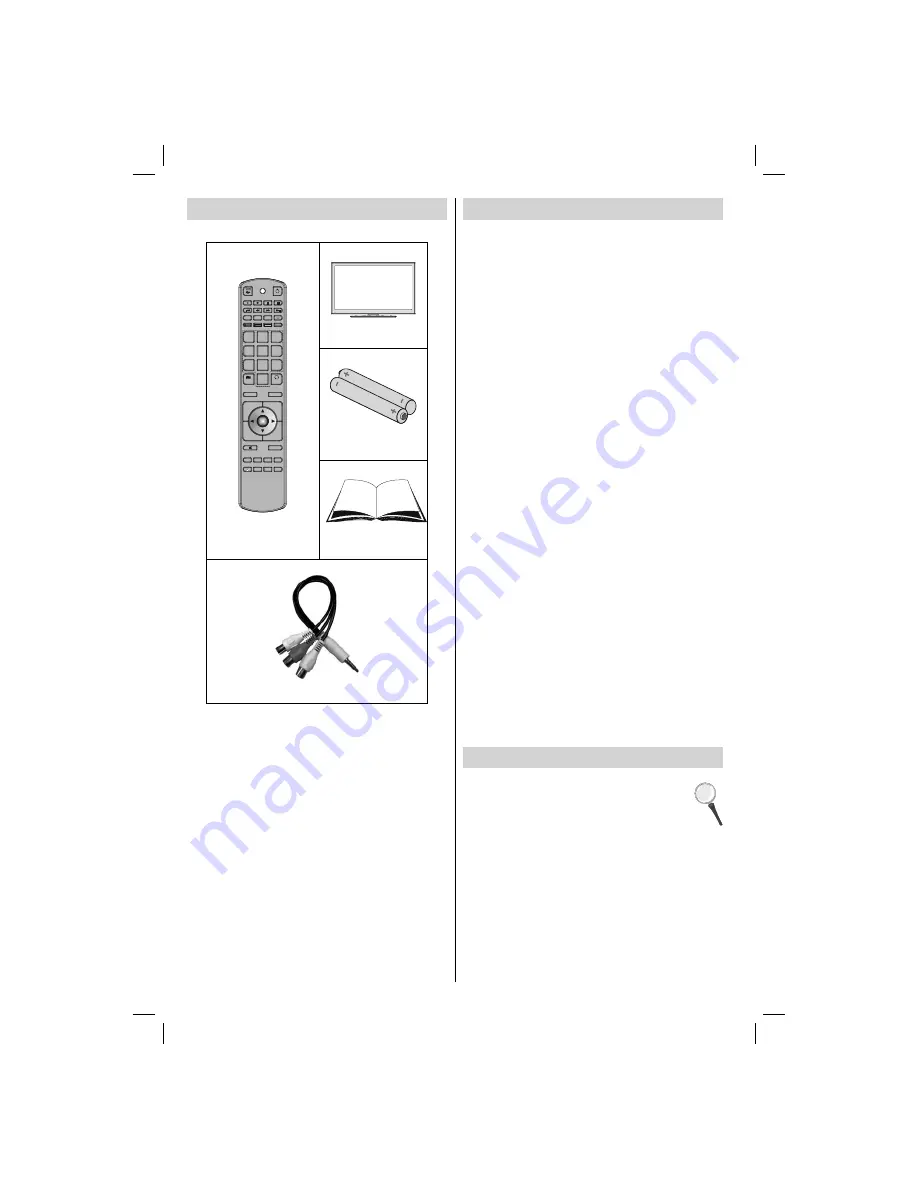
background image

- 2 -

 Package Contents 


REPEAT

ZOOM

TITLE

ROOT

TEXT

SWAP

1

2

3

4

5

6

7

8

9

SCREEN

0

LANG

SUBTITLE

OK

MENU

SOURCE

RETURN

INFO

FAV

SLEEP

EPG

SEARCH

DISPLAY

MODE

P+

PRESETS

P-

V+

V-


 Remote Control 

LCD TV

Batteries: 2 X AAA


 Instruction Book 

1 X Video & Audio Connection Cable

Note: You should check the contents after opening 
your product. Make sure that every item is included

Note: The HDMI connection between PC and TV 
may cause radio interference in which case it is 
recommended to use VGA(DSUB-15) connection.

Features

Remote controlled colour LCD TV.

• 

Fully integrated Terrestrial digital TV (DVB-T - 

• 

MPEG2).
HDMI connectors for digital video and audio. This 

• 

connection is also designed to accept high de

fi

 nition 

signals.
USB input.

• 

Programme recording

• 

Programme timeshifting

• 

1000 programmes (adigital).

• 

On Screen Display (OSD) menu system.

• 

Integrated tuner DVB-T MPEG2 compatible.

• 

Scart socket for external devices (such as video, 

• 

video games, audio set, etc.).
Stereo sound system. (SRS Trusurround HD)

• 

Teletext, fastext, TOP text.

• 

Headphone connection.

• 

Automatic programming system.

• 

Forward or backward manual tuning.

• 

Sleep timer / Child lock.

• 

Automatic sound mute when no transmission.

• 

NTSC playback.

• 

AVL (Automatic Volume Limiting).

• 

Auto power down.

• 

PLL (Frequency Search).

• 

PC input.

• 

Plug&Play for Windows 98, ME, 2000, XP, Vista 

• 

Windows 7.
Game Mode.

• 
• SRS TruSurround HD
• Pixellence

Introduction

Thank you for choosing this product. This manual will 
guide you for the proper operation of your TV. 
Before operating the TV, please read this 
manual thoroughly. Please keep this manual 
in a safe place for future references.
This device is intended to receive and display TV 
programs. The different connection options make 
an additional expansion of the reception and display 
sources possible (receiver, DVD player, DVD recorder, 
VCR, PC etc.).
This device is only suitable for dry indoor use. This 
appliance is intended solely for private domestic use 
and may not be used for industrial and commercial 
purposes. We exclude liability in principle, if the device 
is not used as intended, or unauthorized modi

fi

 cations 

01_MB65_[GB]_IDTV_PVR_PLATINIUM7_5110UK_40965WLED_10074751_50197610.indd   2

01_MB65_[GB]_IDTV_PVR_PLATINIUM7_5110UK_40965WLED_10074751_50197610.indd   2

07.09.2011   14:30:01

07.09.2011   14:30:01

Summary of Contents for 40F6030

Page 1: ...colour television Owner s manual 40F6030...

Page 2: ...ck Using Media Browser 17 Viewing Photos via USB 18 Recordings Library 19 Media Browser Settings 20 Timeshift Recording 20 Instant Recording 20 Watching Recorded Programmes 21 Changing Image Size Pict...

Page 3: ...ion Automatic programming system Forward or backward manual tuning Sleep timer Child lock Automatic sound mute when no transmission NTSC playback AVL Automatic Volume Limiting Auto power down PLL Freq...

Page 4: ...all outlet Do not use liquid or aerosol cleaners Use a soft and dry cloth Ventilation The slots and openings on the TV set are intended for ventilation and to ensure reliable operation To prevent over...

Page 5: ...mains plug can be pulled immediately During periods of prolonged non use the TV should be disconnected from the mains power supply Electrical device not in the hands of children Never let children use...

Page 6: ...nstead of keeping stand by mode Therefore disconnect the TV from the mains plug to save energy when you do not use However it is highly recommended to activate Power Save Mode setting to reduce your a...

Page 7: ...a Browser video mode Electronic Programme Guide 21 Sleep timer 22 Menu on off 23 OK Select Hold in TXT mode Channel List 24 Volume up down 25 Navigation buttons 26 AV Source 27 Previous programme Now...

Page 8: ...component output Connect the component video cables between the COMPONENT VIDEO INPUTS on the TV and the component video outputs of your device While connecting be sure that the letters on your TV Y P...

Page 9: ...s used for connecting an external headphone to the system Connect to 4 the HEADPHONE jack to listen to the TV from headphones optional Side audio video connection input is used for connecting video an...

Page 10: ...r the first time installation When the TV is operated for the first time the installation wizard will guide you through the process First the language selection screen will be displayed Use or buttons...

Page 11: ...thods HDMI inputs Scart sockets DVD Player Scart Cable not supplied HDMI Cable not supplied HDMI SCART Using USB Inputs USB Connection You can connect a USB hard disk drive or USB memory stick to your...

Page 12: ...xternal hard disk drive to the TV and connected USB disk should have at least 1 GB capacity and should have 2 0 speed compatibility If the connected USB device does not support 2 0 speed an error mess...

Page 13: ...Connection Cable Supplied Or SIDE AV Note If you connect a PC to the TV using HDMI connection radio interference may occur Therefore this type of connection is not recommended You should use VGA conn...

Page 14: ...nnels Press buttons to navigate through the programme list Please note that event information is updated automatically If there is no event information data available for channels the EPG will be disp...

Page 15: ...elect Delete Timer option The timer will be cancelled Note It is not possible to record or set timer for two or more individual events at the same time interval EPG Channel Schedule Red button Prev Ti...

Page 16: ...red if the process is cancelled Manual Tuning HINT This feature can be used for direct broadcast entry Select Manual Channel Scan from the Installation menu by using and OK buttons Manual Scan options...

Page 17: ...screen will be displayed Select Yes if you want to move the channel and press OK Press OK button to process Selected channel is now moved Deleting a Channel You can press GREEN button to tag untag all...

Page 18: ...name of the channel is displayed along with its channel list number Hint Not all channels broadcast the programme data If the name and time of the programme are not available then the information ban...

Page 19: ...ops the video playback Pause button Pause the video playback Rewind button Goes backward Forward button Goes forward Subtitle Audio LANG button Sets subtitle Audio Jump GREEN button Jumps to time Use...

Page 20: ...Left Right buttons Jumps to previous or next file to play RED Button Sorts files by Title Artist or Album Note If the Viewing Style is set to Folder in Media Browser Settings Music folder will be dis...

Page 21: ...ing normal broadcast Press STOP button to stop timeshifting mode Similtaneous timeshifting recording s duration depends on your connected USB disk s file size and defined Max Timeshift in the Recordin...

Page 22: ...You can change the aspect ratio image size of the TV for viewing the picture in different zoom modes Press SCREEN button repeatedly to change the image size Available zoom modes are listed below Auto...

Page 23: ...viewing requirements you can set the related mode option Picture mode can be set to one of these options Cinema Game Dynamic and Natural Pixellence Demo Mode While Mode option is highlighted in pictur...

Page 24: ...is featureAuto or Off Turn this feature to Auto when you are watching films to see the fast motion scenes clearly Colour Shift Adjust the desired colour tone Reset Resets the picture settings to facto...

Page 25: ...han programmes Dynamic Bass Dynamic Bass is used to increase bass effect of the TV set Surround Mode Surround mode can be change as On or Off SRS TruSurround HD By pressing or select SRS TruSurround H...

Page 26: ...on Press OK button to view Settings menu Use or button to highlight Conditional Access and press OK to view menu items Configuring Language Preferences You can operate the TV s language settings using...

Page 27: ...tem Press OK button to view more options If you set Country option as UK at the point of first time installation first time installation Maturity Lock option will not be visible This setting is availa...

Page 28: ...The following menu is displayed for recording configuration The following options are available for adjustments Start Early You set recording timer s starting time to start earlier by using this sett...

Page 29: ...the top of the menu list will then change according to the selected Time Zone Changes are automatically stored Press MENU to exit Configuring Source Settings You can enables or disable selected sourc...

Page 30: ...Displaying TV Information Programme Number Programme Name Sound Indicator time teletext channel type and resolution information is displayed on the screen when a new programme is entered or INFO butt...

Page 31: ...ed too close to a non earthed audio equipment or neon lights etc Mountains or high buildings can cause double pictures or ghost images Sometimes you can improve the picture quality by changing the dir...

Page 32: ...60Hz O 1080I 50Hz O 1080I 60Hz O 1080P 50Hz O 1080P 60Hz O 1080P 24 HZ O X Not Available O Available In some cases a signal on the LCD TV may not be displayed properly The problem may be an inconsiste...

Page 33: ...1024x768 72Hz 13 1024x768 75Hz 14 1152x864 75Hz 15 1280x768 60Hz 16 1360x768 60Hz 17 1280x768 75Hz 18 1280x960 60Hz 19 1280x960 75Hz 20 1280x1024 60Hz 21 1280x1024 75Hz 22 1400x1050 60Hz 23 1600x1200...

Page 34: ...ia optional WMA ASF VC1 WMA MPEG1 Program Stream MPEG 1 MPEG1 MP3 AC 3 optional and PCM MPEG2 Program Stream MPEG 2 MPEG2 MP3 AC 3 optional and PCM AVI Xvid XVID MPEG2 MP3 AC 3 and PCM 01_MB65_ GB _ID...

Page 35: ...n Note on reboot operation Reboot is the last step in software upgrade operation if download of new software is finished successfully During reboot TV makes final initializations In reboot sequence pa...

Page 36: ...g 15 DxLxH Without foot 40 x 970 x 596 Weight Kg 13 Digital Reception DVB T MHEG 5 ENGINE compliant with ISO IEC 13522 5 UK engine Profile 1 for UK Object carousel support compliant with ISO IEC 13581...

Page 37: ...l which is marked with the letter N or coloured Black The wire which is coloured brown or red must be connected to the terminal which is marked with the letter L or coloured Red For continued protecti...

Page 38: ...50208077 www finluxdirect com Customer helpline 0845 459 5282...

Reviews: