background image

FINAL SOUND FVSS-201/P DVD RECEIVER USER MANUAL    vs. 1.4

16

Step 8: Turn on the TV and Final Sound FVSS-201/P

Plug in the Final Sound DVD receiver’s power cord to an AC power outlet.

Turn on the Final Sound DVD receiver. First press the ON/OFF button on the rear panel
and secondly press the power button on the front panel or the red button on the remote
control.

You can also press DVD on the remote control.

Turn on the TV and tune to the correct video input channel.

Tune the TV to the channel that corresponds to the INPUT jack you used on the back of
the TV to connect the Final Sound DVD receiver. The name and how you access this
video input channel varies for different TVs. Generally; you’ll press a button on the TV’s
remote control, such as SOURCE, AV, INPUT or VID. Check your TV’s owner manual to
see how you tune your TV to the correct channel.

Go to the next chapter: Complete the On-screen Setup

Summary of Contents for FVSS-201/P

Page 1: ...ER MANUAL vs 1 4 1 Final Sound DVD Receiver User Manual release 1 4 Final Sound B V Eisenhowerweg 8D 5466AC Veghel The Netherlands http www finalsound com Final Sound L L C 83 Davidson Road Framingmam MA 01701 T 508 877 8786 F 508 877 7988 ...

Page 2: ... 2 Congratulations 6 3 Unpacking and connecting the receiver 7 4 On screen Set up 17 5 Navigating your receiver 22 6 The universal remote control 24 7 Operation Explained 26 8 Additional Information 29 9 Connecting to other Final Equipment 34 10 FCC Information 36 11 Warranty 37 12 Warranty Card 38 ...

Page 3: ...f the obsolete outlet 10 Protect the power cord from being walked on or pinched particularly at plugs convenience receptacles and the point where they exit from the apparatus 11 Use only with the cart stand tripod bracket or table specified by the manufacturer or sold with the apparatus When a cart is used use caution when moving the cart apparatus combination to avoid injury from tip over 12 Unpl...

Page 4: ...for limited viewing uses only DVD Safety Information This DVD player is designed and manufactured to respond to the Region Management Information If the Region number of a DVD does not correspond to the Region number of this DVD player this player cannot play the DVD DVD Copy Protection In accordance with the DVD standard your DVD player is equipped with a Copy Protection System which can be switc...

Page 5: ...ymbol are trademarks of Dolby Laboratories Confidential Unpublished works Copyright 1992 1997 Dolby Laboratories All rights reserved DIGITAL THEATER SYSTEMS NOTICE DTS and DTS Digital Surround are registered trademarks of Digital Theater Systems Inc HI DEFINITION MULTIMEDIA INTERFACE HDMI the HDMI logo and High Definition Multimedia Interface are trademarks or registered trademarks of HDMI Licensi...

Page 6: ...g the applied electrostatic loudspeaker from the setup menu Virtual Surround The Final Sound FVSS 201 P supports virtual surround mode Movie sound consists of at least five channels and a dedicated subwoofer channel To recreate five channels of sound in your living room you need five loudspeakers and a subwoofer Some customers won t place five loudspeakers for several reasons Virtual surround will...

Page 7: ... using the Final Sound receiver Step 4 Connect the Final Sound DVD receiver to TV s Video Input Step 5 Connect loudspeakers and subwoofer Step 6 Connect other components optional Step 7 Connect AM and FM antennas Step 8 Turn on TV and Final Sound DVD receiver Chapter 1 of 5 Connections Step 1 Unpack the box FVSS 201 P Make sure you have the following items as you unpack your Final Sound system DVD...

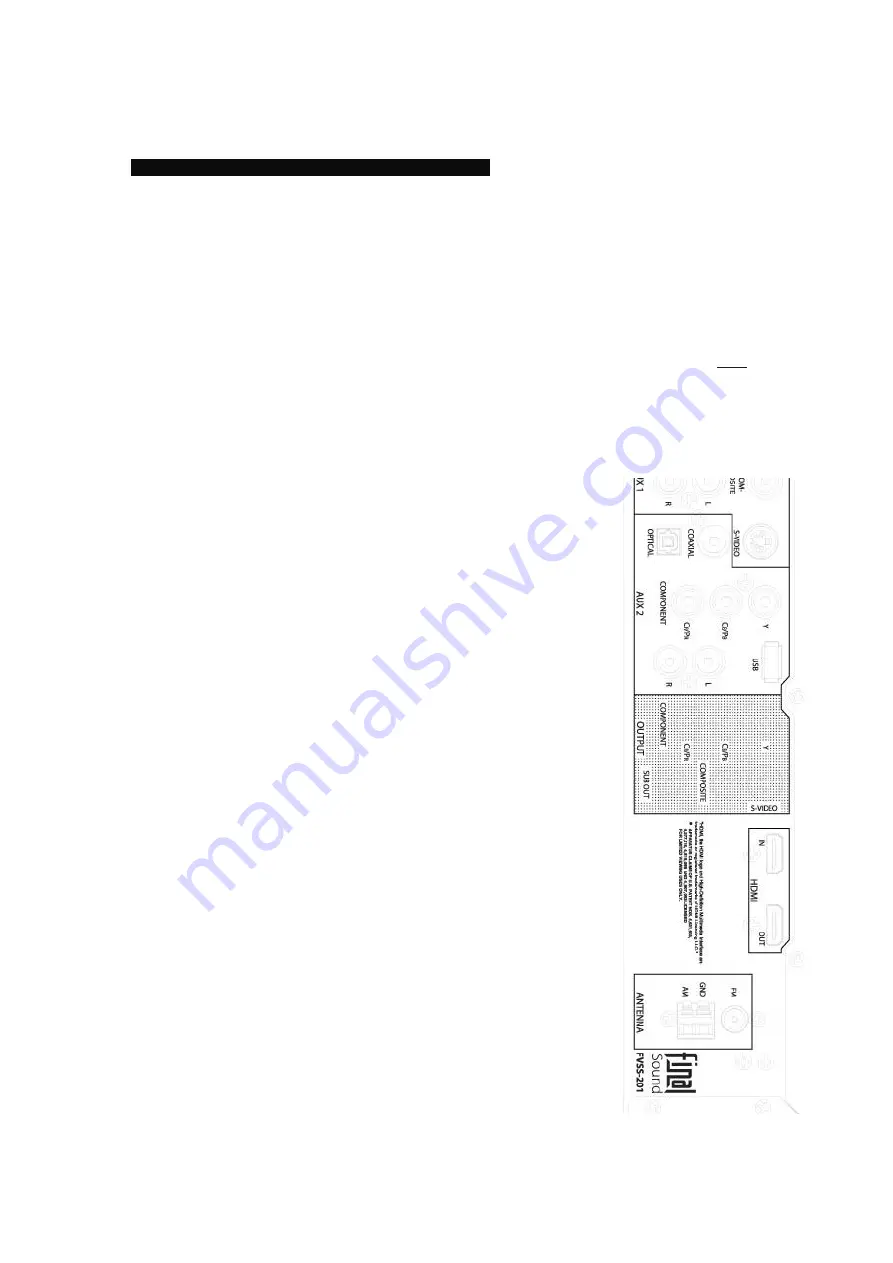
Page 8: ...our Final Sound DVD receiver you must connect cables to the TV so you can see the picture on the TV screen Therefore you connect a cable to the OUTPUT jack on the Final Sound DVD receiver sending the DVD signal OUT to the TV and connect the other end of that cable to the matching INPUT jack s on the TV Available rear panel connections from left to right The Final Sound DVD receiver is equipped wit...

Page 9: ...box s audio and video connections to the Final Sound DVD receiver The SAT CABs incoming connections Composite video in S video in Coaxial audio in Optical audio in Analogue audio in acks same color Pr AUX 1 INPUT Function to connect a peripheral audio and or video device to the Final Sound DVD receiver ...

Page 10: ...ice to the Final Sound DVD receiver The AUX 2 incoming connections Component video in Coaxial digital audio in Optical digital audio in Analogue audio in L R USB input OUTPUT Function connect to best available video input connector on your flat screen crt device television or projector Connect the subwoofer output to the Final Sound Subwoofer s input terminal The US model does not have a SCART con...

Page 11: ...ing connections Component video output S video output Composite output SCART output not available for the US model Subwoofer audio output HDMI HDMI input HDMI output Audio Connection Options Cable ANTENNA FM 75 GND AM Function connect the supplied FM Antenna and AM Antenna to get radio reception ...

Page 12: ...vailable on the set top box in order of preference and choose If the set top box has a HDMI OUTPUT jack for video plug HDMI cable into that jack and to the Final Sound DVD receiver s HDMI in jack This HDMI connection will also support the audio connection from the set top box to the receiver If audio is not available using the HDMI you need to connect the audio seperately see step 3b Or if the bac...

Page 13: ...o connection from TV to receiver no set top box Connect TV Audio OUTPUT to the Final Sound DVD receiver Purpose If you want the TV sound to come through the Final Sound DVD receiver you need to make this audio connection If you don t have a set top box connected to your TV you either have cable coming out of the wall or an off air antenna such as HD simply connect the Audio OUT jacks on the TV to ...

Page 14: ...r s COMPOSITE jack yellow If your TV or projector supports progressive scanning technology see the TV or projector s owner manual if you don t know whether your device supports progressive scanning only the Final Sound DVD receiver s component outputs and HDMI outputs supports progressive scanning technology Also put the progressive scan switch backpanel in the on position If in doubt leave the pr...

Page 15: ... for each antenna to provide the best reception Note An outdoor antenna may be used in place of the supplied indoor antennas Outdoor antennas will generally give better FM performance than an indoor one To add an outdoor antenna consult a qualified installer Follow all safety instructions supplied with the antenna FM Antenna Plug the FM antenna into the Final Sound system s FM 75 jack in the secti...

Page 16: ...ote control You can also press DVD on the remote control Turn on the TV and tune to the correct video input channel Tune the TV to the channel that corresponds to the INPUT jack you used on the back of the TV to connect the Final Sound DVD receiver The name and how you access this video input channel varies for different TVs Generally you ll press a button on the TV s remote control such as SOURCE...

Page 17: ...choose from You can navigate using the up and down arrows Highlight the desired option and press OK For initial set up start with the GENERAL SETUP General set up OSD language English French German Dutch Spanish Italian Swedish Russian Defaults Reset Main menu The GENERAL SET UP Select OSD LANGUAGE and press OK Select the preferred language and press OK Return to the former menu by pressing the le...

Page 18: ...s OK Return to the former menu using the left arrow key Select RESOLUTION and press OK SD Interlace is recommended for standard resolution TVs 720P is recommended for TVs with support for 720 lines of horizontal resolution supporting progressive scan You need a component or HDMI connection 1080i is recommended for TVs with support for 1080i lines of horizontal resolution without supporting progres...

Page 19: ...ey SPEAKER POSITION should be adjusted according to your loudspeaker s placement This parameter is responsible for the room correction in relation to the wall behind the loudspeakers close wall near wall and free space Make your preferred selection and press OK Return to the former menu using the left arrow key SUBTYPE please choose the Final Sound subwoofer connected to the system When you choose...

Page 20: ...OW for reflective and lively rooms NORMAL the average room HIGH for rooms with lots of furniture carpets and heavy drapes Make your preferred selection and press OK Return to the former menu using the left arrow key Select MAIN PAGE and press OK This will bring you back to the main menu Preferences Audio English French Spanish Chinese Japanese Subtitle English French Spanish Chinese Japanese Off D...

Page 21: ... 13 Parents Strongly Cautioned some material may be inappropriate Some material may be inappropriate for children under 13 which also applies to PG 15 etc PG R Restricted Under 17 requires accompanying parent or adult guardian NC 17 No one 17 and under admitted Adult Only adult permitted No Limits That completes the receiver s set up procedure You can leave the menu by pressing MENU on the remote ...

Page 22: ... off standby mode and tunes it to the last selected input If the remote is programmed to operate other components the ON OFF button is used together with the component buttons AUX 1 TV AUX 2 and SAT CAB to turn the components on and off EJECT to open and close the disc tray PLAY PAUSE to play and or pause a disc SKIP to advance to the next track REVERSE fast reverse FORWARD fast forward MODE to se...

Page 23: ...l TV SAT CAB DVD AUX1 AUX2 AM FM When you turn on your Final Sound DVD receiver it tunes to the last source you used The front panel indicates what source is active TV To control your TV see remote control list from the Final Sound remote control SAT CAB activates the SAT CAB input for watching TV from a connected set top box DVD for playing DVDs or CDs AUX1 activates this input VCR hard disc reco...

Page 24: ...rands of audio and video components such as TVs satellite receivers cable boxes DVD players and others The design of the remote control groups the buttons to help you achieve better performance from your remote In this section of the manual you will learn the function of each button and how to program it to operate other brands of components To use the remote control effectively always aim it dire...

Page 25: ...TEREO Selects stereo mode Mainly used to listening to music VS Switches the receiver in virtual surround mode two modes available Keys 0 9 Use the number buttons for direct channel access in TV or SAT CABLE mode AUDIO To select between DVD s audio decoding systems CH Channel up down Selects the lower or higher station on the radio If programmed properly selects the lower or higher channel on a TV ...

Page 26: ...e control has also the capability to directly control the audio delay time by two buttons LS lip sync minus and LS lip sync plus With some DVDs you may find you have to stop playing the DVD adjust the lip sync and start playing again If you only press STOP once during this procedure playback should start from the position it stopped The new remote control allows the user to control all the input d...

Page 27: ...CD playback If the TV didn t turn on and tune to the correct video input channel so you see the Final Sound DVD screen turn on your TV and tune the TV to the channel that matches how you connected the Final Sound DVD receiver s output jacks to the TV s input jacks see chapter 3 Press EJECT the DVD CD tray opens Place a DVD CD into the tray with the label facing up some DVDs have content on both si...

Page 28: ...r Off and press ENTER To change the subtitle language you need to go to the Final Sound system s main menu Zoom Shows the magnification chosen 1 5x 2x and 3x Note 16x for CD Playing CDs with mp3 files Put the CD with mp3 files into the receiver s tray Push EJECT or PLAY The connected TV will display the mp3 s track numbers and some title information Choose your favorite track using the CH CH keys ...

Page 29: ...ode priority Configuring Parental Control and Password Choose PARENTAL in the PREFERENCES SET UP menu Use the UP and DOWN ARROWS to select your preferred rating Press OK To activate your preferred level enter your password The system s default password is 3502 If you want to change your parental level follow the procedure again After selecting the preferred new level the system asks for your passw...

Page 30: ...gging it back in Press and hold STOP for approximately 3 seconds to open the tray DVD won t eject DVD cannot be ejected when the player is reading the DVD Wait a few seconds before ejecting the DVD Video problems Make sure the TV and Final Sound DVD receiver are turned on Make sure the Final Sound DVD receiver is in DVD mode press DVD on the remote control Make sure TV is tuned to Video Input Chan...

Page 31: ...omputer hub router or other device except for USB sticks or mp3 players It s potentially harmful for the receiver and will void the warranty Dolby Digital and DTS Dolby Digital The trademarked marketing name for Dolby Laboratories AC 3 codec The common version contains six channels of sound with five channels for normal range loudspeakers Right Front Center Left Front Right Rear and Left Rear and ...

Page 32: ...ideo SCART Composite HDMI out Component Composite S video SCART Notice SCART out and Component out are selected in the OSD video menu Priority Audio Input Audio Output HDMI in Speaker sub SCART HDMI Optical in Speaker sub SCART HDMI Coaxial in Speaker sub SCART HDMI Analogue in Speaker sub SCART HDMI Notice Plugging in headphones will mute Speaker SUB and SCART AUX1 mode Priority Video Input Video...

Page 33: ...0p select in the OSD video menu Priority Audio Input Audio Output Optical in Speaker sub SCART HDMI Coaxial in Speaker sub SCART HDMI Analogue in Speaker sub SCART HDMI Notice Plugging in headphones will mute Speaker SUB and SCART The US model does not have a SCART connector FM AM mode Press FM AM key will change between AM mode and FM mode In the FM mode if RDS information is available it will di...

Page 34: ...the subwoofer in the desired location Put the subwoofer in Auto turn on mode Connect the subwoofer s low level input left input white connector to the receiver s dedicated SUB output according to this manual s instructions Select the Final Sound S110 or S220 in the receiver s Speaker set up menu Set the sub s volume control to a minimum and the phase switch as a starting point to 0 degrees Adjust ...

Page 35: ... few tracks to set the best subwoofer level Generally slightly too little subwoofer output is preferable to having the subwoofer too loud which will reduce speech intelligibility as an example Note that you may need to try more than one location for the subwoofer to reach optimum results Daisy Chain subwoofers If you have a rather large room it s recommended to add a second subwoofer Therefore the...

Page 36: ... if not installed and used properly this equipment may cause interference to radio and television reception If this equipment does cause interference to radio or television reception which you can determine by unplugging the unit try to correct the interference by one or more of the following measures Re orient the receiving antenna that is the antenna for the radio or television that is receiving...

Page 37: ...er sole expense A returned product must be accompanied by a written description of the defect and proof of the date of purchase Final Sound reserves the right to modify the design of any product without obligation to purchaser of previously manufactured products and to change the prices or specifications of any product without notice or obligation to any person Exclusions Any implied warranties re...

Page 38: ...r on labels at the back of the product 1 Final Sound Center Loudspeaker __________________________________ 1 set Final Sound Front Loudspeakers Home Theatre or Stereo System 2 panels _________________ 1 set Final Sound Rear Loudspeakers 2 panels __________________________________ 1 Final Sound Subwoofer __________________________________ 1 Final Sound DVD Receiver ________________________________ ...

Reviews: