Ferroli OMNIA S 3.2 Installation, Maintenance And User Manual Download Page 34

34

EN

Cod. 3541V950  -  Rev. 00 - 05/2021

OMNIA S 3.2

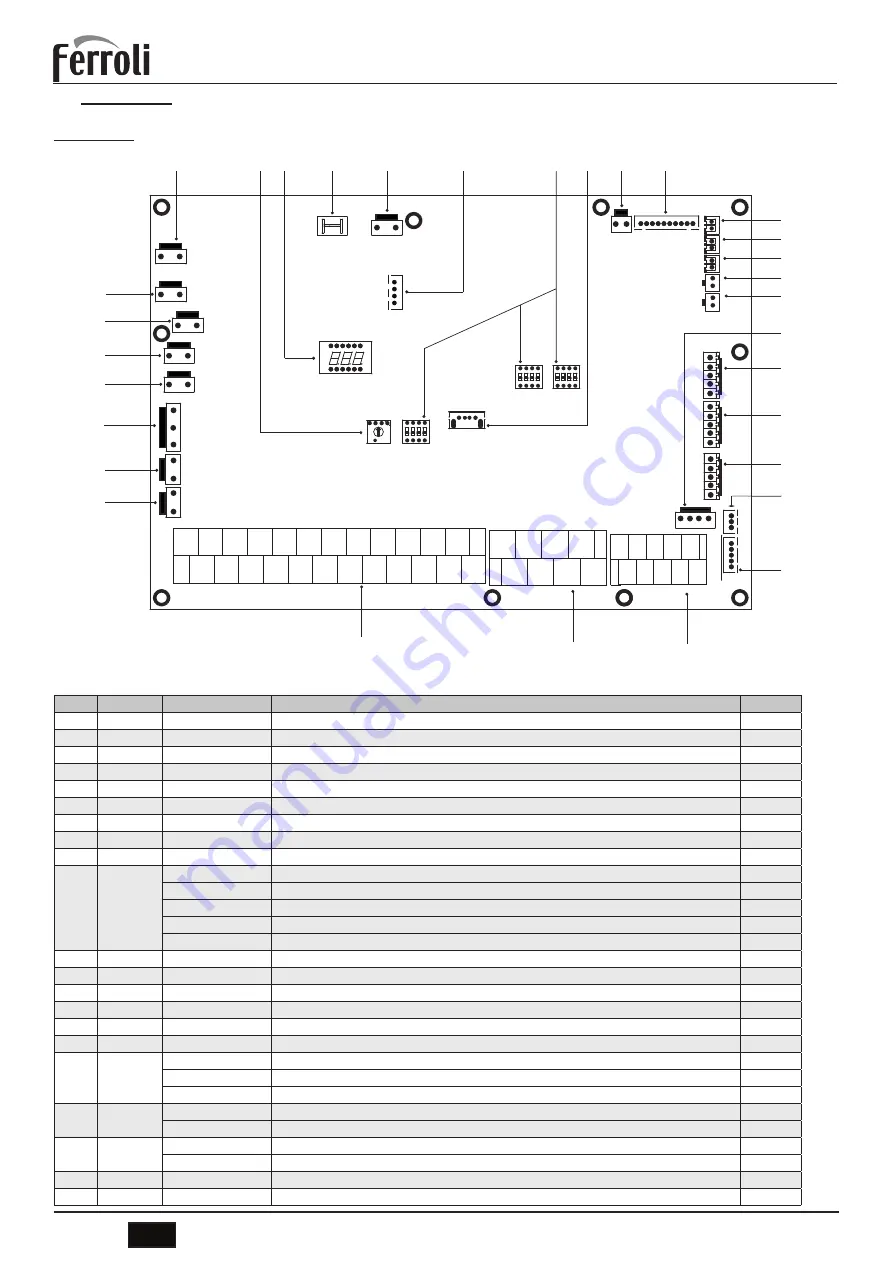
7.6.3 User connections

All the connections have to be done on the terminals of the hydronic board placed in the electric box. 

Hydronic board

&1

&1

&1

6

',6

&1

&1

&1

&1

&1

&1
&1

&1

&1

&1

6

&1

&1

6

6

&1

&1

&1

&1

&1

&1

&1

&1

&1

&1


1

 A

2

  B

3

  X

4

  Y

5

  E

6

 P

7

  Q

8

  E

9

 H1

10

 H2

1

SL1

2

SL2

3

  H

4

C

5


6

1ON

7

1OFF

8

9

10


11


12


3

2

4

2


N

21


N

20

IBH1

19

18

13

14

  L1

15


16 17

N

22

2ON

2OFF

P_c P_o P_s P_d

TBH

N

N 3ON

3OFF

N

N

CN11

25

HT

29

30

31

DFT2

32

DFT1

26

R2

27

AHS1

28

AHS2

N

R1

CN7

CN30

fig. 21 - Hydronic board

Order

Port

Code

Assembly unit

Note

1

CN21

POWER

Power supply to hydronic board

B

2

S3

/

Rotary dip switch

/

3

DIS1

/

Digital display

/

4

CN5

GND

Ground to hydronic board

B

5

CN28

PUMP

Power supply to internal water pump Pi

B

6

CN25

DEBUG

Port for IC programming

/

7

S1, S2, S4 /

Dip switch

/

8

CN4

USB

Port for USB programming

/

9

CN8

FS

Connection to internal water flow switch

/

10

CN6

T2 *

Port for temperature probe of refrigerant liquid side temperature of indoor unit (heating mode)

B

T2B *

Port for temperature probe of refrigerant gas side temperature of indoor unit (heating mode)

B

TW_in *

Port for temperature probe of inlet water temperature of plate heat exchanger

B

TW_out *

Port for temperature probe of outlet water temperature of plate heat exchanger

B

T1 *

Port for temperature probe of final outlet water temperature of indoor unit

B

11

CN24

Tbt1

Port for temp. sensor probe in the plant tank

A

12

CN16

Tbt2

Reserved

/

13

CN13

T5

Port for temp. sensor probe in the DHW boiler

A

14

CN15

Tw2

Port for outlet water for zone 2 temp. probe probe

A

15

CN18

Tsolar **

Port for solar panel temp. sensor

A

16

CN17

PUMP_BP

PWM signal to internal water pump Pi

B

17

CN31

HT

Control port for room thermostat (heating mode)

1

COM

Power port for room thermostat

1

CL

Control port for room thermostat (cooling mode)

1

18

CN35

SG

Port for smart grid (grid signal)

1

EVU

Port for smart grid (photovoltaic signal)

1

19

CN36

M1 M2

Reserved

/

T1 T2

Reserved

/

20

CN19

P Q

Reserved

/

21

CN14

A B X Y E

Port for communication with the display panel

B

Summary of Contents for OMNIA S 3.2

Page 1: ...INTENANCE AND USER MANUAL EN 0 65 O FRIEN R E F R I G E R A N T G A S R32 D L Y E C Cod 3541V950 Rev 00 05 2021 OMNIA S 3 2 WAAL HUNG INDOOR UNITS FOR REVERSIBLE SPLIT HEAT PUMPS WITH DC INVERTER COMP...

Page 2: ...e by the user can be carried out by children aged at least 8 years only if under supervision In case of doubt do not use the unit Contact the supplier The unit and its accessories must be appropriatel...

Page 3: ...age 37 HT COM CL Room thermostat Low voltage 38 AHS1 AHS2 For additional heat source control GAS BOILER 39 EVU SG Photovoltaic input and smart grid 39 8 USER INTERFACE 40 8 1 Key function description...

Page 4: ...ories made by the supplier which are specifically designed for the equipment and make sure to get installation done by a professional All the activities described in this manual must be carried out by...

Page 5: ...k should be protected from physical damage Installation of pipework shall be kept to a minimum If the total refrigerant charge in the system mc is 1 84 kg there are no additional minimum floor area re...

Page 6: ...ements VAmin It must be as close as possible to the floor If the ventilation opening starts from the floor the height must be 20mm The bottom of the opening must be situated 100mm from the floor At le...

Page 7: ...24 0 96 223 3 5 1 45 0 45 105 3 5 1 45 0 55 128 3 5 1 45 0 65 152 3 5 1 45 0 75 175 4 1 66 0 24 57 4 1 66 0 34 80 4 1 66 0 44 103 4 1 66 0 54 127 4 5 1 87 0 03 8 4 5 1 87 0 13 32 4 5 1 87 0 23 55 4 5...

Page 8: ...work may result in accidents due to equipment falling Make certain that all electrical work is carried out by qualified personnel according to the local laws and regu lations and this manual using a...

Page 9: ...sensory or mental capabilities or lack of experience and knowledge if they are supervised or given instruction on using the unit in a safe manner and understand the hazards involved Children should no...

Page 10: ...e servicing space can be well ensured Places where the units piping and wiring lengths come within the allowable ranges Places where water leaking from the unit cannot cause damage to the location Pla...

Page 11: ...n order to avoid electric shock or fire make sure that an earth leak detector is installed Be sure the heat pump is grounded In order to avoid electric shock make sure that the unit is grounded and th...

Page 12: ...er adjacent to the charging area 6 No ignition sources No person carrying out work in relation to a refrigerating system which involves exposing any pipe work that contains or has contained flammable...

Page 13: ...ent in use Intrinscially safe components are the only types that can be worked on while live in the presence of a flammable atmosphere The test apparatus shall be at the correct rating Replace compone...

Page 14: ...down refrigerant system if possible e If a vacuum is not possible make a manifold so that refrigerant can be removed from various parts of the system f Make sure that cylinder is situated on the scal...

Page 15: ...l required signs are to be maintained and employers should ensure that employees receive suitable and sufficient instruction and training on the meaning of appropriate safety signs and the actions tha...

Page 16: ...operations Reduced inrush current thanks to Inverter technology Compressor with twin rotary DC INVERTER motor equipped with crankcase oil heater positioned on anti vibration rubber supports and wrapp...

Page 17: ...the noise emitted and the power absorbed by the unit There are 2 levels of silencing Through time programming it is possible to define the desired silencing level for 2 daily time bands e g at night...

Page 18: ...f the total cooling capacity to the effective power input of the unit COP Coefficient Of Performance ratio of the total heating capacity to the effective power input of the unit A7W35 source air in 7...

Page 19: ...195 205 204 189 185 182 189 185 182 s A class medium temperature water at 55 C 129 138 131 136 135 135 133 135 135 133 s A class SCOP low temperature water outlet at 35 C 4 85 4 95 5 21 5 19 4 81 4 72...

Page 20: ...S Prevalenza utile Prev_ut 10 kPa Prev_ut 16 kPa Mod 16 16T Mod 10 Watel flow rate l h Available static pressure kPa The graph provides the available static pressure granted by the internal circulato...

Page 21: ...38 5 12 25 C 45 C Front view Bottom view Side view fig 3 dimensional data and connections 8 Plant outlet 1 9 DHW outlet 3 4 10 DHW inlet 3 4 11 Plant inlet 1 145 Water pressure gauge G Gas line 15 88...

Page 22: ...outlet 10 DHW inlet 11 Plant inlet 14 Safety valve 36 Automatic air vent 56 Expansion vessel 145 Water pressure gauge FL Flow switch G Gas line IBH System electrical heater L Liquid line Pi Water cir...

Page 23: ...Radiant floor radiator only heating in zones G Gas Line L Liquid Line P_o External pump not supplied to evaluate possible need for installa tion according to the plant water pressure drop managed by...

Page 24: ...ated site If the unit is installed inside an additional refrigerant detection device and ventilation equipment must be added in accordance with the standard EN378 Be sure to adopt adequate measures to...

Page 25: ...llowing requirements The installation location is frost free The space around the unit is adequate for serving see fig 7 The space around the unit allows for sufficient air circulation There is a prov...

Page 26: ...5 1 84 1 84 1 84 1 84 1 84 1 84 kg Indoor unit 10 16 16T UM Liquid refrigerant connection 3 8 1 3 8 1 3 8 3 8 3 8 3 8 3 8 3 8 3 8 3 8 SAE Gas refrigerant connection 5 8 5 8 5 8 5 8 5 8 5 8 5 8 5 8 5 8...

Page 27: ...or poisonous gas 7 4 Refrigerant connections Comply with the following indications when connecting the refrigerant pipes Make sure that the refrigerant pipes can withstand the refrigerant maximum pres...

Page 28: ...and that the flares are the right shape Wipe off the liquid soap with a rag Reduce the pressure of the nitrogen in the circuit by loosening the charge pipe from the bottle Having reduced the pressure...

Page 29: ...must be completely emptied and cleaned of any sludge and pollutants For that purpose only use suitable guaranteed products for heating systems see next section that do not harm metals plastics or rubb...

Page 30: ...ns must be made in accordance with the outlook diagram delivered with the unit with respect to the water intake and water outlet If air moisture or dust gets in the water circuit problems may occur Th...

Page 31: ...lectrical data Indoor unit MOD 10 16 16T Power input 220 240V 50 Hz 220 240V 50 Hz 380 415 3 N PE 50 Hz Max current input A 13 13 10 Automatic circuit breaker A 16 16 16 Power cable section mm2 3x1 5...

Page 32: ...e efficiency and suitability of the earthing system checked by professionally qualified personnel the manu facturer is not responsible for any damage caused by lack of earthing of the system The indoo...

Page 33: ...bottom screws mounting 1 1 A fig 16 view without front panel 2b 2a 2 fig 17 view without front panel fig 18 how to unlock the electric box 4 3 fig 19 how to rotate the electric box To access to the t...

Page 34: ...mperature probe of refrigerant liquid side temperature of indoor unit heating mode B T2B Port for temperature probe of refrigerant gas side temperature of indoor unit heating mode B TW_in Port for tem...

Page 35: ...AHS2 25 CN2 TBH_FB Port for automatic circ breaker of TBH shorted in default 26 CN1 IBH1 2_FB Port for automatic circ breaker of IBH shorted in default 27 CN22 IBH1 Control port for internal backup h...

Page 36: ...n pump Power supply A1 A2 CN11 25 26 1 2 3 4 5 6 7 8 9 10 CN7 CN30 27 28 29 30 31 32 12 24 P d DHW pipe pump fig 24 Pumpsolar Water pump of the solar circuit Power supply A1 A2 CN11 25 26 1 2 3 4 5 6...

Page 37: ...ostat method B one zone control To activate this function set the service parameter 6 1 Room thermostat 2 one zone refer 9 2 Service parameters table on page 50 B 1 When unit detect voltage is 230VAC...

Page 38: ...13 3 4 6 20 14 15 17 19 16 21 6 8 9 10 5 4 3 2 1 CN4 CN22 CN5 S3 DIS1 CN24 CN1 CN2 CN6 CN8 CN13 CN15 CN16 CN18 CN28 S2 CN42 CN21 S1 S4 CN11 CN7 CN17 CN19 CN30 CN35 CN14 CN31 CN36 CN25 CN29 CN40 CN41 C...

Page 39: ...1 CL COM HT EVU SG fig 36 Photovoltaic input and smart grid operation 1 When EVU input is closed the unit operates as below DHW mode turn on the DHW setting temperature will be changed to 70 C au toma...

Page 40: ...ress turns on off DHW or Z1 or Z2 depending on the selection pressure 5 sec turn on off everything DHW Z1 Z2 SW6 UP VALORE Increase the set temperature DHW Z1 Z2 Increase the value of the parameter se...

Page 41: ...eriod 15 Water flow set point Zone 1 delivery set point Zone 2 delivery set point Single zone water flow setpoint without Z1 Z2 alongside Zone 1 water flow setpoint if a has Z1 next to it Zone 2 water...

Page 42: ...e single zone set point proceed as follows press the SW1 SW2 buttons to select the set point press the SW6 SW7 keys to modify the set point confirm the modified value with SW3 key Zone Z1 set point To...

Page 43: ...nt 2 Enabled y n Enables the Eevent YES NO NO Time Start time hh mm 00 00 23 59 1 min hh mm 00 00 Temperature Water temperature setpoint 25 65 1 C 35 Event 3 Enabled y n Enables the Eevent YES NO NO T...

Page 44: ...y n Start hh mm if yes you can set the start time and at that time the pump will work for a time defined by the parameter t_INTERVAL_DHW YES NO NO T11 Enabled y n Start hh mm if yes you can set the st...

Page 45: ...Water temperature measured by probe Tw_out 1 C Tw_I Plate Inl Temp Water temperature measured by probe Tw_in 1 C Tbt1 Buf Tank Up Temp Water temperature measured by probe Tbt1 1 C Tbt12 Buf Tank Low...

Page 46: ...ble events to be set from Event 1 to Event 6 will appear Event 1 Enabled y n Enables the Eevent Time Start time hh mm Temperature Water temperature setpoint The temperature setting remains active unti...

Page 47: ...est to guarantee both services the heat pump will work for the plant and with the TBH electric heater for DHW If the temperature sensor T5 of the DHW tank is faulty the TBH electric heater cannot work...

Page 48: ...orce the activation of the electric system heater and make the heating of the water sent to the heating system more speedy Bckp Heat On Off Activate deactivate backup electrical heater 1 ON 2 OFF 8 5...

Page 49: ...1 2 3 4 1 2 3 4 S1 S2 ON OFF 1 2 3 4 S4 DIP switch ON 1 OFF 0 Factory defauts S1 1 2 0 0 3kW IBH One stage control 0 1 6kW IBH Two stage control 1 1 9kW IBH Three stage control OFF OFF 3 4 0 0 Without...

Page 50: ...ank in the DISINFECT function will last 5 60 min 15 1 16 T_Di_Max the maximum time that disinfection will last 90 300 min 210 1 17 T_Dhwhp_Restrict the operation time for the space heating cooling ope...

Page 51: ...3 Double Zone Double one 0 Non 1 Yes Enable or disable 2 zone management 0 1 1 0 For Serviceman 6 Room Thermostat 6 1Room Thermostat none mode stting one zone double zone Select the type of control o...

Page 52: ...ES 0 1 1 1 13 2 DHW MODE Auto restart DHW mode 0 NON 1 YES 0 1 1 1 For Serviceman 14 Power Input Limitation 14 1 POWER LIMITATION The type of power input limitation refer to Table 6 Max current input...

Page 53: ...Water flow Temp C 55 0 54 4 53 7 52 5 51 6 50 6 50 0 1 Fancoil or Radiators H1 53 0 52 4 51 7 50 5 49 6 48 6 48 0 2 52 0 51 4 50 7 49 5 48 6 47 6 47 0 3 50 0 49 4 48 7 47 5 46 6 45 6 45 0 4 48 0 47 4...

Page 54: ...0 1 Radiant floor Heating or radiator C2 21 0 21 0 19 0 19 0 18 0 18 0 17 0 17 0 2 22 0 22 0 20 0 20 0 19 0 19 0 17 0 17 0 3 23 0 23 0 21 0 21 0 19 0 19 0 18 0 18 0 4 24 0 24 0 21 0 21 0 20 0 20 0 18...

Page 55: ...pressure must be 1 bar measured with cold water Check that the expansion tank is not broken Check that the pressure drop in the hydraulic circuit is not too high for the pump The volume of water in th...

Page 56: ...e Dhw Priority parameter is 1 DHW priority enabled If the Dhw Priority parameter 0 set the t_DHWHP_RESTRICT parameter to the minimum value the suggested value is 60min Set dT1SH to 2 C Enable DHW boil...

Page 57: ...eplace it E6 Fault of the outdoor air temperature probe T4 1 Check the resistance of the probe 2 The probe connector is disconnected Reconnect it 3 The probe connector is wet Remove the water dry the...

Page 58: ...Tw2 fault 1 Check the resistance of the probe 2 The probe connector is disconnected Reconnect it 3 The probe connector is wet Remove the water dry the connector Apply waterproof adhesive tape 4 Probe...

Page 59: ...water filter needs cleaning 3 Make sure there is no air in the system purge air 4 Check the water pressure The water pressure must be 1 bar water is cold 5 Check that the pump speed setting is on the...

Page 60: ...al check of the product For the correct functioning of the system it is mandatory to make the correct settings that depend on the type on the system served by the unit For more details see 9 START UP...

Page 61: ...ipes and or compressor Avoid contact by wearing protective gloves Discharg pipes and coil Explosion Excessive pressure Turn off the machine check the high pressure switch and safety valve the fans and...

Page 62: ...IBH1 N D CB DISPLAY wired controller VALVES PUMPS C DISPLAY CB LPS Circuit Breaker must be installed to the Power Supply of the unit Leakage Protection Switch must be installed to the Power Supply of...

Page 63: ...PS Circuit Breaker must be installed to the Power Supply of the unit Leakage Protection Switch must be installed to the Power Supply of the unit 25 C 45 C L1 B L1 A L2 A L2 B N a IBH1 a N A N C L1 C T...

Page 64: ...nger sensor E11 Stop valve gas E12 Stop valve liquid E13 High Pressure Switch E14 Low Pressure Switch E15 Pressure sensor E16 Capillary E17 Suction temperature sensor INDOOR UNIT 8 System outlet 9 DHW...

Page 65: ......

Page 66: ......

Page 67: ......

Page 68: ...FERROLI S p A Via Ritonda 78 a 37047 San Bonifacio Verona ITALY www ferroli com Made in Italy...

Reviews: