


BlueHelix ALPHA C
295
EN
cod. 3541U152 - Rev. 01 - 04/2021
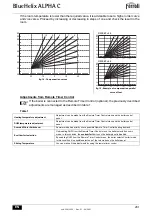
3. Service and maintenance
B
All adjustments described in this chapter can only be
carried out by qualified personnel.
3.1 Adjustments
Gas conversion
The unit can work with
2
nd
or
3
rd
family gases, which is clearly indicated on the packaging and on
the data plate of the unit. If the unit has to be used with a gas other than the factory-set one, pro-
ceed as follows:
1. Disconnect the power supply and turn off the gas.
2. Remove the front panel (
see *** 'Opening the front panel' on page 303 ***
).
3. Apply the plate for LPG (contained in the document bag) near the technical data plate.
4. Refit the front panel and turn on the power to the boiler.
5.
Modify the parameter for the type of gas
:
• Put the boiler in standby mode and press the
Reset
button (detail 6 - fig. 1) for 10 seconds.
• The display shows
100
and
"co"
flashing; press the
"H"
button (detail 4 - fig. 1) to
set and display
120
.
Then press the
“DHW +”
button (detail 2 - fig. 1) to set
123
.
• Press the
Reset
button once (detail 6 - fig. 1).
• The display shows
tS
flashing;
• Press the
Reset
button once (detail 6 - fig. 1).
• Using the
“H”
button (detail 4 - fig. 1) scroll to the parameter
b03
.
• Using the
“DHW +”
button (detail 4 - fig. 1) set:
0 =G20
- Natural Gas (Default setting)
1 =G30/G31
Liquefied Gas
2 =G230
Propane-air
• Press the
“H”
button (detail 4 - fig. 1) to confirm (changing the value of parameter
b03
,automatically changes the value of parameter
b27
to
5
).
• Press the
Reset
button (detail 6 - fig. 1) for 10 seconds.
• Turn the power off for 10 seconds and then back on.
• Wait until the
Fh
mode has finished.
• Put the boiler in standby mode and activate the complete manual calibration mode by simul-
taneously pressing the
“OFF/Summer/Winter”
and
“H”
buttons for 5 seconds.
The display will show the flashing symbols
"Au"
and
"to"
. After burner ignition (flashing
symbols "Hi+flame+radiator) the boiler will do the calibration in the three power le-
vels "
Hi
", "
ME
" and "
Lo
". Afterwards, a numerical value will be displayed (at this point the
boiler is at minimum power "
Lo
").
• If the
CO
2
values are not within the range table 9, proceed as follows: using the “DHW + and
-” buttons. Adjust the
CO
2
at minimum power (Lo); each time the
“DHW + or -”
buttons are
pressed, the display will show the modified value and then the icon "Lo" (to indicate the mi-
nimum power level).
• Increasing the value will decrease the
CO
2
level and vice versa.
• Press the
“H”
button to go to Medium/ignition power "
ME
"; the icon "
ME
” will appe-
ar on the display and a numerical value will appear when the ignition/intermediate power is
reached.
• Adjust the
CO
2
with the “DHW + and -” buttons. Each time the “DHW + or -” buttons are pres-
sed, the display will show the modified value and then the icon "
ME
" (to indicate the ignition/
intermediate power level).
• Press the
“H”
button to go to maximum power "
Hi
", the display will show the icon
"
Hi
" and a numerical value will appear when the maximum power is reached.
• Using the
“DHW + and -”
buttons, adjust the
CO
2
at maximum power (
Hi
); each time the
“DHW + or -”
buttons are pressed, the display will show the modified value and then the
icon "
Hi
" (to indicate the maximum power level). After adjusting the
CO
2
at maximum power,


