background image

COLD

80   

mic

100 

mic

250 

mic HELPTEMP

175 

mic

125 

mic

5

WARRANTY

Fellowes warrants all parts of the laminator to be free of defects in material and workmanship for 
2 years from the date of purchase by the original consumer. If any part is found to be defective 
during the warranty period, your sole and exclusive remedy will be repair or replacement, at 
Fellowes’ option and expense, of the defective part. This warranty does not apply in cases 
of abuse, mishandling or unauthorized repair. ANY IMPLIED WARRANTY, INCLUDING THAT OF 
MERCHANTABILITY OR FITNESS FOR A PARTICULAR PURPOSE, IS HEREBY LIMITED IN DURATION

 TO THE APPROPRIATE WARRANTY PERIOD SET FORTH ABOVE. IN NO EVENT SHALL FELLOWES BE 
LIABLE FOR ANY CONSEQUENTIAL OR INCIDENTAL DAMAGES ATTRIBUTABLE TO THIS PRODUCT. 
This warranty gives you specific legal rights. You may have other legal rights that vary from this 
warranty. The duration, terms and conditions of this warranty are valid world-wide, except where 
different limitations, restrictions or conditions may be required by local law. For more details or to 
obtain services under this warranty, please contact us or your dealer.  

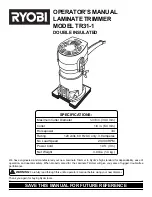
MAINTENANCE - Unique Easi-Access technology

This laminator is equipped with the unique Easi-Access technology for easy maintenance.  This allows the user to open the laminator for maintenance, just like a photocopier. 

7. To clean residue off laminator 

rollers, please only use Fellowes 

Laminating Roller cleaners (item 

No 5703702) as explained in 

product instructions.

1. To open the laminator, please press the 

“Open” button as shown in the illustration 

and wait for the “open” ( ) symbol to 

appear on the LCD screen and the ready 

beep to sound. 

2. If machine is hot, fan will turn on to 

cool the machine down to safe handling 

temperature inside.  During this time the 

“Wait” symbol will flash and cover will 

remain locked.

3. The “open” symbol will show 

in the LCD screen will turn on and 

the ready beep will sound when 

machine is ready to be opened. 

4. Press the buttons on both sides  

of the machine to activate the Easi-

Access mechanism. (The laminator 

needs to be switched on to allow the 

active temperature control to work). 

6. For further maintenance, 

the rollers can be released by 

experienced users.  Press cam 

levers to release the rollers. 

TROUBLESHOOTING

Problem

Ready Light does not come on after extended time
Pouch did not completely adhere to item
Jamming

Cause

Laminator is in a hot, humid area.
Laminated item may be too thick.
No item in pouch
Manually cut out pouch used
Pouch was not used.
Pouch was not centred or straight when fed 

through Pouch/Document Entry.
Glue and residue left on laminating rollers.

Solution
Move laminator to a cool dry area.
Pass through laminator a second time.
All our laminators have been designed to operate jam-free. In the 

unlikely event of a jam occurring, please press the “open“ ( ) 

button and wait for the wait ( ) light to stop flashing. 
The laminator can be opened to remove incorrectly inserted items 

as described under maintenance.  Please ensure that you follow the 

described steps. 
Gently pull on the jammed material to release it. 
Always put item in a pouch.
Align sealed edge with Pouch/Document Entry. Use guide  

on machine to centre.
Clean residues off rollers using Fellowes Laminating Roller wipes, 

see “maintenance” section.
Make sure that not residue is left on the rollers and use 

cleaning sheet before laminating.

Need Help?


Please call our experts at  

Customer Service. You’ll find  

the numbers for your nearest  

Service Centre on the  

BACK cover of this booklet.

1

2

3

4

1

2

17

5

12

5

80

10

0

3

5

175

125

80

100

6

7

8. Please remember to re-secure the 

rollers before closing cover to ensure 

safe operation. 

175

125

80

100

8

Summary of Contents for Venus 125

Page 1: ...fellowes com Office Laminators Please read these instructions before use Veuillez lire ces instructions avant utilisation Lea estas instrucciones antes del uso ...

Page 2: ...edges and corners and residual heat when opening the laminator 2 Discrete carry handles at side Active Cooling System Temperature controlled release trigger for lid Support Shelf on entry to guide Laminate path LCD Interface for user guidance HeatGuard Technology double walled insulation keeps heat inside Opening lid to clean laminating mechanism CAPABILITIES Pouch Thickness 3 10 mil Estimated Hea...

Page 3: ...ator rollers with Fellowes roller wipes item 5703702 after 15 20 applications to guarantee optimum laminating results as explained under maintenance TIPS Do not laminate heat sensitive documents i e tickets ultrasounds etc Use a dry erase marker for writing on laminated pouches 1 Please connect the laminator to the socket using the separate power cable supplied 1 2 Switch laminator on with Power O...

Page 4: ...djustment 6 During warm up a wait symbol will appear in the LCD screen until the required temperature has been reached 7 Once temperature is reached acoustic beep signal will sound a small arrow will flash in LCD screen and roller symbols will rotate 8 While laminator is warming up please prepare item you wish to laminate Place the item inside the pouch and centre it against the sealed edge of the...

Page 5: ...afe handling temperature inside During this time the Wait symbol will flash and cover will remain locked 3 The open symbol will show in the LCD screen will turn on and the ready beep will sound when machine is ready to be opened 4 Press the buttons on both sides of the machine to activate the Easi Access mechanism The laminator needs to be switched on to allow the active temperature control to wor...

Page 6: ...chaleur résiduelle en ouvrant la pelliculeuse 6 Poignées de transport discrètes sur le côté Système de refroidissement actif Gâchette à dégagement contrôlé de température pour le couvercle Tablette de support à l entrée pour guider la voie de pelliculage Interface à ACL comme guide de l utilisateur Ouverture du couvercle pour nettoyer le mécanisme de pelliculage CAPACITÉS Épaisseur de pochette 3 à...

Page 7: ...Ne pelliculez pas les documents thermosensibles par ex billets ultrasons etc Utilisez un marqueur effaçable à sec pour écrire sur les pochettes pelliculées 1 Veuillez brancher la pelliculeuse à la prise avec le câble d alimentation distinct fourni 1 2 Mettez la pelliculeuse en marche avec le bouton Marche Arrêt à l arrière de l appareil 2 3 Enfoncez le bouton de mise en attente à gauche du panneau...

Page 8: ...se s ajuste 6 Durant le réchauffement un symbole attendez apparaît à l écran à ACL jusqu à ce que la température requise soit atteinte 7 Lorsque la température est atteinte un signal acoustique se fera entendre une petite flèche clignotera à l écran à ACL et les symboles de rouleaux tourneront 8 Pendant le réchauffement de la pelliculeuse veuillez préparer l article que vous désirez pelliculer Pla...

Page 9: ...boutons des deux côtés de l appareil pour activer le mécanisme Easi Access La pelliculeuse doit être en marche pour permettre au contrôle de température actif de fonctionner 6 Pour tout autre entretien les rouleaux peuvent être dégagés par les utilisateurs d expérience Appuyez sur les leviers à came pour dégager les rouleaux 5 Ouvrez le couvercle des deux mains Vous pouvez maintenant nettoyer l in...

Page 10: ...atención al cliente si tiene dudas Esta garantía no se aplica en los casos de uso indebido manejo inapropiado o reparación no autorizada Tenga cuidado con los bordes y las esquinas filosas y el calor residual al abrir la plastificadora 10 Manijas de transporte discretas en el costado Sistema de enfriamiento activo Estante de apoyo en la entrada para guiar el trayecto del plastificado Interfaz LCD ...

Page 11: ...os óptimos en el plastificado tal como se explica en Mantenimiento SUGERENCIAS No plastifique documentos sensibles al calor p ej boletos placas de ultrasonidos etc Use un marcador de borrado en seco para escribir sobre las bolsas de plastificado 1 Conecte la plastificadora al tomacorriente con el cable de alimentación independiente provisto 1 2 Encienda la plastificadora con el botón Encendido Apa...

Page 12: ...n símbolo de espera en la pantalla LCD hasta que se haya alcanzado la temperatura requerida 7 Una vez alcanzada la temperatura se emitirá una señal acústica una flecha pequeña destellará en la pantalla LCD y los símbolos de rodillo rotarán 8 Mientras la plastificadora se está calentando prepare el artículo que desea plastificar Coloque el artículo dentro de la bolsa y céntrelo contra el borde sell...

Page 13: ...Easi Access La plastificadora debe encenderse para permitir que el control de temperatura activo funcione 6 Para realizar un mantenimiento más profundo los usuarios experimentados pueden liberar los rodillos Presione las palancas de leva para liberar los rodillos 5 Abra la tapa con ambas manos Ahora puede limpiar el interior de la plastificadora y quitar con cuidado el pegamento residual u otros e...

Page 14: ...lia 1 800 33 11 77 Canada 1 800 665 4339 Europe 00 800 1810 1810 México 1 800 234 1185 United States 1 800 955 0959 Fellowes Australia 61 3 8336 9700 Benelux 31 0 76 523 2090 Canada 1 905 475 6320 Deutschland 49 0 5131 49770 España 34 91 748 05 01 France 33 0 1 30 06 86 80 Italia 39 071 730041 Japan 81 0 3 5496 2401 Korea 82 0 2 3462 2884 Malaysia 60 0 35122 1231 Polska 48 22 771 47 40 Singapore 6...

Reviews: