background image

FEC Remote Lighting Controller V4 HP0832


User Installation and Operation Manual 


 © Interleader Ltd 2020 

53 of 64 

26/08/2020 


16  Appendix 1 

– Software Updater 

The RLC can be updated with new software in situ. 

To  update  the  software  requires  a  Windows  PC  and  a 
USB  cable  with  type  ‘A’  plug  one  end  and  type  ‘B’  the 
other. 

The  installer  requires  neither  software  nor  drivers  to  be 
installed  on  your  PC 

–  the  standard  Windows  HID 

drivers already installed are used. 

Software  updates  can  be  emailed  to  you  as  a  self-
extracting zip file. 

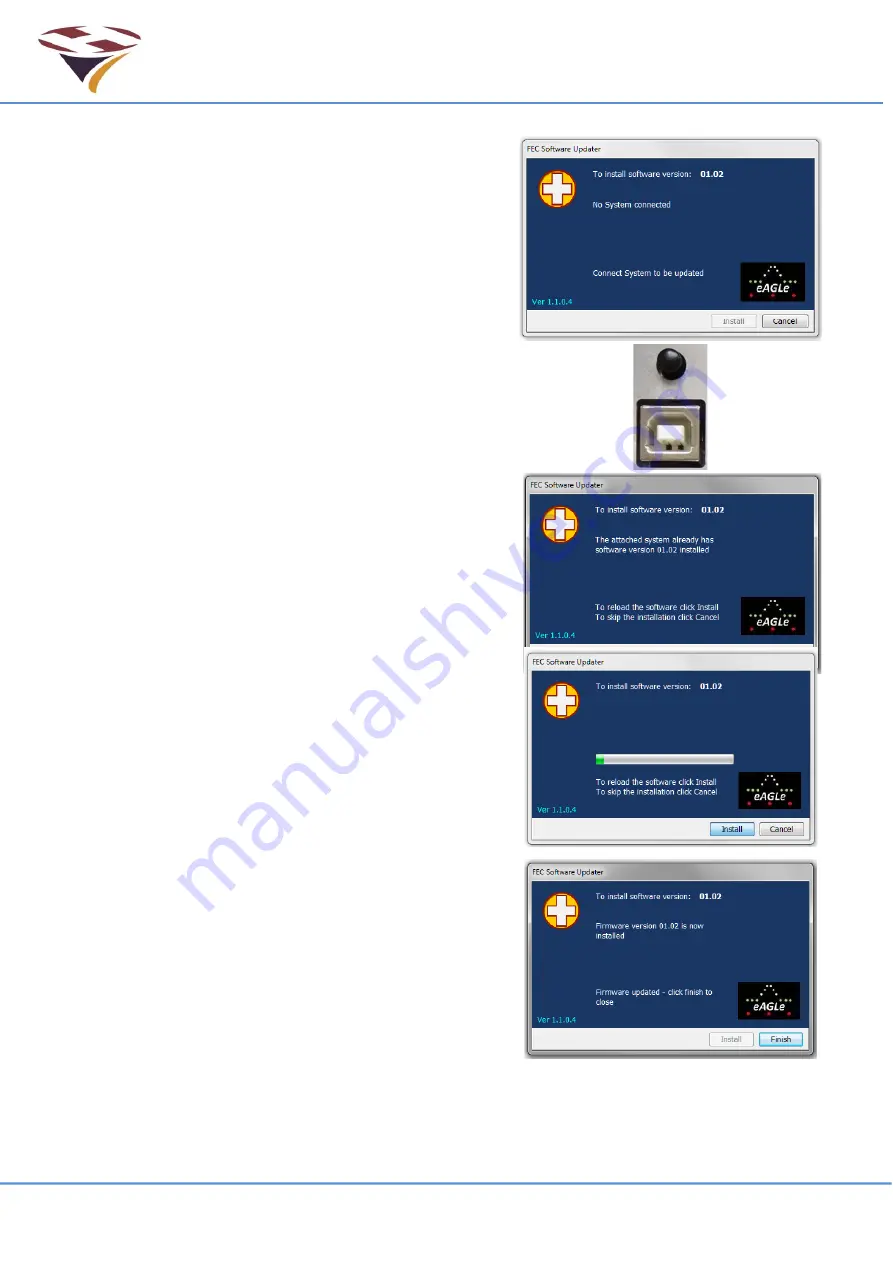
RLC screens are shown next page.  

To  update  the  software  (initiated  through  the  Boot-
loader Switch): 

The following is the simplest way of initiating the uploading 
of new software.  

1) 

Turn  the  unit  off  and  disconnect  from  the  normal 
power source 

2) 

Open the enclosure as described in earlier sections 
(open 

carefully 

and 

disconnect 

aerial 

and 

connecting cable and earth wire) 

3) 

Lay  the  controller  front  panel  face  down  on  a 
protective flat surface 

4) 

Double click on the update file and a screen similar 
to that to the top-right will appear 

5) 

Connect the USB cable to the PC 

6) 

Hold down the Boot-loader switch at the same time 
as  connecting  to  the  USB  port  on  the  rear  of  the 
controller  (image  right) 

–  this  will  power  the 

controller from the PC 

7) 

The  screen  on  the  PC  should  now  advise  that  the 
system  is  connected  and  the  Install  button  will 
changed from greyed-out to active. 

8) 

Click  Install  and  the  software  will  be  automatically 
uploaded to the controller checked 

9) 

A screen (right) confirms the update in progress 

10)  When  complete 

–  click  finish  and  the  window  will 

close 

11)  If  Windows  asks  if  the  programme  installed  ok 

– 

click yes  

12)  Disconnect the USB cable 
13)  Reassemble the controller and turn on 
14)  The controller will now be running the new software 

(Version  and  build  date  displayed  on  the  LCD 
screen at start-up and via SMS) 


Summary of Contents for HP0832

Page 1: ...t Engines Interleader Limited Remote Lighting Controller FEC Type HP0832 User Manual Specification Diagnostics RLC Version 4 Issue 1 26th August 2020 Note that this manual relates to System V4 0 and S...

Page 2: ...and Output Testing Menu 20 6 3 1 Test Relays 20 6 3 2 BMS Input and Output Tests 21 6 4 Setup Systems 22 6 4 1 Set Channel Timeouts 22 6 4 2 Set Real Time Clocks 23 6 4 3 Reset and Reload Software 24...

Page 3: ...circuit 47 9 12 Final Assembly 47 10 Summary Specification 48 11 Cellular Radio 49 12 Power Supply Unit Specification 50 13 Spare Parts 50 13 1 Relays 50 13 2 Other 50 14 Factory Default Settings 51...

Page 4: ...4 1 26th June 2020 New Document for RLC V4 Production model Notes 1 this manual covers all commands available to the Manager and User Additional commands available to FEC System and the OEM are contai...

Page 5: ...protection against harmful interference in a residential installation This equipment generates uses and can radiate radio frequency energy If not installed and used in accordance with the instructions...

Page 6: ...roller V4 HP0832 User Installation and Operation Manual Interleader Ltd 2020 6 of 64 26 08 2020 2 Compliance Statement Europe This product has been marked with the CE mark to show it is compliant with...

Page 7: ...tional FCC EU approved universal Cellular Radio Module for remote SMS control Secure PIN code protected SMS commands to monitor and control your installation Secure status reporting check out your ins...

Page 8: ...adds Systems Management Software SMS control and monitoring with the option of automatic weather reporting wind speed direction temperature dew point and pressure right from your helipad FEC s RLC si...

Page 9: ...ne indicates Cell Radio on The 3rd line confirms the function of each key The 4th line represents the Function Keys Note that in some menus the boxes in the 4th line also give the current status of th...

Page 10: ...ink SMS is run on any PC Laptop or Tablet running MS Windows 10 and which supports Bluetooth LE V4 X The main menu displays the products supported Select the link type default is Bluetooth and SMS wil...

Page 11: ...e ignored To avoid the RLC becoming stuck in this state after 10 minutes the RLC will return to its main operational state As an additional security measure if PINs are not entered within 5 seconds of...

Page 12: ...ng Fn1 Fn3 keys The relevant channel will be activated with the time out timer running By default no PIN is required to activate channels via the keypad but this is configurable via SMS 4 VHF All chan...

Page 13: ...n to show the status of the system Including Line 1 The VHF receiver is ON shown by both the filled box and the word On and the operating frequency is shown in this example a US UNICOM frequency Line...

Page 14: ...Menu Mode To enter the Menu mode simply press the function key F4 Note that the function key representation above is used consistently throughout the manual On pressing F4 for the main menu you will b...

Page 15: ...ol Unit The Setup Control Menu gives access to basic Radio Input Output and system settings All of these basic functions and many more sophisticated functions are also available via SMS which is the a...

Page 16: ...he channels are a simplified and rounded down or up representation of the frequency used A table showing the first 16 channels versus their frequency is shown below The user does not need to know any...

Page 17: ...or does not move Once all numbers have been entered the system has ensured a correct and unique channel The full frequency is displayed screen 3 and confirmation requested ENT 6 2 1 3 Setup VHF Receiv...

Page 18: ...splay of RSSI Read command below as this will give good information about the local conditions Click Setting the minimum PTT press period As well as setting the signal level at which the system will t...

Page 19: ...figure will be updated This is extremely useful in checking the installation aerials down feed etc and setting up the receiver 6 2 2 Cellular Radio If a cellular module is fitted the basic module det...

Page 20: ...ce In the lower left screen above input 1 has been made active and is shown in line 4 as On 6 3 1 Test Relays From the Test Relays Menu either the Channel relays or the Windsock and Beacon relays can...

Page 21: ...are not measured for these relays 6 3 2 BMS Input and Output Tests The BMS input and three BMS output relays can be tested Selecting input monitors the state of the input and displays it Press F4 to e...

Page 22: ...inute intervals Changes are made simply using the F1 F2 keys and then either quitting or saving when happy with the new value NB The provision of very short time out periods is to allow the driving of...

Page 23: ...hown bottom left screen which you can accept F1 OK or reject and start over F2 New Once the time has been correctly entered the day of the month is prompted for Again this is in a two digit format The...

Page 24: ...nel timeouts can be reset to the factory default settings see Factory Default Settings section later in this manual Note that all settings are taken back to their factory default state and all user co...

Page 25: ...e to turn OFF the PAL must cause the lights of at least the primary Illuminated Wind Direction Indicator IWDI in accordance with Paragraph 9 6 1 10 to commence to flash at approximately 50 cycles per...

Page 26: ...PIN is required to achieve this A later version of SMS will enable the option of a PIN to be required In the example above to turn on channel 1 If a PIN is required then after pressing F1 the PIN che...

Page 27: ...ating the same channel Each time a channel is set the timeout period is restarts This is a useful feature if for example a landing is delayed and the lights are approaching turning off indicated by th...

Page 28: ...n the Supplied Media USB or CD There are a number of folders and files on the USB Memory Stick CD typically containing It is recommended that you copy all of the files on the USB memory stick However...

Page 29: ...you get a screen displayed saying this is risky software and a Don t install button then select More Info and then press Install anyway 6 A Publisher cannot be verified screen will be displayed select...

Page 30: ...ntrolling a number of FEC lighting products simply click on the product that you wish to establish communication with The software will automatically check the device and product selected and show the...

Page 31: ...and feel of the commands is similar across all menus making it easier to navigate and be productive Help Pressing the Help key brings up simple text based help This will be expanded in subsequent rel...

Page 32: ...PINs can be changed depending on User Type A Manager will see current PINs left Pressing Change brings up a screen to allow a new PIN to be entered Once successfully applied the screen will appear as...

Page 33: ...a Cellular radio is reto fitted to enable it Fuller instructions are supplied with the module FEC Commands As for Manager OEM Only Commands Update Serial Number The serial number entered will be store...

Page 34: ...rrent version of software from the RLC and confirm if it is a previous current or new version Device Status Normally the software will be the next version but there may be a need to either regress to...

Page 35: ...ection If happy to proceed click Yes Update Software SMS will then show that the software is updating At the same time the LCD display will confirm progress On completion SMS will confirm the update a...

Page 36: ...alendar RTC in the RLC is read and the current time and date displayed right Select Change to update far right Channel Configuration Selecting Channel Configuration shows the current channel timeouts...

Page 37: ...system is due to turn OFF the PAL must cause the lights of at least the primary Illuminated Wind Direction Indicator IWDI in accordance with Paragraph 9 6 1 10 to commence to flash at approximately 5...

Page 38: ...s and minutes Unit Status Absent from the current release of SMS UHF Radio Setup Non standard product to special order Will normally report Not Fitted VHF Status The VHF status command reads the VHF r...

Page 39: ...entered and is stored in SMS in order for the reported barometric pressure to be properly reported corrected for the installation altitude of the MetPak Pressing Refresh re reads the data from the Met...

Page 40: ...y available to OEM for testing and setting up Test Relays All of the RLCs can be tested Relays 1 to 3 have their coil currents measured and reported A figure of 100 15mA is acceptable Readings outside...

Page 41: ...Set Channel Select the required channel to turn on or off and press update Set Radio The VHF Cellular and UHF if fitted radios can be switched on and off Strictly speaking they are logically not physi...

Page 42: ...aerial if option selected It is recommended that a mobile cell phone on the same network as that intended for the controller is used to check the signal strength quality in the intended location if Ce...

Page 43: ...g screws are secure but do not over tighten as this could damage the enclosure and compromise the IP65 rating Once the base has been fitted the unit can be wired up next section Take particular care n...

Page 44: ...d both to power the controller and the switched circuits then the cable switch and fuse rating need to be sized accordingly WARNING If the circuits to be switched are fed from a separate isolator it i...

Page 45: ...or provides the earth bonding connection to the controller d The connectors must be gently pushed tight against the PSU and Relay Interface Board to ensure that these items are prevented from sliding...

Page 46: ...Secondary circuit load characteristics may require an external contactor NB Do not run the light circuits via the 5A fuse this is only for the feed of the 12V mains Power Supply Unit PSU Any light ci...

Page 47: ...witched circuit To test the mains switched circuit press the button on the top of the relay s This will make the contact for the normally open contact and break the contact for the normally closed con...

Page 48: ...V DC Nominal Range DC 10V 15V DC Power standby LCD Backlight On 12V DC 3 watts approx 240V AC 9 10W Power standby LCD Backlight Off 12V DC 2 25 watts approx 240V AC 8 33W Power all relays active 12V D...

Page 49: ...FEC Remote Lighting Controller V4 HP0832 User Installation and Operation Manual Interleader Ltd 2020 49 of 64 26 08 2020 11 Cellular Radio...

Page 50: ...g by free air convection Can be installed on DIN rail TS 35 7 5 or 15 Isolation class LED indicator for power on 100 full load burn in test Approvals 13 Spare Parts The following spare parts are avail...

Page 51: ...Range 10 seconds 60 minutes VHF Threshold 75dBm Range 0dBm 110dBm Click period 100mS Range 1 250mS VHF Active On Option Off Cell Active On Option Off User PIN 0000 Operator PIN 1111 System PIN 9980 R...

Page 52: ...the unit prior to any other tests being carried out Basic Visual Checks Ensure that The unit is properly mounted secure and appears physically undamaged There are no signs of overheating The wiring s...

Page 53: ...refully and disconnect aerial and connecting cable and earth wire 3 Lay the controller front panel face down on a protective flat surface 4 Double click on the update file and a screen similar to that...

Page 54: ...hat the RLC will display as the new software is loaded indicating progress DO NOT interrupt the process once started If the process needs to be repeated start from beginning of the process The first t...

Page 55: ...to power external devices BMS Outputs The BMS outputs are voltage free relay outputs BMS Input The BMS IP pin 5 can have the same range of inputs as the auxiliary inputs below Auxiliary Inputs Below a...

Page 56: ...08 2020 17 1 Auxiliary Cable Harness HP0827 For customers who do not wish to solder wires to the D connector an interface harness is available which brings the connections out on a 15 way screw termin...

Page 57: ...the lights it will control Connection to the RLC is via 4 core 0 35mm2 22 AWG instrument cable AlphaWire 1174L or similar The wiring is connected as follows 15 Way Male D Connector Cable Core Twilight...

Page 58: ...ctor An aerial extension cable may be used but to avoid undue cable losses keep the cable as short as possible total max 10m 18 3 VHF Aerial The RLC is not supplied with any of the VHF aerial componen...

Page 59: ...twisting of the cable must be avoided If a cable is bent even when straightened out again the internal core will be permanently damaged and cause additional loss and unwanted signal reflections in th...

Page 60: ...irband VHF transmitting devices a separate aerial must be used for the RLC To avoid interference or damage to the RLC the RLC and other device s aerials should be either 1 Located some distance apart...

Page 61: ...FEC Remote Lighting Controller V4 HP0832 User Installation and Operation Manual Interleader Ltd 2020 61 of 64 26 08 2020 19 Appendix 4 Bluetooth Radio EU Declaration of Conformity...

Page 62: ...FEC Remote Lighting Controller V4 HP0832 User Installation and Operation Manual Interleader Ltd 2020 62 of 64 26 08 2020...

Page 63: ...Appendix 6 Mounting Template The template below is at a scale of 1 1 if this document is printed on A4 paper or US Letter and no scaling options are used e g do NOT use the printing option scale to f...

Page 64: ...End of Document...

Reviews: