· Before proceeding with the electrical connection, verify that the current carrying capacity of
the system and the socket is adequate for the maximum power rating of the hob.
· Electrical installation of the residence and the electrical current plug in use must be earthed
and conform with safety regulations.
· If there is no dedicated hob circuit and fused switch, they must be installed by a qualified
electrician before the hob is connected.
. Fused switch must be easily accessible once the hob has been installed.
· Do not use adaptors, multiple sockets and/or extension leads.
· This appliance conforms with the requirements ofthe following EEC Directives:
1. Vitroceramic hob EEC/73/23 and 93/68, EEC/89/336 relating to radio interference,
2. EEC/89/109 relating to contact with foods.
· A circuit breaker with a contact opening of at least 3mm must be installed inside the supply
circuit.
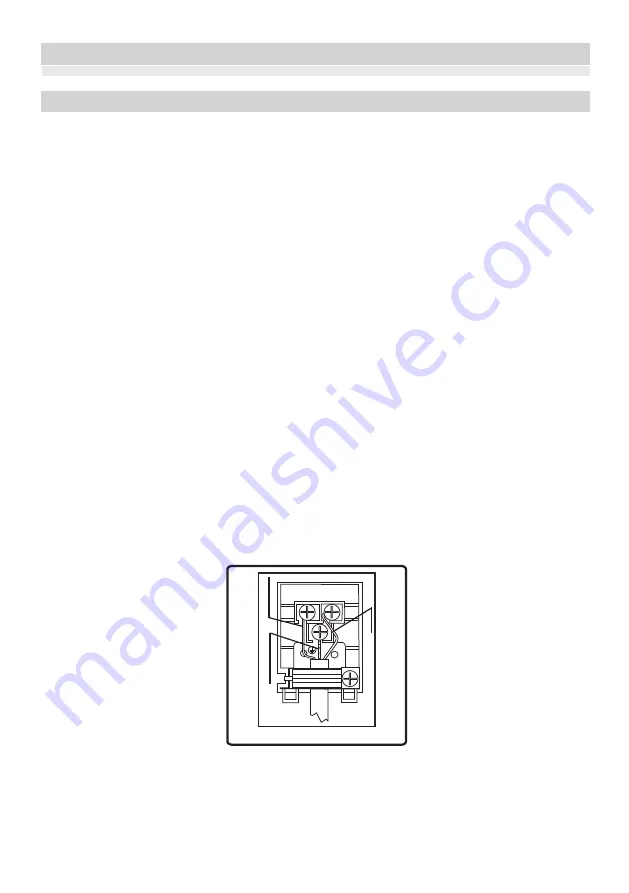
· For the knob controlled vitroceramic hob with two heating elements, the cable must be
H05VV-F 3X1,5mm². For the knob controlled vitroceramic hob with one heating elements, the
cable must be H05VV-F 3X1,0mm². You will find the connection diagram shown on the bottom
of your appliance.
INSTALLATION AND PREPARATIONS FOR USE
15
Figure 15
L
N
B
R
O
W
N
GREEN
B
L
U
E
3.5
Electrical Connection Of Your Hob
Summary of Contents for 22 J LUX
Page 1: ...MK КОМБИНИРАН ПЛОТ УПАТСТВО ЗА УПОТРЕБА ...
Page 2: ...26 FAVORIT ...
Page 26: ......
Page 51: ......
Page 77: ...52211189 ...
Page 78: ...22 J LUX EN ...
Page 79: ......
Page 80: ......
Page 81: ......
Page 86: ......
Page 87: ...Figure 2 ...
Page 88: ...Figure 3 3 ...
Page 89: ...50 200 Max 250 100 150 50 200 Max 250 100 150 Figure 4 Figure 5 Figure 6 Figure 5 Figure 6 ...
Page 96: ...17 ...
Page 97: ...18 ...
Page 98: ...19 ...
Page 99: ...20 ...
Page 100: ...21 ...
Page 101: ...22 ...
Page 102: ......
Page 103: ...MK 22 J LUX ...
Page 104: ......
Page 105: ......
Page 106: ......
Page 107: ......
Page 108: ......
Page 109: ......
Page 110: ......
Page 111: ......
Page 113: ...3 3 ...
Page 114: ...50 200 Max 250 100 150 50 200 Max 250 100 150 4 5 6 5 6 ...
Page 115: ......
Page 121: ...17 ...
Page 122: ...18 ...
Page 123: ...19 ...
Page 124: ...20 ...
Page 125: ...21 ...
Page 126: ...22 22 J LUX ...
Page 127: ...SR 22 J LUX ...
Page 128: ......
Page 129: ......
Page 130: ......
Page 134: ...1 ...
Page 136: ...Slika 3 3 ...
Page 137: ...50 200 Max 250 100 150 50 200 Max 250 100 150 Slika 4 Slika 5 Slika 6 Slika 4 Slika 5 ...
Page 138: ...1ϭ 4 KORIŠÆENJE PROIZVODA Funkcije rerne ...
Page 146: ...19 ...
Page 147: ...20 ...
Page 148: ...Slika 7 21 ...
Page 149: ...22 ...
Page 150: ...23 ...
Page 151: ...24 ...
Page 152: ...52209666 ...


