7
3. INSTALLATION AND PREPARATIONS FOR USE
This modern, functional and practical cooker, that was manufactured with the parts and
materials of highest quality, will meet your cooking needs in every aspect. You must surely
read this manual so that you don't have any problem in future and to be able to have
satisfactory results. The following information are the required rules for right installation and
service processes. It must be read especially by the technician who will install the appliance
Important:
This appliance must be installed by a qualified people according to the
manufacturers installation instructions, local building regulations, gas authority codes and
electrical wiring instructions.
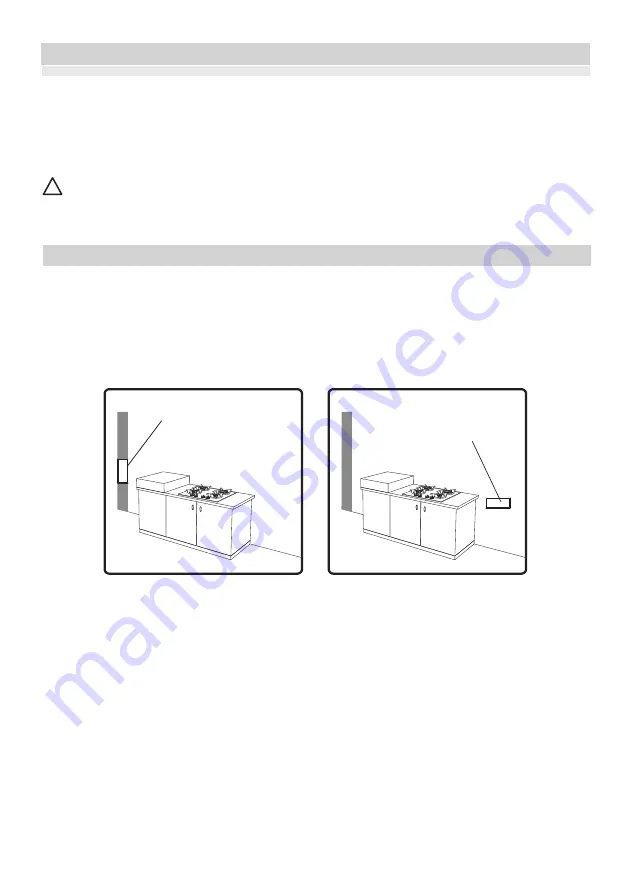
Your product must be set up and used in a place where it will always have ventilation
While operating, this appliance needs
There must be a natural ventilation enough to provide the gas to be used in the environment.
The average air flow must directly come in through the air holes that will be opened on the
walls that are opened towards outside.
.
E
nvironment
where your appliance will be installed
•
.
3
•
2m /h air per kw input.
•
3.1.
!
•
.
2
These air holes must have at least the effective cross section of 100cm for fresh air circulation
(One or more air holes can be opened.). This hole (or holes) must be opened so that they
shouldn't be
blocked. Preferably they must be placed close to the bottom and at opposite side of
the smokes of the burned gases that were emptied. If it seems not possible to open these
ventilations in the place where the appliance is set up, the needed air can also be obtained
through the next room, provided that this place is not a bedroom or a dangerous place. In this
case this “next room” must also be ventilated as required.
Emptying of the Burned Gases from Environment
The cooking appliances that operate with gas, throw the burned gas wastes out directly to the
outside or through the cooker hoods that are connected to the a chimney that opens directly to the
outside. If it seems not possible to install a cooker hood, it is required to set an electric fan on the
window or wall that has access to fresh air. This electric fan must have the capacity to change the air
of the kitchen environment 4-5 times of its own volume of air per hour
Figure 1
Air inlet section
2
min. 100cm
Figure 2
Air inlet section
2
min. 100cm
Summary of Contents for 22 J LUX
Page 1: ...MK КОМБИНИРАН ПЛОТ УПАТСТВО ЗА УПОТРЕБА ...
Page 2: ...26 FAVORIT ...
Page 26: ......
Page 51: ......
Page 77: ...52211189 ...
Page 78: ...22 J LUX EN ...
Page 79: ......
Page 80: ......
Page 81: ......
Page 86: ......
Page 87: ...Figure 2 ...
Page 88: ...Figure 3 3 ...
Page 89: ...50 200 Max 250 100 150 50 200 Max 250 100 150 Figure 4 Figure 5 Figure 6 Figure 5 Figure 6 ...
Page 96: ...17 ...
Page 97: ...18 ...
Page 98: ...19 ...
Page 99: ...20 ...
Page 100: ...21 ...
Page 101: ...22 ...
Page 102: ......
Page 103: ...MK 22 J LUX ...
Page 104: ......
Page 105: ......
Page 106: ......
Page 107: ......
Page 108: ......
Page 109: ......
Page 110: ......
Page 111: ......
Page 113: ...3 3 ...
Page 114: ...50 200 Max 250 100 150 50 200 Max 250 100 150 4 5 6 5 6 ...
Page 115: ......
Page 121: ...17 ...
Page 122: ...18 ...
Page 123: ...19 ...
Page 124: ...20 ...
Page 125: ...21 ...
Page 126: ...22 22 J LUX ...
Page 127: ...SR 22 J LUX ...
Page 128: ......
Page 129: ......
Page 130: ......
Page 134: ...1 ...
Page 136: ...Slika 3 3 ...
Page 137: ...50 200 Max 250 100 150 50 200 Max 250 100 150 Slika 4 Slika 5 Slika 6 Slika 4 Slika 5 ...
Page 138: ...1ϭ 4 KORIŠÆENJE PROIZVODA Funkcije rerne ...
Page 146: ...19 ...
Page 147: ...20 ...
Page 148: ...Slika 7 21 ...
Page 149: ...22 ...
Page 150: ...23 ...
Page 151: ...24 ...
Page 152: ...52209666 ...


