background image

10

10

Revision date: 02.17.23

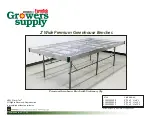
INSTALL LONG BENCH TOP SUPPORT TUBES

Assembly Instructions

4

1.  Set one long 1.25" x 1.25" square tube on the 

crossbars tight against the brackets. 


NOTE:

 See diagrams in the Quick Start 

section near the back of this guide for pipe 

identification for your bench.

4.  Take a 112431 angle clip and place it in 

position against the crossbar and under the 

support. 

2.  Verify that the pipe extends an equal length 

beyond crossbar at each end of the frame. 


ATTENTION:

 Actual dimension depends on 

the length of the bench. Measure distances 

and length and adjust as needed.

5.  Use a piece of tape (not included) to hold the 

clip in place. 

To prevent injury, do not hold 

with fingers when installing the Tek screw.

3.  Clamp the tube to the crossbar. Verify that tube 

is tight against the crossbar brackets.

6.  Take a Tek screw and secure the clip to the 

crossbar. Remove the tape.

Actual length may differ. 

Measure and adjust as needed.

•  (2) 1.25" x 1.25" square tubes (See Quick Start section for ID.)
•  112431 aluminum angle clips (Bench length determines quantity.)

Summary of Contents for Growers supply 112412S2X08

Page 1: ...duction is prohibited without permission 2 Wide Premium Greenhouse Benches Premium Greenhouse Bench with Stationary Top STK DIMENSIONS 112412S2X08 2 W x 3 H x 8 L 112412S2X10 2 W x 3 H x 10 L 112412S2...

Page 2: ...e members If the bench is disassembled and moved inspect all parts and connections before reassembling and use For replacement parts call 800 245 9881 for assistance Important Information SAFETY PRECA...

Page 3: ...different parts of your bench Some parts may not be shown FA4482B Tek Screw 108553 Wafer Head Screw FAG102B 1 4 x 3 4 Bolt FALB10B 1 4 Nut 102921B Neo Bonded Washer QH1070 Pipe Strap 112391 112815 Pol...

Page 4: ...ssembly 2 S125P03175 square tube for legs 1 S125P018 square tube crossbar 4 112391 four bolt clamps 8 FAG102B 1 4 x 3 4 hex bolts 8 FALB10B 1 4 nuts 12 FA4482B Tek screws 1 Gather the parts 2 Construc...

Page 5: ...wo 2 more Tek screws 8 Install one FA4482B Tek screw in center 11 Flip assembly over and repeat Steps 8 10 to secure remaining tube to brackets 12 Repeat steps to install remaining bracket 13 Assemble...

Page 6: ...the pipe strap at the mark Position the strap on the inside of the leg pipe See photo in Step 4 for location 5 Secure pipe strap to the leg tube Do not overtighten Doing so will strip threads 3 Mark...

Page 7: ...for each of the pipe clamps Do not overtighten Screws should be snug Position pipes flush with the outer edge of each QH1070 pipe strap 5 Move to the opposite end and slide one band clamp onto each ro...

Page 8: ...Mark the mounting hole position on the inside of the vertical frame leg 8 Check that six 6 band clamps are in position on the horizontal pipes eight 8 for the 12 long bench See circled clamps above 11...

Page 9: ...for remaining mid support s 14 Using a level verify that the support leg is plumb vertical Adjust support assembly and strut as needed and tighten band clamp bolt 18 Move to the final end support asse...

Page 10: ...gth beyond crossbar at each end of the frame ATTENTION Actual dimension depends on the length of the bench Measure distances and length and adjust as needed 5 Use a piece of tape not included to hold...

Page 11: ...each square tube is secured to each crossbar of the frame 9 Next move to the mid support assembly and install a clip at that location The 12 long frame has two mid supports 11 Install one 112675 end...

Page 12: ...end rails and two bench top support tubes 4 Position the end rails and marked side rails as shown 2 Carefully press one support tube into each of the end rails and center the tube in the end rail 5 Ta...

Page 13: ...ner Verify that the rails are aligned as shown Repeat at each corner 11 Check the support tubes for square and verify that each is aligned with the on center marks on each side rail Do not install Tek...

Page 14: ...o allow the top to drop into position Do not force the top into place or pound on the expaned metal 15 Measure to find the center of each end rail and mark the location NOTE Use a block of wood or sma...

Page 15: ...8 Move bench top and frame to the place where final assembly can occur FA4482B Tek Screw 102921B Neo Bonded Washer 5 Assembly Instructions 19 With assistance carefully lift the assembled bench top and...

Page 16: ...corners of the bench top to secure top to the support tubes See next photo for location of clips 2 Move to a bench top support closest to the bench legs near one end and attach a 112431 clip to the o...

Page 17: ...8 Premium Bench Stationary Top 112412S2X08 2 x 10 Premium Bench Stationary Top 112412S2X10 2 x 12 Premium Bench Stationary Top 112412S2X12 WARNING Evenly distribute weight when using bench Never stand...

Page 18: ...h top parts B FA4482B Tek Screw QH1070 Pipe Strap A FAG102B Bolt FALB10B Nut 112391 Bolt Clamp S125P096G14 Diagram above shows the 112431 clip connection Actual frame may include additional square pip...

Page 19: ...L096375 Side Rail 112399L024375 End Rail Expanded Metal Top S125P024 Tube 112815 Poly Bench Corner 108553 Waferhead Screw S125P024 Support Tube FA4482B Tek Screw and 102921B Neo Bonded Washer S125P024...

Page 20: ...e 112675 finishing plugs before you secure the bench top to the main frame Secure the bench top to the support tubes of the main frame using Tek screws and 112431 angle clips See Procedure 6 Install o...

Page 21: ...21 Revision date 02 17 23 PAGE RESERVED FOR CUSTOMER NOTES AND RECORDS...

Page 22: ...ch top parts 131P096 112391 Bolt Clamp A B QH1070 Pipe Strap S125P03175 B FA4482B Tek Screw QH1070 Pipe Strap A FAG102B Bolt FALB10B Nut 112391 Bolt Clamp S125P120G14 Diagram above shows the 112431 cl...

Page 23: ...99L024375 End Rail S125P024 Tube S125P024 Tube S125P024 Tube 112815 Poly Bench Corner 108553 Waferhead Screw FA4482B Tek Screw and 102921B Neo Bonded Washer S125P024 Support Tube 2 x 10 Bench Top 1124...

Page 24: ...e 112675 finishing plugs before you secure the bench top to the main frame Secure the bench top to the support tubes of the main frame using Tek screws and 112431 angle clips See Procedure 6 Install o...

Page 25: ...25 Revision date 02 17 23 PAGE RESERVED FOR CUSTOMER NOTES AND RECORDS...

Page 26: ...ench top parts 131P120G17 S125P144 S125P03175 112391 Bolt Clamp A B QH1070 Pipe Strap B FA4482B Tek Screw QH1070 Pipe Strap A FAG102B Bolt FALB10B Nut 112391 Bolt Clamp S125P144 Diagram above shows th...

Page 27: ...99L024375 End Rail S125P024 Tube S125P024 Tube S125P024 Tube 112815 Poly Bench Corner 108553 Waferhead Screw FA4482B Tek Screw and 102921B Neo Bonded Washer S125P024 Support Tube 2 x 12 Bench Top 1124...

Page 28: ...TTENTION Install the 112675 finishing plugs before you secure the bench top to the main frame Secure the bench top to the support tubes of the main frame using Tek screws and 112431 angle clips See Pr...

Page 29: ...29 Revision date 02 17 23 PAGE RESERVED FOR CUSTOMER NOTES AND RECORDS...

Reviews: