background image

1

Revision date: 09.21.18

©2018 FarmTek

®

All Rights Reserved. Reproduction 

is prohibited without permission.

*Actual system may differ slightly from what is shown.

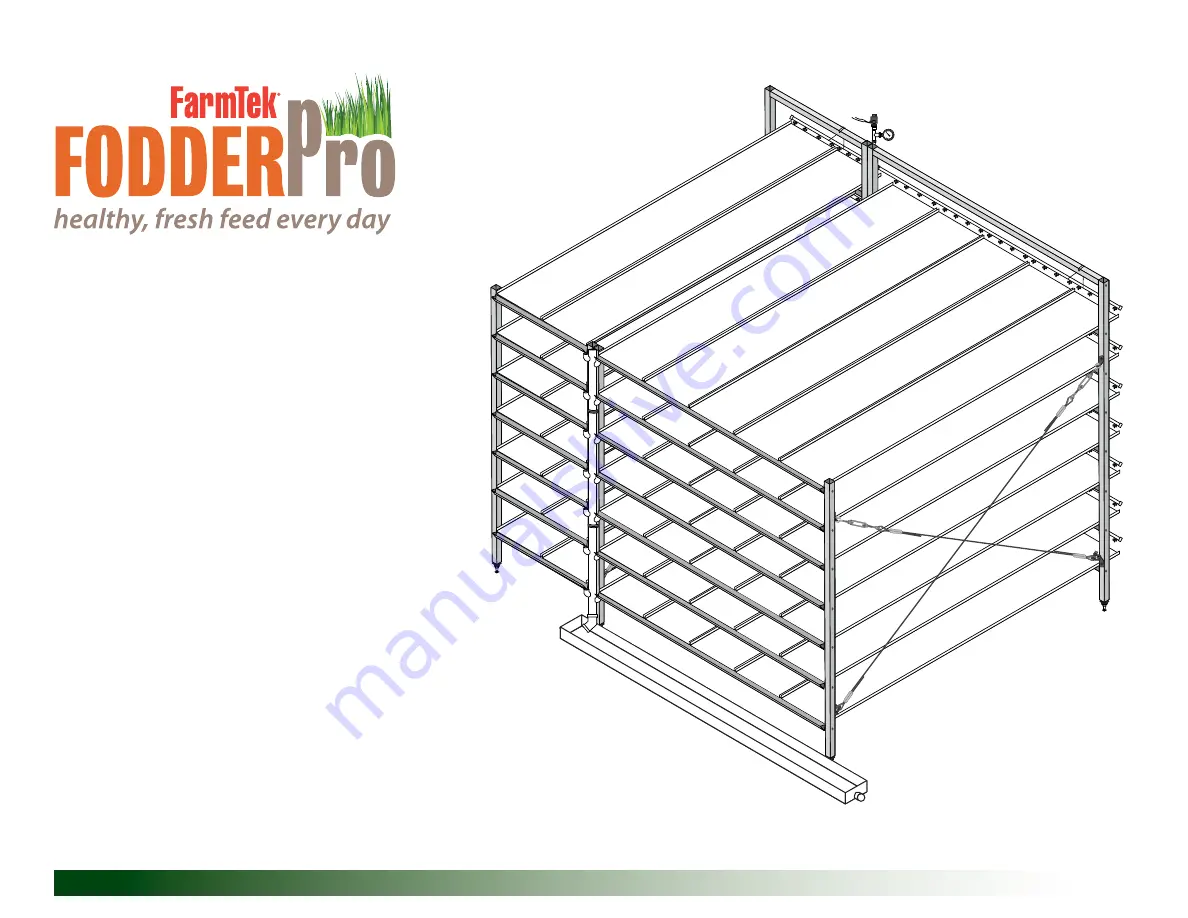
FodderPro 3.0 Commercial 

Feed Systems–113542

"...grow your own nutrient-rich fodder..."

psi

0

40

20

60

80

10

0

Summary of Contents for FodderPro 3.0

Page 1: ...8 FarmTek All Rights Reserved Reproduction is prohibited without permission Actual system may differ slightly from what is shown FodderPro 3 0 Commercial Feed Systems 113542 grow your own nutrient rich fodder psi 0 40 20 60 80 100 ...

Page 2: ...und or on the frame with electric power tools Use cordless battery power tools CONSULT THE SERVICES OF A QUALIFIED ELECTRICAL TECHNICIAN WHEN INSTALLING TIMERS ARTIFICIAL LIGHTING OR OTHER ELECTRICALLY POWERED ACCESSORIES OPEN SYSTEM The FodderPro 3 0 Commercial Feed System is an open system the water is not recycled for use in the fodder system The open system requires a water source and a drain ...

Page 3: ...1129 WF1330 108503 AS2162 WR4067 WR1095 109071 Timer 110406 110414 These extra components are included in the event that damage occurs to the supply manifolds during installation or use To install remove the original damaged part and install the new components See procedure later in this guide WF6990 PVC Cement and 113372 Purple Primer PVC PRIMER PVC CEMENT Follow all directions printed on pvc pri...

Page 4: ...ring to be completed according to established local codes by a professional plumber and electrician Components and materials needed to connect fodder system to main water supply and to connect timer to solenoid are not included Additional purchase required TIMER Set the timer to as needed to provide water to the system at desired intervals WATER PRESSURE To ensure proper operation of drippers and ...

Page 5: ... a full concrete slab is not part of the building install concrete blocks or pavers or pour small concrete slabs level with the finished grade to support the frame tubes 1 Review the diagrams to determine the overall footprint of this system and prepare the site for frame assembly See diagram 2 Begin by separating the steel frame tubes according to part number and length Each tube has a specific p...

Page 6: ...rizontal Tube Mid 112772 5 16 x 3 Flathead Bolt FAG338 5 16 x 3 Hex Cap Bolt FAME51B 5 16 Flat Washer BACK FRONT FD15CMGL02550S1 25 1 2 FD15VMGL08575S1 85 3 4 FD15LMGL06900S1 69 FD15HMGL03200S1 32 FD15HMGL03200S1 32 FD15VMGL07225S2 72 1 4 Complete these steps 1 Identify and collect the parts needed to assemble the 14 tray pod frame See diagram to the right 2 Install the levelers at the bottom of e...

Page 7: ...izontal Tube Mid 112772 5 16 x 3 Flathead Bolt FAG338 5 16 x 3 Hex Cap Bolt FAME51B 5 16 Flat Washer Complete these steps 1 Identify and collect the parts needed to assemble the 35 tray pod frame See diagram to the right 2 Install the levelers at the bottom of each vertical frame tube See Procedure 2 3 Assemble the front drain end and back supply end main frames See Procedure 2 4 Assemble the cent...

Page 8: ...in this example Except for the main frame components the assembly of any pod frame is the same Complete these steps to install each 112477 insert 1 Slide one 112477 insert into the bottom of a vertical end frame tube Tap gently with a small hammer if needed to seat in place 2 Secure using a 112838 Tek screw Install screw through frame tube and wall of the 112477 insert 3 Adjust the FAH337B bolt so...

Page 9: ...x 3 flat head bolt to attach the end frames to the center frames Large hole in frame tube should be visible during frame assembly Tighten all connections IMPORTANT After assembling the frame sections as shown in Procedures 2 4 set the frame in position and complete Procedure 5 to level and plumb the frame before assembling the next pod Do not allow the frame to stand without the cables installed a...

Page 10: ...D ASSISTANCE Complete these steps 1 Attach the top 108503 brackets to the frame approximately 1 above the top of the second level frame tube Use a Tek screw and FAME51B flat washer to secure each bracket to the center of the vertical frame tube 1 2 Take the first cable assembly fully open the turnbuckle without disassembling it and hook it to one of the installed 108503 brackets 3 Take an AS2162 s...

Page 11: ...ing so will strip the threads from the hole 7 Repeat these steps to install the remaining cable assembly for the first pod frame 8 After installing both cable assemblies evenly tighten each turnbuckle to remove cable slack If you run out of turnbuckle adjustment and slack remains loosen the turnbuckle and lower the 108503 bracket on the frame Retighten to remove slack 9 With assistance carefully a...

Page 12: ...ng to ensure that the string line is level c Measure from string to the frame tube Dimension to be 3 Adjust frame levelers if needed to achieve the 3 slope Review the diagrams on this page and complete these steps 1 Place a level along each vertical support on the cable side of the frame and tighten or loosen the cable turnbuckles as needed to plumb the corner supports Tighten turnbuckles evenly S...

Page 13: ...at all levelers are locked in place For improved stability avoid fully extending the levelers 6 Assemble and set the next pod in position and repeat this procedure Procedure 5 7 After assembling pod frames set in place leveled and plumbed install the 112770 finishing plug in the top of each vertical frame tube 8 Continue with the installation of the gutters and downspout DIAGRAM C Lock Nut STEP 3 ...

Page 14: ...drain toward the downspout when installed correctly Diagram below shows the downspout location and identifies where to install each gutter type Required parts FGS01R03125F Gutter Pod A FGS01L07925F Gutter Pod B 112838 10 x 1 Tek Screws 100442 Tek Screw Driver psi 0 40 20 60 80 100 Supply Manifold Side of Fodder System Drain Side of Fodder System Downspout A B Gutter Gutter Downspout w Drain Elbows...

Page 15: ...rays are on each pod level 5 Remove the trays and drive a 112838 Tek screw through the gutter and into the frame tube at the locations chosen in Step 4 6 Repeat this procedure to install all remaining gutters 7 Continue with the installation of the downspouts INSTALL GUTTERS continued STEP 5 STEP 4 STEP 6 STEP 3 Set trays on frame to judge where to install fasteners to secure gutter to frame Slide...

Page 16: ...wnspout Required parts 112838 10 x 1 Tek Screws 100442 Tek Screw Driver FAPA15 U Clamp FDSBRKT Downspout Bracket FDS01L069 Downspout Circles show location of the u clamps for the downspout When installed correctly downspout elbows rest on the u clamps for support See procedure on next page to install downspout FAPA15 112838 Tek Screw psi 0 40 20 60 80 100 Supply Manifold Side of Fodder System Drai...

Page 17: ...hat u clamp is snug to the underside of drain elbows as shown 3 Hold downspout Mark lower bracket location at second level from bottom 4 Place FDSBRKT bracket against frame and align bolt holes with marks 6 Using 100442 driver install a 112838 Tek screw in center hole of bracket 5 Verify that bracket position allows for installation of fasteners in each hole 7 Repeat to attach remaining FDSBRKT fl...

Page 18: ... screws Doing so can damage the u clamp 11 Repeat step to install remaining u clamp for the downspout NOTE In most instances downspout elbows seen in left photo are tight to the underside of the gutters Slight variations may occur during the manufacturing process In such cases some elbows may remain slightly below the gutter while others on the same downspout touch the gutter when downspout is ins...

Page 19: ...h the supply manifold to the frame ATTENTION During installation first attach manifold assembly to frame Position the 106807 pipe hangers as shown to ensure they do not interfere with manifold fittings Identify horizontal manifold branch tube positions and install as noted Install wire hangers between trays In no instance should a tray rest on a wire hanger The 113542 Fodder Pro 3 0 system include...

Page 20: ... so the arrow points in the direction the water flows See Procedure 11 to adjust and set the water pressure Complete this procedure to assemble the gauge and regulator portion of the supply manifold Use Diagram A to complete the assembly Wrap all threaded fittings 4 5 times with WR1095 tape before assembly Wrap threads in a direction the will not allow the tape to unwind when fittings are assemble...

Page 21: ... Regulator to Manifold Trunk Complete these steps 1 Wrap the threads of the fitting at the end of the manifold trunk with thread tape 2 Attach a gauge and regulator assembly to the manifold trunk Tighten until snug 3 Continue by attaching the assembly to the frame psi 0 40 20 60 80 100 FPT2H105 ...

Page 22: ...60 80 100 MANIFOLD To set initial height align trunk end with top of vertical frame tube when attaching trunk to frame Minor height adjustments are made during the manifold branch and wire hanger installation steps See dashed line in photo A A C B 106807 Install lower clamp C of the manifold tight to the underside of fitting to prevent manifold from sliding ...

Page 23: ... frame diagram below and those on the next pages to install branch tubes Wrap the threaded end of each manifold branch tube with thread tape before attaching it to the manifold trunk FPB2PG 2 Tray Branch FPB5PG 5 Tray Branch psi 0 40 20 60 80 100 2 Tray 5 Tray 5 Tray Pod 2 Tray Pod ASSEMBLY NOTES Wrap branch fitting threads with thread tape Tighten branch tube connection until snug Do not overtigh...

Page 24: ...ently pull down to seat hanger in place 2 Seat tube tightly in hanger Hanger hooks are outside of the drippers 4 Verify that hanger hooks are positioned outside of each dripper as shown 2 Install hangers See procedure upper right Slide manifold up or down to level branch tubes psi 0 40 20 60 80 100 1 ATTENTION During hanger installation ensure that the horizontal tubes remain level Adjust manifold...

Page 25: ... Additional materials may be needed to achieve the desired results Contact your sales representative to purchase additional channels splices and end caps if needed Complete these steps to assemble the drain channel 1 Gather the parts shown at the right 2 Using pvc primer and pvc cement assemble the on floor drain channel 3 After the cement has set move the drain channel into position under the dow...

Page 26: ...ect the main water supply to the assembled fodder system Do not turn water on until the WR1220 solenoid is set See Procedure 11 on next page 4 Enlist the services of a licensed professional electrician to connect the main power to the timer and the timer to the solenoid Consult the documentation included with the timer to properly connect it 5 Set the WR1220 solenoid valve as described in Procedur...

Page 27: ...ater turned off move to the WR1220 and turn butterfly valve clockwise until fully closed Do not overtighten Photos above identify the different parts of the WR1220 solenoid valve Butterfly Valve Pressure Control Butterfly Valve Electrical leads to energize solenoid Water Flow Arrow Bypass Lever Bypass lever set at 12 o clock 5 Turn butterfly valve counter clockwise and set the desired water pressu...

Page 28: ...ce the broken adapter is pushed into tube align replacement 110414 adapter with hole in pvc tube and gently grip with adjustable pliers as shown below in Photo 1 Assure the adapter is straight in line with the axis of hole 3 Gently squeeze pliers until adapter is seated and locked into pvc tube 4 Align tapered end of the 110406 emitter with new adapter as shown in Photo 2 and press the emitter int...

Page 29: ...ision date 09 21 18 113542 Quick Start Guide Full Frame Assembly Full Frame View psi 0 40 20 60 80 100 Outside to Outside Frame Dimension Approximately 118 Outside to Outside Frame Dimension Approximately 72 ...

Page 30: ...30 113542 Revision date 09 21 18 Supply End Back psi 0 40 20 60 80 100 Height Approximately 87 Frame only ...

Page 31: ...0 80 100 Solenoid ATTENTION Timer controls water to the entire fodder system Fodder system is designed to harvest seven 7 trays each day Example above shows harvesting seven trays vertically one tray at each level Supply End Back Manifold Watering ...

Page 32: ...42 Revision date 09 21 18 Drain End Front Outside to Outside Frame Dimension Approximately 118 Downspout ATTENTION The supply manifold and drippers are not shown in the drain end diagram On Floor Drain Channel ...

Page 33: ...33 Revision date 09 21 18 113542 Side View Frame Height Back Approximately 87 Frame Height Front Approximately 75 ...

Page 34: ... in this guide General Guidelines to Promote Optimal Growth Water Temperature 60 F minimum to 75 F maximum pH Level 6 2 6 4 range Humidity 40 to 80 Best in most cases is 60 Ideal Temperature Range 63 F to 75 F Basic Maintenance The fodder system requires regular maintenance and cleaning The duration between the maintenance and cleaning sessions however depends on how and where the system is used a...

Page 35: ...35 Revision date 09 21 18 113542 Additional Photo Full System Actual system differs from what is shown Component assembly is the same Photo is provided to show a fully assembled fodder system ...

Page 36: ...36 113542 Revision date 09 21 18 Additional Photo Full System Actual system differs from what is shown Component assembly is the same Photo is provided to show a fully assembled fodder system ...

Page 37: ...Photo Full System Photo left shows the lower end of supply manifold Photo above shows the manifold branch tubes connected to the manifold trunk Actual system may differ from what is shown Photos provided to show an example of an assembled system ...

Page 38: ...m Photo left shows downspout and installed trays Photo above shows seeded trays and gutter end of the system When properly installed curved end of each tray allows water to flow easily into gutter Photo below shows close up of gutters and downspout drain elbows ...

Page 39: ...39 Revision date 09 21 18 113542 PAGE RESERVED FOR CUSTOMER NOTES AND RECORDS ...

Reviews: