background image

23

Farmnavigator G7 Dataseed – User Manual

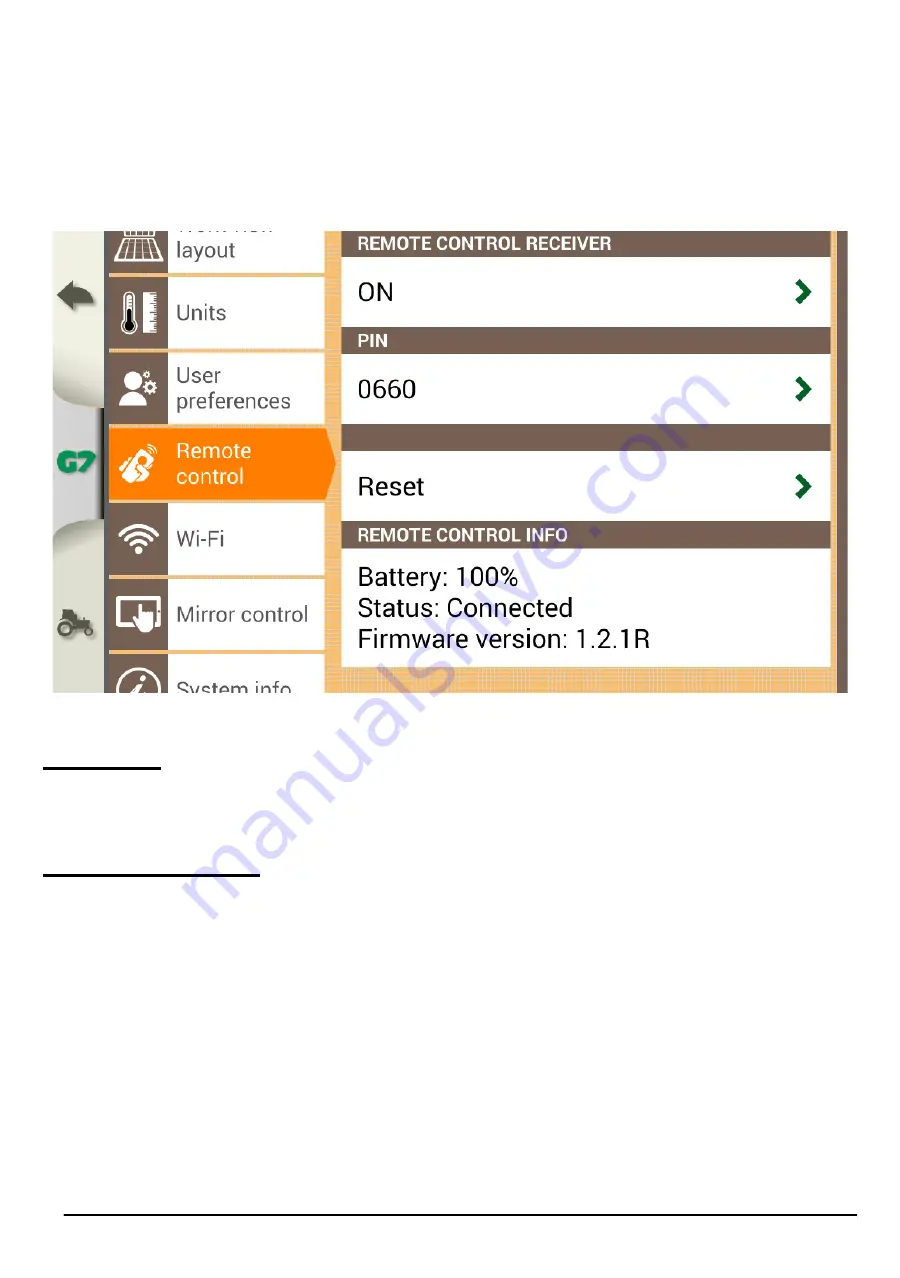
2. Select “PIN” and enter the PIN code given on the back of your remote 

control;

3. Press the middle button (navigation arrow) of your remote control, to 

connect the display to the remote control;

4. Once connected, select “REMOTE CONTROL INFO” to check 

connection status, battery status and firmware version.

Figure 2.3.6.a - Remote control pairing

2.3.7 Wi-Fi

The “Wi-Fi” menu allows you to connect G7 Dataseed to a local Wi-Fi 

network.

2.3.8 Mirror control

Install the Mirror Control app to control G7 Dataseed with your smartphone 

or tablet (Android or Apple devices). It is possible to connect G7 Dataseed 

to a smartphone or tablet via wireless network, only if they are connected 

to the same router.

To enable Mirror control:  Select “SETUP” > “Mirror control” > “ON”.

Summary of Contents for G7 Dataseed

Page 1: ...USER MANUAL Updated to 1 0 xR software version where x indicates all 1 0 software versions ...

Page 2: ... Dataseed to the implement 8 1 6 1 ECU Dataseed troubleshooting 10 2 Main menu and basic operations 12 2 1 Recording a sowing track 12 2 2 Weeding phase repeating the sowing track 15 2 3 Setup 18 2 3 1 Satellites 18 2 3 2 Guidance Options 21 2 3 3 Work view Layout 22 2 3 4 Units 22 2 3 5 User preferences 22 2 3 6 Remote control 22 2 3 7 Wi Fi 23 2 3 8 Mirror control 23 2 3 9 System info 24 2 4 Dat...

Page 3: ...w the installation instructions provided inside the box AvMap disclaims any liability deriving from an improper use or installation of the product in a way that may violate the regulations and safety It is highly recommended that the installation of the product will be performed by a qualified maintenance technician Consult the Installation manual for a correct installation procedure Figure 1 2 a ...

Page 4: ... G7 Dataseed The All in One RTK receiver is equipped with a cable with a 9 pin serial connector that transfers data and power between the G7 Dataseed and the receiver With the device off connect the receiver cable to the harness connector labeled GPS 1 3 2 Receiver position orientation The receiver includes a tilt sensor to measure every slight inclination of the tool for this reason it is essenti...

Page 5: ... planter The receiver must be positioned exactly in the center of the tool Figure 1 3 3 a Receiver positioned in the center of the implement Figure 1 3 3 b Receiver installation in the center of the planter 1 3 3 2 Weeder installation Example of installation on a weeder The receiver must be positioned exactly in the center of the tool Figure 1 3 3 c Receiver positioned in the center of the weeder ...

Page 6: ...urbing elements metal covers plastic items etc Furthermore it is very important at the end of installation to place the implement on a well leveled surface and measure the height from the ground to the colored edge of the receiver itself The measurement must be entered in the receiver configurations on the G7 Dataseed To configure the receiver at the end of the installation read paragraph 2 3 1 Fi...

Page 7: ...ear on the screen Please read it carefully and press OK to accept and continue and open the main menu To turn the display off 1 Press and hold the power button for 2 to 3 seconds 2 Press YES to turn the device off It is possible to reset G7 Dataseed if the device cannot be normally turned on off The reset button is located at the left of the power button below the plastic cover Figure 1 4 b Locati...

Page 8: ...ugh the pages Slide the fingers closer together or further apart to zoom in or zoom out the field Touch the screen with two fingers simultaneously to rotate the field Table 1 5 a Touch screen gestures and movements 1 6 How to connect ECU Dataseed to the implement The Dataseed system includes ECU Dataseed the control unit for the weeding tool ECU Dataseed is compatible with tools with the following...

Page 9: ...TROLLER RIGHT LEFT Electro valve left movement Electro valve right movement Battery Battery PWR The connection scheme of ECU Dataseed is as follows Figure 1 6 a ECU Dataseed connection scheme Figure 1 6 b Example of connection of solenoid valve ...

Page 10: ... and to the right and check that the wiring is not an obstacle during handling ATTENTION always check the tool handling area 1 6 1 ECU Dataseed troubleshooting Any communication connection errors are shown both on the display and through a LED positioned in the center of ECU Dataseed Here are the errors and possible solutions Error Error detail Solution Display ECU Error There is no communication ...

Page 11: ...GHT buttons Open and repeat a saved track to switch to automatic control mode ECU Dataseed Steady Blue LED light No movement both in manual mode and in automatic mode The working speed must be greater than 0 km h Check the connection of RIGHT and LEFT Check the correct hydraulic supply Check the correct functioning of the hydraulic part Table 1 6 1 a ECU Dataseed troubleshooting ...

Page 12: ...h precision all the information relative to the sowing tracks recorded Correct data entry before starting recording will be very useful during the weeding phase when repeating the saved track Before starting the registration phase make sure you have connected and configured the system as described in the previous chapter To record a track 1 Tap RECORD NEW TRACK 2 Under Track name enter the name of...

Page 13: ...g tap RECORDING Figure 2 1 a Track data entry The work page track registration allows you To record pause and stop recording using the buttons on the left side of the screen To manually move any tool connected to the ECU Dataseed by tapping the right and left arrow buttons on the right side of the screen While recording a track it is not possible to switch to Automatic mode the button becomes acti...

Page 14: ...hile recording the record button is flashing red At the bottom of the screen the recorded points the speed and the distance traveled are displayed During the recording it is possible to pause the recording of the points by tapping the PAUSE button Figure 2 1 c End track registration ...

Page 15: ...bility to repeat with extreme precision a previously recorded track and automatically control a weeder equipped with a shifting frame Before repeating the track it is suggested to double check The correct installation of the receiver The correct installation of the ECU Dataseed To repeat a track 1 Tap on REPEAT TRACK in the main menu 2 Select the track from the list 3 Tap track name to select it F...

Page 16: ... recorded track In the work page repeating track mode the saved track is shown in black while the RECORDING button is disabled Figure 2 2 c Track to be repeated in automatic mode To start automatic weeding control Position the weeding implement near the track to follow ...

Page 17: ... to press the Manual button to switch to Automatic mode Figure 2 2 d Automatic repeatig track mode during weeding ATTENTION the equipment will begin to move automatically always pay attention to the area surrounding the equipment On the right side of the work page there some icons for interacting with the shifting frame control system In detail AUTO In this mode the translator moves in automatic m...

Page 18: ...nbetweenG7DataseedandECU Dataseed Check the power supply and the connection on the Controller connector Table 2 2 f Work page icons repeating track mode 2 3 Setup The SETUP menu includes all the settings for the operation of the software and external devices in particular the GNSS receiver 2 3 1 Satellites One of the most important settings is the GNSS receiver configuration in the Satellites menu...

Page 19: ...d is compatible with the All in One RTK receiver The fundamental configurations for the correct use of the system are the following Figure 2 3 1 b Satellites Satellite fundamental configurations Antenna position Figure 2 3 1 c Antenna position settings ...

Page 20: ... of the receiver from the ground measured during installation in Offset 2 Terrain compensation Figure 2 3 1 d Set ground compensation zero level 1 After entering the height from the ground it is important to activate the ground compensation by tapping on TERRAIN COMPENSATION 2 Here you can view the inclination of the implement on which the receiver is installed and at the same time calibrate the s...

Page 21: ... 3 1 e Set zero level NTRIP client Finally to work with centimeter accuracy the NTRIP settings must be correctly configured In the menu make sure that the NTRIP CLIENT EXTERNAL is set as Connected 2 3 2 Guidance Options Figure 2 3 2 a Guidance options ...

Page 22: ...iew layout menu it is possible to change the background of the work page 2 3 4 Units In the Units menu it is possible to change the units of measurement of area speed distance and range 2 3 5 User preferences In the User preferences menu you can adjust the display brightness language and other localization preferences Figure 2 3 5 a User preferences menu 2 3 6 Remote control In the Remote control ...

Page 23: ...tion status battery status and firmware version Figure 2 3 6 a Remote control pairing 2 3 7 Wi Fi The Wi Fi menu allows you to connect G7 Dataseed to a local Wi Fi network 2 3 8 Mirror control Install the Mirror Control app to control G7 Dataseed with your smartphone or tablet Android or Apple devices It is possible to connect G7 Dataseed to a smartphone or tablet via wireless network only if they...

Page 24: ...em info In the System info menu it is possible to view the current software version If the wireless connection is active you can search for updates by tapping the Check for updates button Figure 2 3 9 a System info 2 4 Database Figure 2 4 Database Menu ...

Page 25: ...tion relating to tracks fields farmers and drivers 2 4 1 Tracks Figure 2 4 1 a Track data All recorded tracks are saved in the TRACKS menu Tap on the name of the track to access all its information DATA tab Tap on the PREVIEW tab to view the track Figure 2 4 1 b Track preview ...

Page 26: ... Tap on the EXPORT key to export the track in three different formats CSV KMZ SHP The file is saved on the MicroSD memory card or on USB memory if connected to the device Figure 2 4 1 c Track export in various formats 2 4 2 Fields Figure 2 4 2 a Fields database ...

Page 27: ...taseed User Manual In the FIELDS menu it is possible to add a new field to rename it or delete it 2 4 3 Farmers In the FARMERS menu it is possible to add a new customer to rename or delete it Figure 2 4 3 a Farmers database ...

Page 28: ...28 Farmnavigator G7 Dataseed User Manual 2 4 4 Drivers In the DRIVERS menu it is possible to add a new driver to rename or delete him Figure 2 4 4 a Drivers database ...

Page 29: ... wait for the connection 3 If there are new updates they will be downloaded Follow the instructions on the monitor to proceed with the update 4 When restarting press the UPDATE NOW button and wait for the procedure to end Figure 3 1 a Software update screen 3 2 GNSS Receiver update The All in One RTK receiver includes automatic update technology Firmware Over the Air FOTA No user operations are re...

Page 30: ...camera is correctly connected to G7 Dataseed the video camera icon will be automatically activated in the work page Tap the camera button on the work page to switch to video mode Video camera available The video camera is recognized and connected Video camera not available The video camera is not connected or not compatible Table 3 3 b Video camera button 3 4 Connection to external activation devi...

Page 31: ...on with reference voltage Pin3 normally open ATTENTION Do not connect any device that supplies power to pin2 and pin3 It is recommended to always use protective devices The voltage from pin2 is for signal use only Oncethedeviceisconnected whenthecontactisclosed theG7Dataseed activates the recording of the track Conversely when the contact is open the recording is paused ...

Page 32: ...irst level assistance regarding User manual Warranty Replacements Malfunctions Repairs Updates Telephone 39 0585 784044 Mail support avmap it To get second level assistance regarding RTK Receiver settings ECU Dataseed settings Telephone 39 334 6033178 Mail support farm avmap it ...

Page 33: ...MAG7DFMDE011 ÑMAG7DFMDE011 UÓ ...

Reviews: