


FARMI 260
23
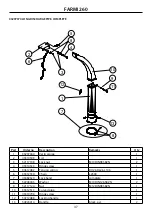
1
2
2
3
Fig 15. Turning the upper chamber
REMOVING THE KNIVES FROM THE KNIFE BRACKETS
1. Remove the knife lock nuts (M12). Fig. 16.
2. Remove the knife fastening bolts (M12). Turn the
wrench in such a way that your hands would not
hit the knife if the wrench should slip. Fig. 17.
Wear protective gloves when
handling knives or anvils.
Lock bolt
Fig 16. Locking the disk and removing the lock nuts
Fig 17. Removing the knife fastening bolts
KNIFE AND ANVIL MAINTENANCE
Read the safety instructions.
The disk continues rotating like
a flywheel after the PTO is disen-
gaged.
Please wait until the disk has
stopped completely before per-
forming any further actions.
When manually turning the ro-
tor, never touch the edges of the
lower chamber or other parts
where there is the risk for the
hands to get squeezed between
the lower chamber and the rotor
knives or blades.
OPENING AND REMOVING THE UPPER CHAMBER
•
Remove the lock bolt (M6) (1).
•
Loosen the hinge bushing nuts (M20) (2) slightly.
•
Pull the hinge pin (3) out.
•
Turn the upper chamber to the side.
•
Lock the disk with the lock bolt.See Fig. 16.
•
Remove the feeder or turn it to the side.
Exercise extreme caution when
opening the upper chamber.
Take appropriate measures to
keep the upper chamber from
falling down.
!
DANGER!
WARNING!
!
WARNING!
!
WARNING!
!


