Storage - Section D
Sprayer Winterization
Proper winterization is an important step in extending the life of your sprayer investment and
preparing it for operation next season. The following steps are a guideline to assist in the
winterization of your sprayer.
1. Essential to optimum winterization is to thoroughly clean and rinse the interior of the tank
and flush out the plumbing. This process can be completed with the aid of a tank-cleaning
compound available from most farm and spray equipment centers. Fill with an adequate
amount of cleaning solution to allow for circulation through the rinse balls while maintaining
the solution level above the bulkhead fitting in the sump of the tank. This cleaning will remove
any residual chemical left in the system.
2. The success of the winterization process is dependent upon the amount of water removed
from the system. Excessive water left in the system will dilute the antifreeze solution and
reduce its effectiveness.
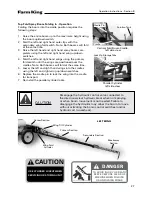
a. Open all valves to the rinse ball, agitation and the booms.
b. Drain out any remaining solution from the main tank.
c. Drain out any remaining water from the clean water rinse tank.
d. Remove in-line strainer bowls and dump out water; reinstall the strainers.
e. Remove the plug from the bottom of the pump, drain and reinstall the plug.
f. Raise the booms and at the bottom end of the plumbing of each boom section,
remove a diaphragm check valve to drain the boom. Replace the diaphragm check
valve.
3. Begin the process of protecting the plumbing with the addition of RV antifreeze.
a. Close all of the valves in the system, including the solution tank valve located between
the tank and the pump.
b. Add a minimum of 10 gallons of RV antifreeze to the rinse tank.
c. Open the rinse tank valve to let the antifreeze solution flow from the rinse tank to the
pump. Make sure that the pump is charged with solution. The line out of the top of the
pump should fill with antifreeze.
d. Start the solution pump. A minimum of 20 - 30 pounds of pressure is required to
adequately circulate the antifreeze through the system.
CAUTION
During the winterization process, maintain a minimum
amount of solution in the plumbing system. Running the
pump dry may cause severe damage to the pump seals.
DANGER
All chemical contaminated rinse material must be
collected and disposed of according to product label
instructions and in accordance with all local, provincial/
state and federal laws.
41
Summary of Contents for 1600
Page 1: ...Operator and Parts Manual 1600 High Clearance Sprayer 04 2010 SXL 26030 ...
Page 5: ...Safety Instruction Section A 5 ...
Page 11: ...Safety Decal Placement Safety Instructions Section A 11 ...
Page 12: ...Notes Safety Instructions Section A 12 ...
Page 13: ...Operation Instructions Section B 13 ...
Page 29: ...Connection Startup Section C 29 ...
Page 38: ...Connection Startup Section C Notes 38 ...
Page 39: ...Storage Section D 39 ...
Page 43: ...Maintenance Service Troubleshooting Section E 43 ...
Page 50: ...Maintenance Service Troubleshooting Section E Notes 50 ...
Page 51: ...Parts Schematics Section F 51 ...
Page 52: ...19 Description Decal Placement Parts Schematics Section F 52 ...
Page 54: ...Description Trailer Sprayer Light Kit Assembly Parts Schematics Section F 54 ...
Page 56: ...Description Frame Assembly Parts Schematics Section F 56 ...
Page 58: ...Description Drawbar Assembly Parts Schematics Section F 58 ...
Page 60: ...Description 10 Bolt Adjustable Axle Assembly Parts Schematics Section F 60 ...
Page 62: ...Description Cradle Assembly Parts Schematics Section F 62 ...
Page 64: ...Description Tank Spreader and Sight Gauge Parts Schematics Section F 64 ...
Page 66: ...Parts Schematics Section F Description Fold Over the Top Boom Center Section Assembly 66 ...
Page 68: ...Description Fold Boom Primary Section Assembly Parts Schematics Section F 68 ...
Page 70: ...Description Fold Boom Secondary Breakaway Assembly Parts Schematics Section F 70 ...
Page 72: ...Parts Schematics Section F Notes 72 ...
Page 74: ...Description Sprayer Hydraulic Routing Parts Schematics Section F 74 ...
Page 76: ...Description Fold Over The Top Boom Hydraulic Valve Breakdown Parts Schematics Section F 76 ...
Page 79: ...Parts Schematics Section F Notes 79 ...
Page 82: ...Description Spray Boom Cylinder Assembly Parts Schematics Section F 82 ...
Page 84: ...Description Boom Rephasing Cylinder Assembly Parts Schematics Section F 84 ...
Page 86: ...Description Pump Plumbing Parts Schematics Section F 86 ...
Page 88: ...Parts Schematics Section F Description Tank Plumbing 88 ...
Page 90: ...Description Raven Control Plumbing Parts Schematics Section F 90 ...
Page 93: ...Parts Schematics Section F Notes 93 ...
Page 94: ...Description Valve Mounting 94 Parts Schematics Section F ...
Page 96: ...Description Fold Over the Top Boom Plumbing Kit Parts Schematics Section F 96 ...
Page 98: ...Description Manual Fence Row Plumbing Parts Schematics Section F 98 ...
Page 100: ...Description Eductor Assembly Parts Schematics Section F 100 ...
Page 103: ...Warranty Section G 103 ...

