background image

FANAWAY NEXUS    Installation Instructions 


12  | 

P a g e  


Do not soak or immerse your ceiling fan in the water or other liquids. It could damage the motor or the 

blades and create the possibility of an electrical shock. 


Ensure that the fan does not come in contact with any organic solvents or cleaners. 


To clean the fan blade, wipe with only a damp clean cloth with NO organic solvents or cleaners. 


The motor has a permanently lubricated ball bearing so there is no need to oil. 


SAFETY PRECAUTIONS FOR BATTERY 

-


WARNING – 

Keep new and used batteries away from children. 

-


CAUTION 

 Do not ingest battery

—Chemical burn hazard. 

-

  Always use 

2 x AAA battery type with this ceiling fan remote controller. 

-


Ensure the batteries are inserted with the correct polarity. 

-

  To prevent false operation during battery insertion or replacement, this ceiling fan must be disconnected 

from the supply mains. 

-


Remove batteries from the product when not in use for long periods of time. 

-

  Batteries must be removed from the remote transmitter before it is discarded. 

-


Dispose of exhausted batteries immediately and safely (so they cannot be retrieved by children). Batteries 
can still be dangerous. Contact your local council to safely dispose of the battery. 

-


Regularly  check  the  product  and  make  sure  the  battery  box  lid  is  correctly  secured.  If  the  battery 

compartment does not close securely, stop using the product and keep it away from children. 

-

  If you think batteries might have been swallowed or placed inside any part of the body, seek immediate 

medical attention. 

If you suspect your child has swallowed or inserted a button battery, immediately call 

the 24-hour Poisons Information Centre on 

13 11 26

 for fast, expert advice. 

-


Battery  Leaks:  Battery  contains  chemicals  and  sh  ould  be  treated  as  any  chemical  would.  Take 
precautions when handling leaked battery chemicals. Battery chemicals should not be placed near the 
eyes or ingested. Contact Poisons Information Centre on 

13 11 26

 for fast, expert advice. 


TECHNICAL INFORMATION 

Fan   

36’’ FANAWAY NEXUS DC fan 

Fan Models 

SKU# 216114 

SKU# 216115 

Rated Voltage 

220-240V~ 50Hz 

Rated Wattage (Motor) 

23W 

Rated wattage (Lamp) 

LED 22W

,

1900lm,    2700K/3000K/4000K/5000K


Battery for remote   

2 x AAA (Included) 

Weight 

6.0kg 

Canopy Dimensions 

H:54mm    Dia:140mm 


Summary of Contents for NEXUS

Page 1: ...V1 0 AU 07 2022 FANAWAY NEXUS DC CEILING FAN INSTALLATION OPERATION MAINTENANCE WARRANTY INFORMATION CAUTION READ INSTRUCTIONS CAREFULLY FOR SAFE INSTALLATION AND FAN OPERATION...

Page 2: ...lar AC ceiling fans usually come with only 3 speeds this DC fan comes complete with a 6 speed remote which gives a greater choice of comfort levels SAFETY PRECAUTIONS 1 The appliance is not intended f...

Page 3: ...be mounted so that the blades are at least 2 1m above the floor 7 This fan is suitable for indoor use only Mounting the fan in a location where it is subject to water or moisture is dangerous and may...

Page 4: ...n has been damaged during transport Do not operate install any product which appears damaged in any way Return the complete product to the place of purchase for inspection repair or replacement Examin...

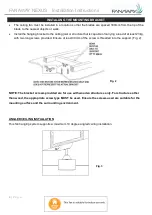
Page 5: ...of carrying a load of at least 23kg with two long screws provided Ensure at least 30mm of the screw is threaded into the support Fig 2 NOTE The bracket screws provided are for use with wooden structu...

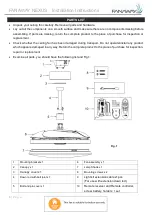
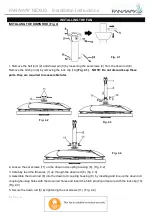
Page 6: ...they are required to reassemble later 2 Loosen the set screws 11 on the down rod coupling housing 8 Fig 4 2 3 Carefully feed the fan wires 1 up through the down rod 6 fig 4 3 4 Assemble the down rod...

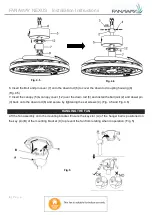
Page 7: ...ver the down rod 6 and install the ball joint 2 and dowel pin 3 back onto the down rod 6 and secure by tightening the set screws 4 Fig 4 5 and Fig 4 6 HANGING THE FAN Lift the fan assembly onto the mo...

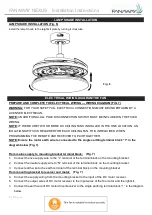
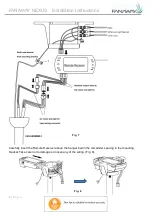
Page 8: ...EIVER TO PAIR TOGETHER NOTE Ensure the motor earth wire is connected to the single earthing terminal block 1 in the diagram below Fig 7 From mains supply to mounting bracket terminal block Fig 7 1 Con...

Page 9: ...Installation Instructions 8 P a g e Carefully insert the Remote Receiver above the hanger ball in the remainder spacing in the mounting bracket Take care not to damage or loosen any of the wiring Fig...

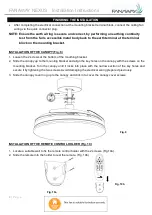
Page 10: ...e 2 screws at the bottom of the mouthing bracket 2 Slide the canopy up to the mounting bracket and align the key holes on the canopy with the screws on the mounting bracket Turn the canopy until it lo...

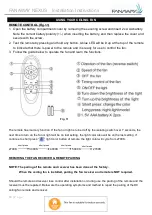
Page 11: ...n or light is turned off by the isolating switch over 7 seconds the next time to turn on the fan or light will be on last setting the light color also will be on the last setting if continue to short...

Page 12: ...of a few centimetres is quite acceptable and DOES NOT suggest any problem TO REDUCE THE FAN WOBBLE Please check that all screws which fix the mounting bracket and down rod are secure NOISE When it is...

Page 13: ...ed Dispose of exhausted batteries immediately and safely so they cannot be retrieved by children Batteries can still be dangerous Contact your local council to safely dispose of the battery Regularly...

Page 14: ...ng or maintenance using inappropriate cleaning products E Defects caused by normal wear and tear accident negligence alteration or misuse F A product dismantled repaired or serviced by any serviceman...

Page 15: ...e entitled to a replacement or refund for a major failure and compensation for any other reasonably foreseeable loss or damage You are also entitled to have the goods repaired or replaced if the goods...

Reviews: