FANAWAY NEXUS Installation Instructions
10 |
P a g e
USING YOUR CEILING FAN
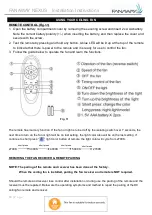
REMOTE CONTROL (Fig.11)
1.
Open the battery compartment cover by removing the securing screw and insert 2 x AAA battery.
Note the correct battery polarity (+/-) when inserting the battery, and then replace the cover and
secure with the screw.
2.
Test the remote by pressing and hold any button. A blue LED will be lit up at the top of the remote
to indicate that there is power to the remote and it is ready for use to control the fan.
3.
Follow the guide below to operate the fan and learn the functions.
The remote has memory function. If the fan or light is turned off by the isolating switch over 7 seconds, the
next time to turn on the fan or light will be on last setting, the light color also will be on the last setting, if
continue to short press “ ” light color button of remote, the light color will cycle from 2700K.
2700K 3000K 4000K 5000K 2700K
REPAIRING THE FAN RECEIVER & REMOTE PAIRING
NOTE: The pairing of the remote and receiver has been done at the factory.
When the ceiling fan is installed, pairing the fan receiver and remote is NOT required.
Should the remote and receiver lose control after installation or during use, the pairing of the remote and the
receiver must be repaired. Below are the operating symptoms and method to repair the pairing of the DC
ceiling fan remote and receiver.
Fig. 11
short press
short press
short press
short press


