a)
Two times the maximum arrest force permitted when certification exists, or
b)
5,000 lbs., (22.2 kN) in the absence of certification.
An FBH must be worn when this equipment is used as a component of a PFAS. As required by OSHA, the personal fall arrest system must be able to arrest
the user’s fall with a maximum arresting force of 1,800 lbs., and in this application limit free fall to 12 feet or less.
If the maximum free fall distance must be exceeded, the employer must document, based on test data, that the maximum arresting force will not be
exceeded, and the personal fall arrest system will function properly.
3.5.1
Restraint System:
An anchorage selected for restraint must be able to support a static load applied in the direction permitted by the system of at least:
a)
Two times the foreseeable force when certification exists, or
b)
1,000 lbs. (4.4 kN) in the absence of certification.
An FBH must be worn when this equipment is used as a component of a restraint system. As required by OSHA, the restraint system must prevent the user
from reaching a fall hazard area. Free fall is not permitted.
3.6 Definitions:
The following are definitions of terms.
Authorized Person:
A person assigned by the employer to perform duties at a location where the person will be exposed to a fall hazard (otherwise
referred to as “user” for the purpose of these instructions).
Certified Anchorage:
An anchorage for fall arrest, positioning, restraint, or rescue systems that a qualified person certifies to be capable of supporting the
potential fall forces that could be encountered during a fall or that meet the criteria for a certified anchorage prescribed in this standard.
Competent Person:
One who is capable of identifying existing and predictable hazards in the surroundings or working conditions which are unsanitary,
hazardous, or dangerous to employees, and who has authorization to take prompt corrective measures to eliminate them.
Qualified Person:
A person with a recognized degree or professional certificate and with extensive knowledge, training, and experience in the fall
protection and rescue field who is capable of designing, analyzing, evaluating and specifying fall protection and rescue systems to the extent required by
this standard.
Rescuer:
Person or persons other than the rescue subject acting to perform an assisted rescue by operation of a rescue system.
4.
INSTALLATION AND OPERATION
Installation and operation of fall protection anchorages must be under the supervision of a competent person trained in their design and use.
NOTE:
Approved fall protection may be required during installation of all anchorage units discussed in this manual.
DO NOT
use any anchorage discussed in this manual until the system has been completely installed, inspected, and approved for use by a competent
person.
Plan the installation carefully. Consider conditions and circumstances that could affect user safety. Inspect the anchor before each use according to the
inspection procedure detailed in Section 7 of this manual.
4.1
Fall Clearance Calculation:
When working at heights and using a PFAS ensure there is enough distance between the walking/working level and the next
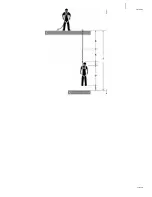
lower level or obstruction to provide sufficient distance for the PFAS to function in case of a fall event. The Fall Clearance Distance can be calculated in
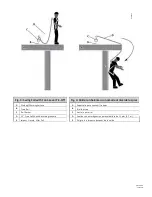
many different ways depending on equipment. Attaching to a foot-level anchor increases fall clearance requirements. Figure 3 of this manual is specific to
the application discussed in this manual and details how to determine the minimum fall clearance from a foot level anchorage. In addition, consult the
user instruction manual provided by the manufacturer of the fall protection system in use.
4.2
Swing Fall:
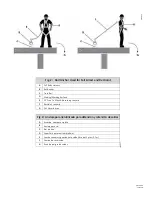
Application and use of the anchor discussed in this manual will require a foot-level tie off, as shown in Figure 4. Swing falls from a foot-
level tie off are especially hazardous and the force of striking an object or the next lower level may cause serious injury or death. Work as close to the
anchor as possible.
4.3
Installation Requirements:
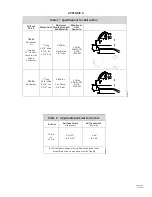
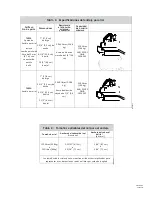
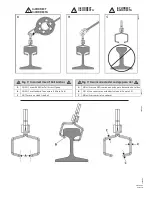
See Section 3 for anchorage strength requirements. The anchor discussed in this manual is designed for railroad rail of 112
pound to 141 pound, with head widths between 2-23/32” and 3-1/16”. See Table 2 for dimensional data. Measure the rail and ensure that it is the correct
size for this anchor. Do not use this anchor on head-free rail. See Figure 5.
Avoid sharp edges, abrasive surfaces, moving machinery, caustic chemicals, and heat sources. Ensure the anchorage structure is capable of supporting all
required loads.
WARNING
DO NOT intentionally misuse the rail anchor. Intentional misuse or use in any application for which the anchor is not designed may lead to serious injury
or death
4.4
Install the Rail Anchor:
Follow these steps;
1.
Inspect the rail for any damage, abnormality or contaminates. Ensure the rail is within the dimensions stated in this manual. See Table 2 and Figure 5.
2.
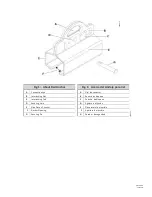
Remove the detent pin from the rail anchor and separate the two plates as shown in Figure 6.
3.
Inspect the two plates in accordance with the procedures detailed in Section 7 of this manual.
4.
Place both side plates on opposite sides of the rail.
5.
Insert the interlocking tabs through the interlocking slots.
6.
Slide the plates into alignment. Visually ensure the securing hole is aligned, and that the connector eye is aligned.
7.
Insert the detent pin in the securing hole.
4.4.1
Use the Anchor:
Use of this anchor is limited to above the grade only. Inspect the anchor before each use according to the procedure detailed in
Section 7. Attach the FallTech Ironman® 12-foot free fall lanyard, part number 8248, to the connection eye on the anchor. Consult the fall protection
system manufacturer’s user instructions for details.
NOTE:
Part number 7495K is a rail anchor kit, complete with a 12-foot free fall lanyard. Part number 7495A is an anchor only. If using 7495A, use with an
approved 12 foot free fall lanyard.
DO NOT
use the anchor in any manner not consistent with the instructions in this manual.
DO NOT
use a Self-Retracting Device or a non-compatible carabiner with this anchor.
DO NOT
use this anchor on head-free rail. See Figure 7.
4.5 After a Fall:
Remove from service any equipment subjected to fall arrest forces.
5.
SPECIFICATIONS
See Table 1.
6.
MAINTENANCE AND STORAGE
Clean the anchor with a soap and water solution. Dry with a cloth. Store indoors. Avoid chemical vapors and moisture and crush hazards.
7.
INSPECTION PROCEDURE:
The user must inspect the anchor before each use. Formal inspection by a Competent or Qualified person on an annual basis
is required by ANSI.

