Falcon Elan U109645 - 02 Installation & Service Instructions Manual Download Page 21

21                                                                        U109645

INSTALLATION

Check that the appliance is electrically safe when you have finished.

Australia

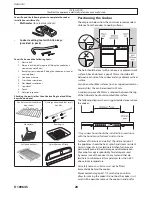
cleaning and servicing. The cooker should not be placed 
on a base.

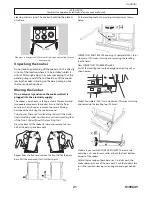
Plan view - a clearance of 130mm each side is required to allow for oven 

door opening.

Unpacking the Cooker

Do not take any packaging off the cooker until it is directly 
in front of the location where is to be installed (unless it 
will not fit through a door in its outer packaging). Cut the 
banding straps and lift the cardboard box off the cooker, 
leaving the cooker standing on the base packaging. See 
the loose unpacking sheet.
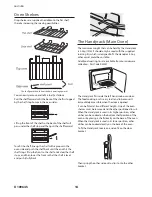
Moving the Cooker

On no account try and move the cooker while it is 

plugged into the electricity supply.

The cooker is very heavy, so take great care. We recommend 
two people manoeuvre the cooker. Ensure that the floor 
covering is firmly fixed, or removed to prevent it being 
disturbed when moving the cooker around.

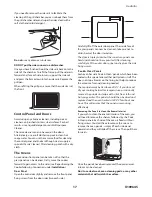
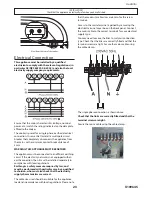
To help you, there are two levelling rollers at the back, 
and a levelling roller and two screw-down levelling feet 
at the front. You will need the levelling tool.

From the back tilt the cooker forward and remove the rear 
half of the polystyrene base pack.

Repeat from the front and remove the front half of the poly 
base. Pull the drawer out to its furthest point.

Fit the levelling tool on the rectangular adjuster as shown 
below.

LOWER THE FRONT ROLLER by doing 14 complete (360º) turns 
clockwise. (This means turning and removing the levelling 
tool 56 times).
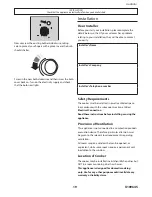
Now LOWER THE TWO REAR ROLLERS.  
First fit the levelling tool on the hexagonal adjusting nut as 
shown below.

Make 10 complete (360º) turns clockwise. (This means turning 
and removing the levelling tool 20 times.)

Make sure you lower BOTH REAR ROLLERS. There are two 
adjusting nuts, one for each roller, at both the front bottom 
corners of the cooker.
Unfold the rear edge of pack base tray. Carefully push the 
cooker backwards out of the base pack. Push the cooker close 
to its final position, leaving just enough space to get behind 
it.

Summary of Contents for Elan U109645 - 02

Page 1: ...110 Ceramic with Glide out Grill User Guide for Australia Installation Service Instructions U109645 02...

Page 2: ...Clock 9 Multi function oven functions 10 Tips on Cooking with the Timer 11 General Oven Tips 12 Oven cooking guide 13 Oven Shelves 14 The Handyrack Main Oven 14 Main Oven Light 15 Storage 15 Cleaning...

Page 3: ...back and the grill door open Personal Safety This appliance is heavy so take care if you need to move it Accessible parts will become hot during use and will retain heat even after you have stopped c...

Page 4: ...nd watch as it heats Deep fry pans should be only one third full of fat Filling the pan too full of fat can cause spill over when food is added If you use a combination of oils or fats in frying stir...

Page 5: ...n change in temperature The ceramic surface should be washed after use in order to prevent it from becoming scratched or dirty However you should clean the hob with caution as some cleaners can produc...

Page 6: ...quick and energy e cient Never use a round bottomed wok even with a stand 3 The very best pans have bases that are very slightly curved up when cold If you hold a ruler across the bottom you will see...

Page 7: ...and pull the grill pan carriage forward using the handle The grill has two elements that allow either the whole area of the pan to be heated or just the right hand half Adjust the heat to suit by tur...

Page 8: ...cooking The recommended cooking temperatures for a fanned oven are generally lower than a non fanned oven The Multi function oven has two controls a function selector and a temperature setting knob T...

Page 9: ...top the left hand oven at a specific time of day Turn the Timer knob to the position Use the Adjusting knob to set the time at which the oven is to stop You can set the oven to turn on at any time ove...

Page 10: ...o return to manual cooking If you are out don t worry about the beeper going o it stops on its own after a while When you return turn the Timer knob to the vertical to revert to manual cooking AUTO is...

Page 11: ...thorough cooking such as a large meat roast It is also possible to bake on two shelves at one time although they will need to be swapped over during the cooking time as the heat at the top of the ove...

Page 12: ...king To reduce fat splashing when you add vegetables to hot fat around a roast dry them thoroughly or brush lightly with cooking oil If you want to brown the base of a pastry dish preheat a baking tra...

Page 13: ...der of the time THOROUGHLY THAW FROZEN JOINTS AND POULTRY BEFORE COOKING POULTRY Chicken 160 C 2 3 150 C 20 25mins per 500g 20 25mins 200 C 2 3 190 C 15 20mins per 500g 15 20mins Turkey 160 C 2 150 C...

Page 14: ...aximum weight that can be held by the Handyrack is 5 5kg 12lb It should only be used with the supplied roasting tin which is designed to t the Handyrack Any other vessel could be unstable Additional r...

Page 15: ...ners back out of the way Cleaning your Cooker Isolate the electricity supply before carrying out any major cleaning Then allow the cooker to cool Never use paint solvents washing soda caustic cleaners...

Page 16: ...o and that the hob is cool Remove the excess burned on substance with a single edged razor scraper Hold the scraper at an approximate 30 angle to the surface and then scrape o the burned on matter Onc...

Page 17: ...ven door slightly and remove the front panel xing screws from the door sides two each side Carefully lift o the outer door panel The inside face of the glass panels can now be cleaned take care not to...

Page 18: ...to your own individual tastes The oven is not cooking evenly Do not use a baking tray with dimensions larger than those speci ed in the section on General Oven Tips If you are cooking a large item be...

Page 19: ...s Telephone number Safety Requirements The cooker must be installed in a well ventilated space in accordance with the subsequent section entitled Electrical Connection Read these instructions before...

Page 20: ...be level with or above any adjacent work surface Above hob level a gap of 75mm should be left between each side of the cooker and any adjacent vertical surface For non combustible surfaces such as unp...

Page 21: ...oker around To help you there are two levelling rollers at the back and a levelling roller and two screw down levelling feet at the front You will need the levelling tool From the back tilt the cooker...

Page 22: ...e levelling tool supplied to turn the adjusting nuts at the front bottom corners of the cooker Adjust the height of the front roller to level the cooker Turn clockwise to raise the cooker and anticloc...

Page 23: ...ty network is not equipped with an earth connection then it must be installed separately in compliance with local regulations Earthing is a safety measure required by law and must be performed with pa...

Page 24: ...eck that the light is working NB The oven light bulb is not included in the guarantee Hobplate Turn on each plate in turn and check that it heats up Grill Open the grill compartment door Turn on the g...

Page 25: ...o the push t control panel end caps at each end and remove the end xing screws under the end cap Remove the retaining screws for each panel one at the front and two at the rear The lower front retaini...

Page 26: ...agonally away from the door centre until the hook is released Proceed to the next hook and release it in a similar way and so on You can use force if the hooks are sti as the old seal will be discarde...

Page 27: ...rear of the unit Remove the xings that secure the cover and lift it clear Remove the two screws A and allow the plate to drop down Remove the two screws B holding the element to the bottom sheet Disc...

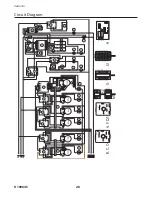
Page 28: ...U109645 28 Australia Circuit Diagram...

Page 29: ...J3 Multi function oven fan J4 Multi function oven fan element J5 Multi function oven browning element inner pair J6 Multi function oven top element outer pair J7 Multi function oven base element K1 R...

Page 30: ...240V 50Hz Hob Left hand Multifunction Oven Right hand Fan Oven Fan element 2 5kW 2 5kW Top element 1 2kW Browning Element 1 15kW Bottom element 1 0kW Grill 2 3kW Maximum total electrical load at 230V...

Page 31: ...31 109645 Australia...

Page 32: ......

Reviews: