Falcon 900S Dual Fuel User Manual Download Page 7

5

English

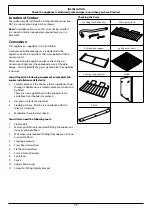
ArtNo.061-0001 - 90 induction - 900S MF oven controls

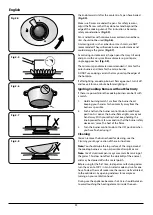
Energy Saving Feature

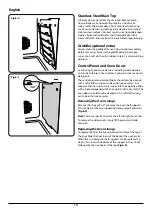
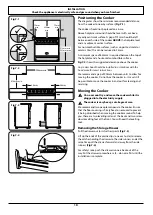
The oven has a divider feature 

(Fig.2-9).

 With this is in place 

only one half of the oven is heated and only the right-hand 
side elements are used. This saves energy and is ideal for 
cooking most foods. When using the divider, condensation 
may appear in the left-hand oven. This is normal.

For very large loads, or large dishes for special occasions then 
the divider can be removed. This brings into use the elements 
on the left-hand side as well as those on the right when a 
function is selected.

All oven functions are available in full and divided forms and 
shelves are provided for use in both forms.

 

WARNING! 
Take great care when removing the divider NOT to 
scratch the inner glass door surface. Scratches in the 
glass can cause stress and may cause the door to fail.

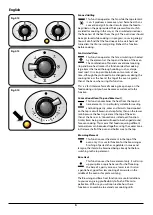
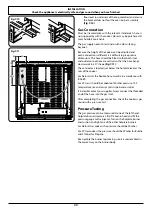
The Multi-function Oven

The oven is a multi-function oven 

(Fig.2-10)

. In addition to 

convection elements around the fans, it is fitted with extra 
heating elements, in the top of the oven and under the oven 
base. Take care to avoid touching the top elements when 
placing or removing items from the oven.

Please remember that all ranges vary – temperatures in your 
new ovens may differ to those in your previous range.

Multi-function oven modes 

(Fig.2-11)

Defrost

This function operates the fan(s) to circulate cold air 
only. No heat is applied. This enables small items such 
as desserts, cream cakes and pieces of meat, fish and 

poultry to be defrosted.

Defrosting in this way speeds up the process and protects 
the food from contamination. Pieces of meat, fish and poultry 
should be placed on a rack, over a tray to catch any drips. Be 
sure to wash the rack and tray after defrosting.

Defrost with the oven door closed. Defrosting should not 
be carried out in a warm oven. Large items, such as whole 
chickens and meat roasts should not be defrosted in this way. 
We recommend this be carried out in a refrigerator.

Ensure that dairy foods, meat and poultry are completely 
defrosted before cooking.

Fan Oven

This function operates the fans and the heating 
element around them. An even heat is produced 
throughout the oven, allowing you to cook large 

amounts quickly.

Convection oven cooking is particularly suitable for multi-
rack cooking and is a good ‘all-round’ function. It may be 
necessary to reduce the temperature by approximately 10°C 
for recipes previously cooked in a conventional oven.

If you wish to preheat the oven, wait until the indicator light 
has gone out before inserting the food.

ArtNo.281-0150 - Oven Divider

Fig.2-9

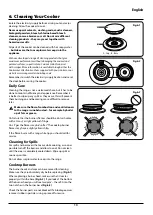
ArtNo.326-0009 - Albertine SC - MF oven elements EU

Fig.2-10

A - Grill Elements,    B - Convection Elements, C - Base Heat Elements
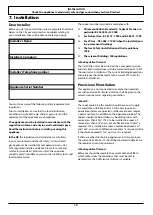
Fig.2-11

A -Defrost,  B - Fan Oven,  C - Fanned Grilling,  D - Fan Assisted Oven,

E - Conventional Oven,   F - Browning Element,   G - Base Heat

ArtNo.061-0005 - 90 induction - 900S MF symbols

ArtNo.061-0005 - 90 induction - 900S MF symbols

Summary of Contents for 900S Dual Fuel

Page 1: ...900S Dual Fuel Gamme Combustible Mixte ArtNo 000 0008 Falcon logo shaded User Guide Installation Service Instructions Mode d emploi Instructions d installation et d entretien U109968 04...

Page 2: ...Before You Start 1 2 Overview 3 3 Cooking Tips 9 4 Cooking Table 10 5 Troubleshooting 11 6 Cleaning Your Cooker 13 7 Installation 16 8 Circuit Diagram 23 9 Technical Data 24 10 Warranty After Sales S...

Page 3: ...h respiratory or allergy problems should vacate the area for this brief period If you smell gas DO NOT turn electric switches on or off DO NOT smoke DO NOT use naked flames DO turn off the gas at the...

Page 4: ...for spills or overheating of foods when frying at high or medium high temperatures Never try to move a pan of hot fat especially a deep fat fryer Wait until the fat is cool Do not use the top of the u...

Page 5: ...knob is pressed in sparks will be made at every burner this is normal Do not attempt to disassemble or clean around any burner while another burner is on An electric shock could result If when you le...

Page 6: ...horizontally away from the burner as possible 2 Push and turn the burner control knob to solid ame position As soon as the burner ame lights move your hand away With your other hand keep holding the...

Page 7: ...culate cold air only No heat is applied This enables small items such as desserts cream cakes and pieces of meat sh and poultry to be defrosted Defrosting in this way speeds up the process and protect...

Page 8: ...Conventional Oven Top and Base Heat This function combines the heat from the top and base elements It is particularly suitable for roasting and baking pastry cakes and biscuits Food cooked on the top...

Page 9: ...ions The oven shelves are retained when pulled forward but can be easily removed and re tted To remove the shelf The shelf has a small recess on either side To remove the shelf these must be in line w...

Page 10: ...e drawer right out Fig 2 24 Lift up the ends of the plastic clips one each side to release the catches holding the drawer to the side rails and at the same time pull the drawer forward and away from t...

Page 11: ...an necessary otherwise the knobs may get very hot Always leave a fingers width between dishes on the same shelf This allows the heat to circulate freely around them To reduce fat splashing when you ad...

Page 12: ...35 minutes individual 10 20 minutes 15 20 minutes 15 20 minutes per 500g Steaks according to thickness 45 50 minutes per 500g of mixture 2 2 hours Up to 3 hours 80 90 minutes 15 25 minutes 10 15 minut...

Page 13: ...erature setting The oven is not cooking evenly If you are cooking a large item be prepared to turn it round during cooking 5 Troubleshooting If two racks are used check that space has been left for th...

Page 14: ...burner for few seconds The igniter should spark and light the gas If when you let go of the control knob the burner goes out the safety device has not held in Turn the control to the o position and w...

Page 15: ...r it is better to wipe up any spills as they occur this will prevent them burning on and becoming more di cult to remove later Make sure the ow of combustion and ventilation air to the range is unobst...

Page 16: ...r best results use liquid detergents The control panel and control knobs should only be cleaned with a soft cloth wrung out in clean hot soapy water but take care that no surplus water seeps into the...

Page 17: ...Plastic chrome or copper Warm soapy water soft cloth Brass Brass polish Oven Door Glass Glass Lid Toughened glass Hot soapy water cream cleaner scourer if necessary Oven and Grill Part Finish Recomme...

Page 18: ...on and Use regulations 1998 The relevant Building IEE regulations In the Republic of Ireland The installation must be carried out by a competent person and installed in accordance with the current edi...

Page 19: ...lied with gas through a exible hose a stability bracket or chain must be tted These are not supplied by with the cooker but are available at most builders merchants Gas pressure tester manometer Flexi...

Page 20: ...5mm between units to allow for moving the cooker Do not box the cooker in it must still be possible to move the cooker in and out for cleaning and servicing Moving the Cooker On no account try and mov...

Page 21: ...rit level on a shelf in one of the ovens to check for level Place the cooker in its intended position taking care not to twist it within the gap between the kitchen units as damage may occur to the co...

Page 22: ...ar of the cooker For Natural Gas the exible hose must be in accordance with B S 669 For LP Gas it should be capable of 50mbar pressure 70 C temperature rise and carry a red stripe band or label If in...

Page 23: ...electrical supply type Fig 7 12 and Fig 7 13 Check that the links are correctly tted and that the terminal screws are tight Secure the mains cable using the cable clamp These appliances are of type X...

Page 24: ...using these screws alternative colour screws can be found in the loose parts pack Refit the Drawer Rest the drawer back on the side runners and keeping it level push it right back The clips should cl...

Page 25: ...23 English ArtNo 080 0036 LC Albertine 36 EU circuit diagram 8 Circuit diagram...

Page 26: ...iance badge for test pressures Dimensions Overall height minimum 912mm maximum 937mm Overall width 900mm see Positioning of cooker Overall depth 720mm Minimum space for cooking 800mm Ratings Oven Full...

Page 27: ...o the rest of this booklet especially the Troubleshooting section rst to check that you are using the appliance correctly If you are still having di culty contact your retailer 10 Warranty After Sales...

Reviews: