11
The Oven shelves
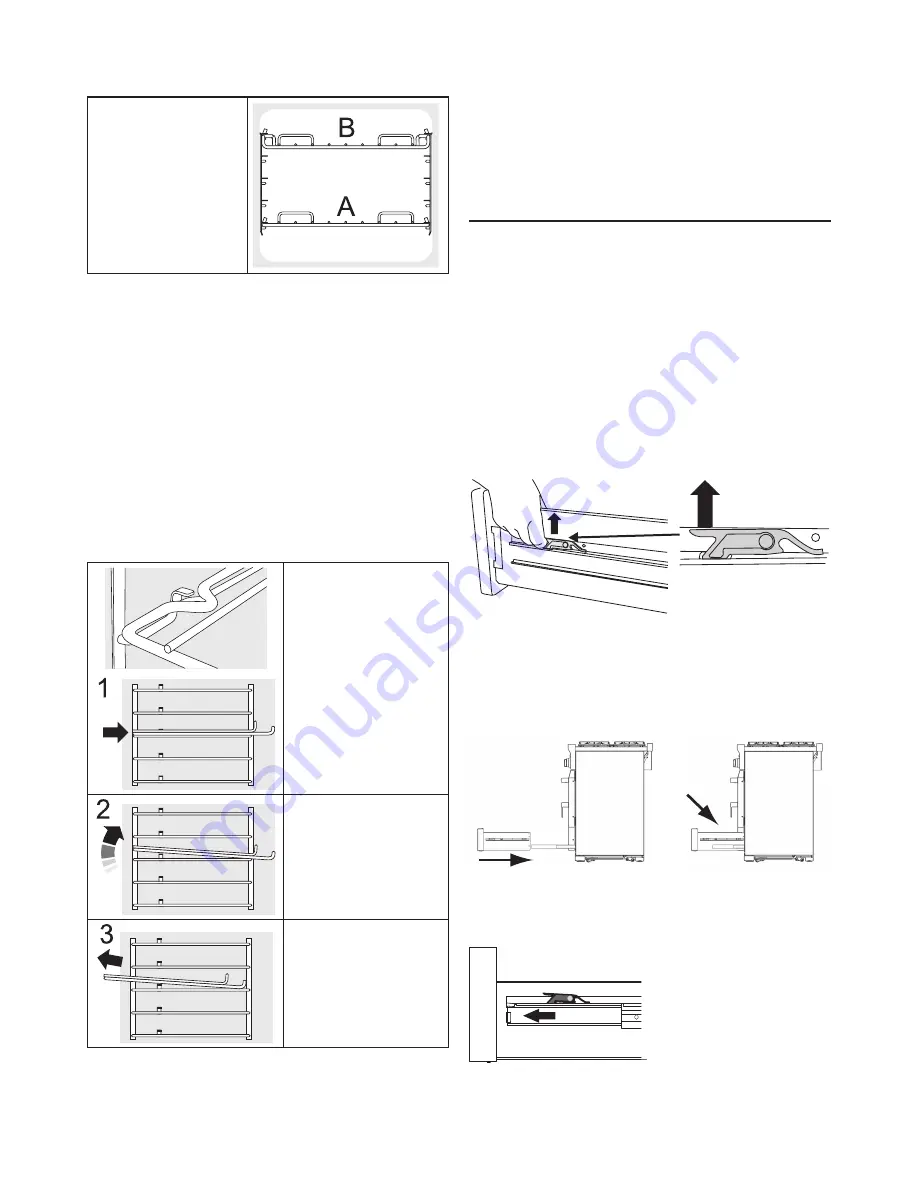
There are 4 standard
oven selves and 1
drop shelf.
A standard shelf
B Drop shelf
With the exception of the top position in the
left hand multifunction oven, which will only
accept the drop shelf, any shelf can be fitted
in any of the positions. The oven shelves are
retained when pulled forward but can be easily
removed and refitted.
The shelves should not be fitted directly one
above the other. When cooking on more than
one shelf always leave at least one runner
space between them. Place baking trays,
individual cake tins or baking dishes centrally
on the oven shelf. For best results pre-heat the
oven until the oven indicator light goes out.
To remove a shelf
first make sure it is
pushed fully back, so
that the shelf stop is
in line with the kink
in the side of the
shelf.
Lift up the front of
the shelf so the shelf
will pass over the
shelf stop.
Pull the shelf forward.
To refit the shelf, hold it so it is slightly up at the
front and rest the back of the shelf on the side
wires. Push the shelf to the back of the oven
and then lower the front so that it is resting on
the side wires.
Storage
The bottom drawer is for storing oven trays and
other cooking utensils. It can get very warm so
don’t store anything in it that may melt or catch
fire. The drawer can be removed completely for
cleaning etc.
To remove the drawer
Pull the drawer forward. Lift up the ends of
the plastic clips (one each side) to release the
catches holding the drawer to the side runners
and at the same time pull the drawer forward
and away from the side runners.
For safety push the drawer runners back out of
the way.
To refit the drawer
To replace the drawer in the cooker, pull the
side rails fully out.
Carefully move the drawer back between the
rails and rest it on the side rails.
At each side
hold the front of
the drawer and
pull the side rail
forward so that
the clips click into
position holding
the drawer to the
side rails.


