background image

9

EN

Voltage – Frequency: 

230V – 50 Hz

Power: 

500W

Maximum jug capacity: 

1.5l

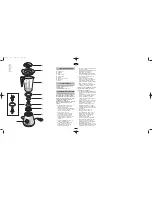
1. DESCRIPTION OF THE APPLIANCE

A.

Top lid

B.

Jug lid

C.

Jug

D.

Closing ring

E.

Rubber seal

F.

Blade

G.

Blade support connector

H.

Motor base

I.

Selector

Do not unplug the mixer by pulling on the
cable.

This mixer has been designed for
domestic use only.  The manufacturer
accepts no responsibility for any damage
caused by the use of the appliance for
other purposes, incorrect use or repairs
carried out by unauthorised personnel. 

Do not let the cable come into contact
with sharp edges or to hang over the
edge. Do not place the cable near heat
or dampness. 

Place the mixer on a flat, stable surface,
far from hot areas or heat sources (gas
burners, electrical hotplates or ovens).

Safety instructions that should be borne
in mind when switching the mixer on. 

Do not leave the mixer unattended while
in operation. Keep out of the reach of
children.

Make sure that the selector (I) is set to
the ‘0’ position (disconnected) before
plugging the mixer in to the mains supply
or before unplugging it.  

People with nervous dysfunctions should
not use the appliance unless
accompanied by another person. 

Make sure the jug (C), closing ring (D),
blade (F) and blade support connector
(G) are correctly positioned before
switching the mixer on.

Do not expose the appliance to the
elements (rain, wind, etc.).

Never insert your hands or other utensils
into the mixer recipient while in operation.  

Make sure the lid is correctly in place
when using the mixer.

THE BLADES ARE SHARP, HANDLE
THEM WITH CARE. To avoid injury,
never place the blades in the base
without first ensuring that the jug is
properly in place.

When mixing hot liquid, remove the top
lid (A) from the jug lid (B). Do not fill the
mixer over the maximum level. 

Always start working at the lowest speed.  

Keep your hands away from the central
opening in order to avoid possible burns. 

Do not mix excessively hot ingredients.

DO NOT KEEP THE MIXER SWITCHED
ON FOR MORE THAN 3 MINUTES AT

2. TECHNICAL DETAILS

These instructions contain important
information regarding both safety and the
correct functioning of the appliance.
Please read these instructions carefully,
keep them in a safe place and pass them
on to the next owner of the mixer.
The safety instructions provided should
always be taken into account when
switching the appliance on.

Check that the voltage of the domestic
network coincides with the voltage
indicated for the appliance.

Connect the appliance to an efficient
earth installation. If in doubt, contact a
qualified professional.

In the event of failure and/or improper
working, turn the appliance off, unplug it
and do not attempt to repair it. Contact an
authorised Technical Assistance Centre
and request that they use original
replacement parts and accessories. 

Do not use the mixer if the cable or plug
are damaged.

Do not attempt to replace the cable, as
this may be dangerous. Send it
immediately to an authorised technical
assistance service.

Do not plug the appliance in or unplug it
with wet hands. 

3. SAFETY WARNINGS

interior    9/3/06  07:34  Página 8

Summary of Contents for BV-2006X

Page 1: ...va il diritto a modificare i modelli descritti in questo Manuale d Istruzioni O k t ÛkÂv Ût ç È tËp okÏÂÈÛtÈk to Èk ˆÌ v tpo o oÈ Û t Ìovt Ï ou ÂpÈyp ºovt È Ûto pfiv Evtu o O ËyÈÒv A gyártó fenntartja magának a jogot a használati útmutatóban közölt műszaki adatok megváltoztatására Výrobce si vyhrazuje právo modifikovat modely popsané v tomto uživatelském návodu Výrobca si vyhradzuje právo modifik...

Page 2: ...ctamente colocadas antes de la puesta en marcha de la batidora No la exponga a los elementos atmosféricos lluvia viento etc Nunca introduzca las manos u otros utensilios dentro del recipiente de la batidora cuando esté funcionando Utilice la batidora con la tapa correctamente colocada LAS CUCHILLAS ESTAN AFILADAS MANIPÚLELAS CON CUIDADO Para evitar lesiones nunca coloque las cuchillas en la base s...

Page 3: ...base Asegúrese de que el selector I esté en la posición 0 Enchufe el aparato Vierta a través del orificio de la jarra o de la tapa B los alimentos o bebidas a la batidora Coloque la tapa B junto con la tapa superior A Fig 6 y ponga en marcha la batidora Para el funcionamiento en continuo coloque el selector I en la posición 1 2 ó 3 Para que funcione a velocidad baja gire el selector a la posición ...

Page 4: ...la clavija se humedezcan Procese los alimentos en tiempos cortos entre 5 y 30 segundos compruebe la consistencia y siga procesando el alimento hasta conseguir la consistencia deseada Si no se consigue la consistencia deseada rápidamente pare el aparato poniendo el selector en la posición 0 y Lleve el selector a la posición varias veces seguidas o Quite la tapa de la jarra y remueva los alimentos c...

Page 5: ...ctrodoméstico significa evitar posibles consecuencias negativas para el medio ambiente y la salud derivadas de una eliminación inadecuada y permite un tratamiento y reciclado de los materiales que lo componen obteniendo ahorros importantes de energía y recursos Para subrayar la obligación de colaborar con una recogida selectiva en el producto aparece el marcado que se muestra como advertencia de l...

Page 6: ...ke sure the lid is correctly in place when using the mixer THE BLADES ARE SHARP HANDLE THEM WITH CARE To avoid injury never place the blades in the base without first ensuring that the jug is properly in place When mixing hot liquid remove the top lid A from the jug lid B Do not fill the mixer over the maximum level Always start working at the lowest speed Keep your hands away from the central ope...

Page 7: ...tching the mixer on make sure that the jug is correctly fitted into its place on the base Make sure that the selector I is set to its 0 position Plug the appliance in Place or pour the ingredients or beverages to be mixed into the jug through the jug opening or lid B Replace the lid B along with the top lid A Fig 6 and switch the mixer on To work continuously place the selector I in position 1 2 o...

Page 8: ...te disposal and enables the constituent materials to be recovered to obtain significant savings in energy and resources To remind you that you must collaborate with a selective collection scheme the symbol shown appears on the product warning you not to dispose of it in traditional refuse containers For further information contact your local authority or the shop where you bought the product MAKE ...

Page 9: ... mis en place avant de faire fonctionner le blender Ne pas exposer l appareil aux agents atmosphériques pluie vent etc Ne jamais introduire les mains ou un ustensile quelconque à l intérieur du bol lorsque l appareil est en marche Utilisez toujours le blender avec le couvercle du bol correctement mis en place LES LAMES SONT TRÈS COUPANTES MANIPULEZ LES AVEC PRÉCAUTION Pour éviter de vous blesser n...

Page 10: ...rations de montage et de démontage sont à réaliser lorsque l appareil est débranché Placer le joint en caoutchouc E sur le bord du couteau F et placer le couteau sur le raccord support G Fig 2 Le fixer en faisant tourner le bol dans le sens contraire des aiguilles d une montre Fig 3 Placer le couvercle doseur A sur le couvercle B en introduisant ses languettes dans les rainures du couvercle et en ...

Page 11: ... d une spatule libérez les bords du bol et poussez les aliments vers les lames ou Enlevez quelques ingrédients du bol NOTE COUPEZ TOUS LES INGRÉDIENTS VÉRIFIEZ QUE LE BLENDER EST ÉTEINT ET DÉBRANCHÉ DE LA PRISE DE COURANT AVANT DE MONTER OU D ENLEVER UNE PIÈCE QUELCONQUE Nous vous recommandons de nettoyer l appareil immédiatement après chaque utilisation Enlevez le bol Retirez le couvercle et les ...

Page 12: ...e élimination inadéquate tout en facilitant le traitement et le recyclage des matériaux qu il contient avec la considérable économie d énergie et de ressources que cela implique Afin de souligner l obligation de collaborer à la collecte sélective le marquage ci dessus apposé sur le produit vise à rappeler la non utilisation des conteneurs traditionnels pour son élimination Pour davantage d informa...

Page 13: ...eller autorisierten Technischen Kundendienst Berühren sie den Netzstecker nicht mit feuchten oder nassen Händen Ziehen Sie den Stecker niemals am Kabel aus der Steckdose Dieses Gerät ist nur für den häuslichen Gebrauch bestimmt Es wird nicht für Schäden gehaftet die aus unsachgemäßer falscher oder unangemessener Benutzung entstehen oder durch Reparaturen hervorgerufen werden die von unqualifiziert...

Page 14: ...Setzen Sie den Deckel B mit dem oberen Deckel A Abb 6 auf und nehmen Sie den Mixer in betrieb Für eine kontinuierliche Funktion stellen Sie den Schalter auf die Position 1 2 oder 3 Damit er mit langsamer Geschwindigkeit arbeitet drehen Sie ihn auf die Position 1 Damit er mit halber Geschwindigkeit arbeitet drehen Sie ihn auf die Position 2 Damit er mit hoher Geschwindigkeit arbeitet drehen Sie ihn...

Page 15: ... erreicht ist Wenn Sie die gewünschte Konsistenz nicht schnell erreichen stellen Sie das Gerät ab indem Sie den Schalter auf die Position 0 stellen und Stellen Sie den Schalter mehrfach hintereinander auf die Position plusieurs fois de suite ou Oder Sie nehmen den Deckel des Mixbehälters ab und Sie mischen die Nahrungsmittel mit einem Spatel durch Oder Sie verringern die Menge der Nahrungsmittel d...

Page 16: ... von der Netzspannung nach jeder Benutzung und vor jeder Arbeit zur Instandhaltung und Reinigung Erlauben Sie nicht dass das Kabel oder der Stecker feucht werden 7 INFORMATION ZUR ORDNUNGSGEMÄSSEN ENTSORGUNG ELEKTRISCHER UND ELEKTRONISCHER ALTGERÄTE Am Ende seiner Nutzzeit darf das Produkt NICHT zusammen mit dem Hausmüll beseitigt werden Es kann zu den eigens von den örtlichen Behörden eingerichte...

Reviews: