background image

E n g l i s h

E n g l i s h

1 9

1 9

I C T- 0 1

I C T- 0 1

•  Boiling water and steam may cause burning, so these functions 

should be performed with the utmost care. Never direct the steam 
dispenser towards parts of the body.

 It may cause burning!

•  Always ensure that the steam selector is disconnected when no 

steam is required, otherwise, steam may escape unintentionally.  
It may cause burning!

•  The water/steam dispenser gets very hot during use. Only hold 

the dispenser by the handle.

 It may cause burning!

•  Depending on the lime content of the water, the machine should 

be descaled regularly with a citric acid solution. In areas of very 
hard water, the water pipes should be descaled more frequently.

  The manufacturer will not be held liable for any damage 

caused by inadequate descaling.

  Follow the mixing instructions indicated on the descaling pack.  

Otherwise, the machine may get damaged.

•  Do not lean on the open drawer of the coffee machine, as this 

may damage the machine.

•  If the coffee machine is installed near an oven with a self-clea-

ning function, disconnect the coffee machine during self-clea-
ning, otherwise it may get damaged.

The manufacturer cannot be held liable for any damage caused by 
failure to observe the safety instructions and warnings.

SAVE THESE INSTRUCTIONS

SAVE THESE INSTRUCTIONS

This machine complies with the safety regulations currently in for-
ce. Incorrect use of the machine may lead to personal injury and 
damage to objects. 
Please read all the instructions carefully before using the machine 
as they contain important information on safety and the use and 
maintenance of the machine. This will protect you and prevent da-
mage to the machine.

CORRECT USE

•  The machine is designed exclusively for preparing espresso and 

cappuccino, as well as boiling water for tea and other hot beve-
rages. Other types of use are not permitted and could be dan-
gerous. The manufacturer declines all responsibility for damage 
caused by improper and/or or incorrect use of the machine.

TECHNICAL SAFETY

•  Before connecting the machine to the power mains, check care-

fully to make sure that the voltage and frequency ratings shown 
on the rating plate correspond to those of the electrical system. 

  These values must absolutely correspond in order to avoid 

damage to the machine. In case of doubt, contact a qualifi ed 
electrician.

•  The electrical safety of the machine is guaranteed only if it is 

connected to a standard earth conductor. It is very important to 
verify this information with the utmost attention, and in case of 
doubt have the electrical system checked by a qualifi ed electri-
cian. The manufacturer declines all responsibility for any dama-
ge caused to people or things due to the lack or malfunction of 
the earth conductor 

(for example: risk of electrocution)

.

• Put the machine into operation only after complete installation 

in order to avoid contact with the electrical components. Before 
carrying out assembly, disassembly, or daily maintenance of the 
machine, always make sure to disconnect the power cable from 
the electrical outlet.

•  The connection of the machine to the power mains must not be 

made using extension cables, as they do not guarantee the ne-
cessary safety of the machine 

(for example: risk of overhea-

ting)

.

•  The machine can also be fl ush-mounted in a wall unit (special 

accessory). It is not suitable for outdoor use. Considering the 
heavy weight of the machine, it is essential for the unit to be 
adequately secured to the adjacent wall. 

• If the power cable is damaged, it must be replaced by the ma-

nufacturer, its technical service, or by a qualifi ed electrician, in 
order to prevent any risk.      

•  All installation, maintenance, and repair operations must be car-

ried out by qualifi ed personnel only. Incorrect installation, main-
tenance, and repairs may lead to serious dangers to the user, for 
which the manufacturer declines all responsibility.

•  The machine is disconnected from the power mains only when:

-  the main switch of the electrical system is switched off;
-  the fuse of the home electrical system is completely discon-

nected;

-  the power plug of the machine is completely removed from the 

electrical outlet.                   

  To disconnect the machine from the power mains, grasp the 

plug and remove; do not pull on the power cable.

•  Do not open the machine casing for any reason. Touching the 

voltage cables or modifying the electrical or mechanical structu-
re may lead to electrocution. This could also cause disturbance 
in the operation of the machine. 

The manufacturer declines all 

responsibility towards persons or things due to failure to 
observe the instructions above

.

•  In the event that the machine has to be installed in combination 

with another appliance, it must be separated from the other ap-
pliance by a solid intermediate shelf. 

USAGE SAFETY

Warning! Danger of burning! The liquids that come out of the 
dispensers are extremely hot!

•  Children may access the machine only under adult supervision. 

Children’s skin is more sensitive to high temperatures. 


Danger of burning!


  Remember, too, that espresso coffee is not a suitable beverage 

for children.

• The fi rst time the machine is put into operation, it is necessary 

to rinse the pipes to eliminate any deposits and to ensure hygie-
ne.

•  Fill the water tank only with room temperature or cold potable 

water. Hot or boiling water or any other liquid can damage the 
operation of the machine. We recommend changing the water 
daily to prevent the germ proliferation.

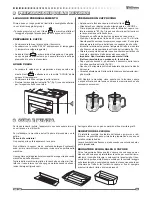
•  Place only whole coffee beans in the coffee container. Ground 

coffee poured into the container can damage the operation of the 
grinder.

•  Sugar damages the machine!
  Never use coffee beans that are treated with caramel, sugar, 

or other similar substances, instant coffee, or any substances 
containing sugar.

•  Boiling water and steam can cause burning; therefore, please 

use these functions with the utmost attention. Do not turn the 
steam dispenser towards any parts of your body. 

Danger of bur-

ning!

•  Always make sure that the steam selector is disengaged when 

steam is not needed. Otherwise, steam could be dispensed ina-
dvertently. 

Danger of burning!

•  The hot water/steam dispenser becomes very hot during use. 

Grasp the dispenser only by the coupling. 

Danger of burning!

•  Depending on the lime content of the water, the machine should 

be descaled regularly using a liquid solution of citric acid. In zo-
nes where the water is very hard, it will be necessary to descale 
the water pipes more often.

  The manufacturer declines all responsibility for any damage 

caused by insuffi cient descaling.

  Follow the mixture ratio indicated on the package of the desca-

ling product; otherwise the machine could be damaged.

•  Do not put weight on the open door of the coffee machine, as this 

could damage the machine.

The manufacturer declines all responsibility for any damage cau-
sed by failure to follow the safety instructions and precautions.

Summary of Contents for Built-In Coffee Machine MQC-A10 US

Page 1: ......

Page 2: ...tenitore dei chicchi di caffe P 22 6 RIMOZIONE DEI FONDI DI CAFFE E ACQUA P 24 7 FUNZIONAMENTOED USO P 26 Accensione P 26 Impostazione macinatura P 32 Scelta del tipo di caff P 34 Regolazione lunghezz...

Page 3: ...aff 06 Serbatoio acqua 07 Griglia di sgocciolamento 08 Contenitore per chicchi di caff 09 Tasto per accensione spegnimento 10 Selettore 1 tazza o 2 tazze 11 Selettore caff ristretto medio o lungo 12 T...

Page 4: ...il fusibile dell impianto elettrico della casa completamente svitato la spina di alimentazione della macchina completamente estratta dalla presa di corrente elettrica Per scollegare la macchina dalla...

Page 5: ...to dalla macchina l erogazione del caff pu essere interrotta in qualsiasi momento mediante pressione sull apposito tasto 12 fig 1A B questo permette all utilizzatore anche di decidere la dose ad esso...

Page 6: ...parecchiatura deve essere effettuata esclusi vamente da personale qualificato in accordo alle normative vigenti Considerando l elevato peso della macchina indispensabile che il mobile sia fissato adeg...

Page 7: ...I tal i ano Itali ano 7 7 I CT 01 ICT 01 Fig 2B Fig 2B...

Page 8: ...e rispettando le norme di sicurezza in vigore Importante La presa di corrente deve essere accessibile dopo l installazione della macchina 7 Inserire la macchina nel mobile avendo cura che le guide del...

Page 9: ...i un caf f di buona qualit determinante anche l impiego di una buona acqua Si consiglia quindi di svuotare frequentemente il serbatoio dell acqua e riempirlo con acqua fresca Evitare di lasciare l acq...

Page 10: ...NDI 7 FUNZIONAMENTO ED USO 7 FUNZIONAMENTO ED USO ACCENSIONE Accendere la macchina mediante il tasto Dopo alcuni secondi sul display appaiono le seguenti informazioni messaggio di benvenuto Durante la...

Page 11: ...assate per ridurre il consumo Premendo il tasto si ripristina velocemente lo stato di mac china pronta LINGUA DISPLAY Premere il tasto comparir Mediante i tasti si seleziona la lingua desiderata DUREZ...

Page 12: ...uttore ma pu es sere modificata come segue Aprire la macchina Ruotare la manopola posta sul fianco sinistro della macchina A fig 5 con cura Ruotando la manopola in senso orario si ottiene una macinatu...

Page 13: ...rtate Non riscaldare eccessivamente il latte Il latte surriscaldato non produce pi la schiuma Dopo qualche secondo posizionare il beccuccio della lancia fino alla superficie del latte fig 7B Quando si...

Page 14: ...unto la macchina provveder ad eseguire il ciclo di lavaggio delle condutture Non appena il ciclo di lavaggio ultimato la macchina si predi spone in funzionamento normale Chiudere il rubinetto riempire...

Page 15: ...2 15 ed 2002 Normative specifiche riguardanti apparecchiature per la preparazione di acqua calda EMC 89 336 e alle relative normative 55014 1 55014 2 61000 3 2 61000 3 3 13 DISMISSIONE DEGLI ELETTROD...

Page 16: ...k P 22 Filling the coffee bean container P 22 6 REMOVING COFFEE GROUNDS AND WATER P 24 7 OPERATION AND USE P 26 Switch on P 36 Setting the grind P 36 Selecting the type of espresso P 36 Adjusting the...

Page 17: ...Drawer handle 05 Coffee dispenser 06 Water tank 07 Drip grille 08 Container for coffee beans 09 On Off button 10 1 cup 2 cup selector 11 Short medium or long coffee selector 12 Coffee dispensing butt...

Page 18: ...cabinet special acces sory It is not suitable for outdoor use Due to the weight of the machine the cabinet must be secured firmly to the wall Installation maintenance and repair works must only be car...

Page 19: ...table for outdoor use Considering the heavy weight of the machine it is essential for the unit to be adequately secured to the adjacent wall If the power cable is damaged it must be replaced by the ma...

Page 20: ...ainer used glass or cup has a smaller volume than the dosage programmed by the machine coffee dispensing can be interrupted at any time by pressing key 12 Fig 1A B allowing the user to decide on the p...

Page 21: ...t be carried out exclusively by qualified personnel in compliance with the regulations in force Considering the heavy weight of the machine it is essential that the furniture unit be suitably secured...

Page 22: ...E n g l ish En g l i s h 2 2 2 2 I CT 01 I CT 01 Fig 2B Fig 2B...

Page 23: ...ing the safety regula tions in force Important The power outlet must be accessible after the machine has been installed 7 Insert the machine in the unit taking care that the machine gui des are correc...

Page 24: ...water tank needs to be refilled when the display shows To ensure the best result in making espresso in addition to using good quality coffee it is also essential to use good water We the refore recom...

Page 25: ...again IMPORTANT ALWAYS EMPTY THE GROUNDS CONTAINER 7 OPERATION AND USE 7 OPERATION AND USE SWITCH ON Switch the machine on using the key After a few seconds the following message appears on the displa...

Page 26: ...hine to a ready status quickly DISPLAY LANGUAGE Press the key and the display panel shows Use the keys to select the desired language Availa ble languages are English Spanish Italian French and German...

Page 27: ...ely A very important factor for ensuring a good coffee is the right setting for the grinding level which is factory set but can also be modified as follows Open the machine Carefully turn the dial loc...

Page 28: ...seconds Important Do not heat the milk excessively Overheated milk no longer produces froth After a few seconds position the spout of the nozzle at the sur face of the milk Fig 7B When the desired fr...

Page 29: ...water tank and wait for the coffee and water temperatures to be reached The machine is ready for normal operation The manufacturer declines all responsibility for any damage caused by failure to carry...

Page 30: ...lectrical appliances and EN 60335 2 15 ed 2002 Particular requirements for ap pliances for heating liquids EMC 89 336 and the respective standards 55014 1 55014 2 61000 3 2 61000 3 3 13 DISPOSAL OF EL...

Page 31: ...ffeebohnen f llen Seite 22 6 ENTFERNUNG DES KAFFEESATZES UND DES WASSERS Seite 24 7 FUNKTION UND GEBRAUCH Seite 26 Einschalten Seite 26 Mahl Einstellung Seite 32 Wahl der Kaffeesorte Seite 34 Regulier...

Page 32: ...ten 11 W hlschalter Caff ristretto starker Espresso mittlerer oder langer 12 Kaffeeausgabetaste 13 Hei Wasser Dampf W hltaste 14 Taste I 15 Display 16 M hlgradregulierung 17 Achtung 18 Hauptschalter 1...

Page 33: ...lektrischen Anlage komplett herausge schraubt wurde wenn der Versorgungs Stecker der Maschine aus dem Netzan schluss gezogen wurde Um die Maschine von der elektrischen Versorgung abzutrennen ziehen Si...

Page 34: ...erte Menge kann man die Kaffeeau sgabe in jedem Moment durch Dr cken der Taste 12 Abb 1A B unterbrechen so hat der Benutzer die M glichkeit die f r ihn geei gnete Menge zu w hlen Auch der Mahlgrad kan...

Page 35: ...rf nur von Fachpersonal unter Bea chtung der geltenden Richtlinien durchgef hrt werden Auf Grund des hohen Gewichts der Maschine ist es unvermeidlich diese auf geeignete Weise an der Wand zu befestige...

Page 36: ...Deutsch Deutsch 3 6 3 6 I CT 01 I CT 01 ABBILDUNG 2A ABBILDUNG 2A...

Page 37: ...hierbei die geltenden Sicherheitsrichtlinien Wichtig Nach der In stallation muss die Steckdose noch erreichbar sein 7 F hren Sie die Maschine in das M belst ck ein achten Sie hier bei darauf dass die...

Page 38: ...nur Qualit tkaffee sondern auch gutes Wasser Wir empfehlen ih nen also den Tank fters zu leeren und wieder mit frischem Wasser aufzuf llen Lassen Sie das Wasser nicht zu lange im Tank WICHTIG benutze...

Page 39: ...R 7 FUNKTION UND GEBRAUCH 7 FUNKTION UND GEBRAUCH EINSCHALTEN Maschine durch Dr cken der Taste anschalten Nach einigen Sekunden erscheinen auf dem Display folgende In formationen Begr ung W hrend der...

Page 40: ...ter verringert um den Energieverbrauch zu reduzieren Dr ckt man die Taste ist die Maschine schnell wieder be triebsbereit SPRACHE DISPLAY Dr ckt man die Taste erscheint Mit den Tasten w hlt man die ge...

Page 41: ...er ndert werden Maschine ffnen Den Drehknopf auf der linken Seite der Maschine A Abb 5 vorsichtig drehen Dreht man den Drehknopf im Uhrzeigersinn erh lt man eine feine re Mahlung dreht man ihn gegen d...

Page 42: ...sen und um die Milch einige Sekun den lang aufzuw rmen Wichtig W rmen Sie die Milch nicht zu stark an Zu hei e Milch l sst sich nicht mehr sch umen F hren Sie nach einigen Sekunden den Schnabel der D...

Page 43: ...cken auf dem Display erscheint EN TKALKUNGPHASE 04 Jetzt f hrt die Maschine den Sp lzyklus der Leitungen durch Nach Beendigung des Sp lzyklus stellt sich die Maschine auf Nor malbetrieb ein Hahn schl...

Page 44: ...hen und EN 60335 2 15 Ausg 2002 Spezifische Normen f r Ger te zur Vorbereitung von hei em Wasser EMC 89 336 und entsprechende Richtlinien 55014 1 55014 2 61000 3 2 61000 3 3 13 AUSMASSE DER HAUSHALTSG...

Page 45: ...ur des grains de caf P 22 6 ENLEVEMENT DES FONDS DE CAFE ET EAU P 24 7 FONCTIONNEMENT ET UTILISATION P 26 Allumage P 38 Configuration mouture P 38 Choix du type de caf P 38 R glage de la longueur du c...

Page 46: ...tiroir 05 Arriv e du caf 06 R servoir eau 07 Grille d gouttage 08 Conteneur pour grains de caf 09 Touche pour allumage arr t 10 S lecteur 1 tasse ou 2 tasses 11 S lecteur caf serr moyen ou long 12 Tou...

Page 47: ...usible de l installation lectrique du fabricant est compl te ment d viss la fiche d alimentation de la machine est compl tement sortie de la prise de courant lectrique Pour d brancher la machine du r...

Page 48: ...que le do sage programm par la machine la sortie du caf peut tre interrom pue en tout moment en appuyant sur la touche 12 fig 1A B ce qui permet aussi l utilisateur de choisir la dose qui lui convient...

Page 49: ...ppareil ne doit tre effectu e que par du person nel qualifi conform ment aux normes en vigueur Etant donn le poids lev de la machine il est indispensable que le meuble soit ad quatement fix la paroi 1...

Page 50: ...Fr an a i s Fr a n a is 5 0 5 0 I CT 01 I CT 01 Fig 2B Fig 2B...

Page 51: ...tant les nor mes de s curit en vigueur Important La prise de courant doit tre accessible apr s l installation de la machine 7 Ins rer la machine dans le meuble en faisant attention ce que les guides d...

Page 52: ...ir un bon caf expresso en plus d utiliser un caf de bonne qualit il est aussi important d utiliser une bonne eau Nous conseillons donc de vider fr quemment le r servoir de l eau et de le remplir avec...

Page 53: ...ON 7 FONCTIONNEMENT ET UTILISATION ALLUMAGE Allumer la machine en actionnant la touche Apr s quelques secondes l cran affiche les informations suivantes message de bienvenue Pendant la phase de chauff...

Page 54: ...cette phase les temp ratures des chaudi res diminuent pour r duire la consommation Appuyer la touche pour r tablir rapidement l tat de machine pr te LANGUE ECRAN Appuyer la touche appara tra Les touch...

Page 55: ...hine Tourner la manette situ e sur le c t gauche de la machine A fig 5 avec attention Tourner la manette dans le sens des aiguilles d une montre pour obtenir une mouture plus fine la tourner par contr...

Page 56: ...nt quelques secondes Important Ne pas trop chauffer le lait Le lait surchauff ne donne pas de mousse Apr s quelques secondes d placer le bec du tuyau jusqu la superficie du lait fig 7B Quand on a obte...

Page 57: ...ondui tes D s que le cycle de lavage est termin la machine se pr pare au fonctionnement normal Fermer le robinet remplir le r servoir de l eau et attendre que les temp ratures de caf et eau soient att...

Page 58: ...et simi laires et EN 60335 2 15 d 2002 Normes sp cifiques au sujet des appareils pour la pr paration d eau chaude EMC 89 336 et aux normes correspondantes 55014 1 55014 2 61000 3 2 61000 3 3 13 ELIMI...

Page 59: ...af P 22 6 ELIMINACI N DE LOS FONDOS DE CAF Y DEL AGUA P 24 7 FUNCIONAMIENTO Y USO P 26 Encendido P 26 Programaci n molturaci n P 32 Elecci n del tipo de caf P 34 Regulaci n dosificaci n del caf P 34 P...

Page 60: ...06 Dep sito de agua 07 Rejilla de goteo 08 Recipiente para granos de caf 09 Tecla para encendido apagado 10 Selector 1 taza o 2 tazas 11 Selector de caf corto medio o largo 12 Tecla de erogaci n de c...

Page 61: ...iva do el fusible de la instalaci n el ctrica de la casa est completa mente desenroscado el enchufe de alimentaci n de la m quina est completamente desconectado de la toma de corriente el ctrica Para...

Page 62: ...rogramada por la m quina la erogaci n del caf puede ser interrumpida en cualquier momento presionando la tecla correspondiente 12 fig 1A B lo que tam bi n permite al usuario decidir la dosis m s adecu...

Page 63: ...ser efectuada exclusivamente por personal cualificado en conformidad con las normativas vigentes Teniendo en cuenta el peso elevado de la m quina es indispensa ble que el mueble sea sujetado adecuadam...

Page 64: ...E spa o l Es p a o l 6 4 6 4 I CT 01 I CT 01 Fig 2B Fig 2B...

Page 65: ...con las normas de seguridad en vigor Importante La toma de corriente debe ser accesible despu s que la m quina ha sido instalada 7 Introducir la m quina en el mueble teniendo cuidado que las gu as de...

Page 66: ...O DE AGUA Para obtener un buen caf expreso es determinante el uso de un caf de buena calidad as como el empleo de agua buena Por lo tanto es aconsejable vaciar frecuentemente el dep sito de agua y lle...

Page 67: ...O 7 FUNCIONAMIENTO Y USO ENCENDIDO Encender la m quina mediante la tecla Despu s de algunos segundos el visualizador muestra las siguien tes informaciones mensaje de bienvenido Las indicaciones caf y...

Page 68: ...consumo Al pulsar la tecla se restablece r pidamente el estado de m quina lista IDIOMA VISUALIZADOR Pulsar la tecla aparecer Mediante las teclas se selecciona el idioma desea do DUREZA DEL AGUA Pulsar...

Page 69: ...a por el constructor pero que puede ser modificada de la siguiente manera Abrir la m quina Girar la manivela en el lado izquierdo de la m quina A fig 5 con atenci n Haciendo girar la manivela en senti...

Page 70: ...algunos segundos Importante No calentar demasiado la leche La leche dema siado caliente no produce espuma Despu s de algunos segundos colocar la boquilla de la lanza hasta que toque la leche fig 7B En...

Page 71: ...ece DESCALCIFICACI N FASE 04 A este punto la m quina efectuar el ciclo de lavado de los tubos En cuanto termine el ciclo de lavado la m quina se prepara para el funcionamiento normal Cerrar el grifo l...

Page 72: ...y EN 60335 2 15 ed 2002 Normativas espec ficas acerca de los equipos para la preparaci n de agua calien te EMC 89 336 y a las normativas relativas 55014 1 55014 2 61000 3 2 61000 3 3 13 ELIMINACI N D...

Page 73: ...F YOU NEED SERVICE Please contact Customer Care at Fagor America at 1 877 743 2467 or email Fagor America at fagor adcoservice com WARRANTY REGISTRATION CARD Built in Coffee Machine Register your warr...

Page 74: ...FAGOR AMERICA APPLIANCES DIVISION P O BOX 94 LYNDHURST NJ 07071 PLACE STAMP HERE...

Page 75: ......

Page 76: ......

Reviews: