


EN
1
8
18
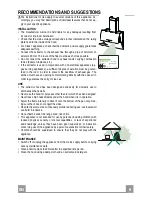
Charcoal filter (recycling version)
This filter cannot be washed or regenerated. It must be replaced when the C appears on the
display or at least once every 4 months. The filter saturation alarm has to be activated already
before.
Activation of the alarm signal
• In the recycling version hoods the filter saturation alarm must be activated during the instal-
lation or later.
• Switch off the hood and the lights.
• Press the E-key for about 5 seconds until the last two segments of the motor LEDS are lit on
the display.
• By releasing the E-key the clock icon starts to flash.
• Within 3 seconds press the D-key to activate/deactivate charcoal filter saturation alarm.
• C-symbol lit - charcoal filter saturation alarm ACTIVATED.
• C-symbol unlit - charcoal filter saturation alarm DEACTIVATED.
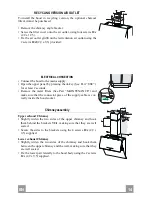
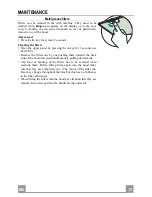
REPLACING THE CHARCOAL FILTER
Alarm reset
• Press the G-key for at least 2 seconds.
Replacing the filter
• Open the upper panel by pressing the A-key for about a second
(see Part USE).
• Remove the metal filters.
• Remove the saturated charcoal filter as indicated (A).
• Fit the new filters as indicated (B).
• Put the metal grease filters in their seats.
A
B
Lighting
LIGHT REPLACEMENT
20 W halogen light.
• Extract the lamp from the lamp holder by pulling gently.
• Replace with another of the same type, making sure that the
two pins are properly inserted in the lamp holder socket holes.
Summary of Contents for Mirror WH PRO X-V A80
Page 1: ...Instructions Manual Manuel d Instructions Bedienungsanleitung Manual de instrucciones...
Page 6: ...GR 6 6 53 54 56 59 61...
Page 7: ...RU 7 7 64 65 67 70 72...
Page 8: ...SA 8 8 75 76 78 81 84...
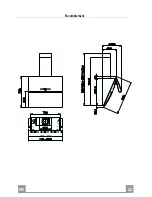
Page 11: ...EN 1 1 11 Dimensions...
Page 22: ...FR 2 2 22 Encombrement...
Page 33: ...DE 3 3 33 Platzbedarf...
Page 44: ...ES 4 4 44 Dimensiones...
Page 53: ...GR 5 3 53 I 120 mm...
Page 55: ...GR 5 5 55...
Page 57: ...GR 5 7 57 Vr 11a B 11a 3mm 1 A Vr 11 1 L B L A 11a Vr 11 o150 120 mm o120 mm 9 150 9 120...
Page 60: ...GR 6 0 60 1 5 V LR03 AAA T1 T2 T3 2 T4 2 T5 2 T6 T7 Delay 24h 2 24 T1 T6 T2 T3 T4 T5 T7...
Page 61: ...GR 6 1 61 2 G 2 1 A...
Page 62: ...GR 6 2 62 C 4 E 5 E 3 D C C G 2 1 A A B A B 20 W...
Page 63: ...GR 6 3 63...
Page 64: ...RU 6 4 64 I 120...
Page 66: ...RU 6 6 66...
Page 68: ...RU 6 8 68 Vr 11a B 2 11a 3 1 Vr 11 L 1 B L A 11a Vr 11 150 120 120 9 150 9 120...
Page 70: ...RU 7 0 70 A 1 B C D 10 I 100 24 F 30 G 2 100 200 5 I 1 L 1 3 1 F 5 B A D C E G F I H L...
Page 71: ...RU 7 1 71 1 5 LR03 AAA T1 T2 T3 2 T4 2 T5 2 T6 T7 24 2 24 T1 T6 T2 T3 T4 T5 T7...
Page 72: ...RU 7 2 72 G 2 1...
Page 73: ...RU 7 3 73 4 5 3 D G 2 1 A B 20...
Page 74: ...RU 7 4 74...
Page 75: ...SA 7 5 75 I 120...
Page 77: ...SA 7 7 77...
Page 79: ...SA 7 9 79 Vr 11 a B 11 a 3 A Vr 11 L B L A 11a Vr 11 120 150 120 9 150 9 120...
Page 81: ...SA 8 1 81 on off A B C I 10 D 24 100 3 E 30 F 100 C 200 G H on off I L F B A D C E G F I H L...
Page 82: ...SA 8 2 82 1 5 LR AAA T1 on off T2 T3 on off T4 T5 T6 T7 24 24 T1 T6 T2 T3 T4 T5 T7...
Page 83: ...SA 8 3 83 G A...
Page 84: ...SA 8 4 84 C 4 E 5 E D 3 C C G A A B A B 20...
Page 85: ...SA 8 5 85...
Page 86: ......
Page 87: ......


