


12
6
7
8
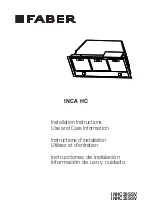
Attach each
charcoal
filter to the
black grid on
each side of
the blower.
Press the
charcoal
filter tightly
to the black
grid on the
blower side
and rotate
the filter
Replace the grease filters removed
previously.
Direct Connect Wiring Box
Accessory sku # WIREBOX
(purchased separately)
Created by
-
Denomination
-
Lang
EN
Sheet
1/1
Modif.by
Approved by
Approval date
Doc. status
Drawing N.
NEW_DRAWING_BOX
Rev
01
ELECTRICAL INSTALLATION WITH CONNECTION CABLE
ELECTRICAL INSTALLATION WITH
OPTIONAL WIRING BOX
For permanent wiring, use only the Direct Connect
Wiring Box accessory sku WIREBOX, manufactured
by Faber.
Max. 33
7/16
”
For Non-Ducted Recirculation
Option
Required Activated Charcoal Filter Accessory
- sku # - FILTER1
Long Lasting Activated Charcoal Filter
Accessory - sku # FILTER1LL
(purchased separately)
clockwise (towards the front of the insert hood)
until it locks into place. Turn counterclockwise
(towards the back of the insert hood) to remove.
EN
77
INSTALLATION
Fitting the Hood canopy
BEFORE FITTING THE HOOD TO THE WALL UNIT, PROCEED AS FOLLOWS:
• Disconnect the wires to the Commands at the connectors.
• Disconnect the wires to the Light at the con-
nectors.
• The Hood can be installed directly on the
underside of the wall unit (Minimum 650 mm
from the Cooker Hob).
• Create an opening in the bottom of the wall unit,
as shown.
• Insert the hood until the side supports snap into
place.
• Fasten using the 10 screws
12a
provided.
• Lock in position by tightening the screws
Vf
from
underneath the hood.
• Open the suction panel by turning the specific knob.
• Disconnect the panel from the hood canopy by sliding the
fixing pin lever.
• Remove grease filters.
• Screw the Frame into place
using the 6 screws
12f
, re-
connect the wires to the
Commands and Light, re-
place the metal grease filter
and the Panel.
260
13
495 - 675
1
2
GROUNDING INSTRUCTIONS This appliance must
be grounded. In the event of an electrical short circuit,
grounding reduces the risk of electric shock by providing
an escape wire for the electric current. This appliance
is equipped with a cord having a grounding wire with a
grounding plug. The plug must be plugged into an outlet
that is properly installed and grounded.
WARNING - Improper grounding can result in a risk of
electric shock.
Consult a qualified electrician if the grounding instructions
are not completely understood, or if doubt exists as to
whether the appliance is properly grounded.
Do not use an extension cord. If the power supply cord
is too short, have a qualified electrician install an outlet
near the appliance.
Summary of Contents for INHC29SSV
Page 5: ...5 RANGEHOOD DIMENSIONS REAR RANGEHOOD DIMENSIONS DRAFT 06 NOV 2018 12 04 INHC29SSV INHC35SSV...
Page 6: ...6 Min 24 Min 30...
Page 17: ...17 Wiring Diagram 991 0530 011 H90 503 D00004494_00 120V 60Hz...
Page 22: ...22 DIMENSIONS DE LA HOTTE DIMENSIONS DE LA HOTTE DRAFT 06 NOV 2018 12 04 INHC29SSV INHC35SSV...
Page 23: ...23 Min 24 Min 30...
Page 34: ...34 Sch ma de c blage 991 0530 011 H90 503 D00004494_00 120V 60Hz...
Page 40: ...40 Min 24 Min 30...
Page 51: ...51 Diagrama de cableado 991 0530 011 H90 503 D00004494_00 120V 60Hz...
Page 53: ...53...
Page 54: ...54...
Page 55: ...55...