OPEN A
STOP
FSW
SET UP
OPEN A
OPEN B
RADIO SET UP
7 PROGRAMMING
7.1 Setting the board
Set the unit with Dip-Switch DS1 to obtain the operation you
require.
7.2 Learning
During the learning procedure, the obstacle detection device
does not operate. However, the STOP command and the
closing safety devices (FSW) are enabled; if they are triggered,
learning is interrupted and a fault is signalled.
The SETUP cycle is carried out with the plastic housing
installed. Just remove the rear door (Fig. 4).
Grip the rear door with both hands and pull gently
downward. When you have finished the procedure
described in this chapter, put the door back in place.
The learning cycle makes it possible to define the following:
- the force required to move the door.
- the slow-down points.
- the opening and closing stop points.
- the pause time (in automatic logic).
Learning must be started with the operator locked, irrespective
of the door’s position.
The procedure also determines the operating logic.
The logic tables indicate the behaviour of the automated
system in different conditions, and following commands or
action by the safety devices.
Learning can be automatic or manual. In the latter case, the
opening and closing deceleration points can be determined.
However, in automatic mode, the unit independently determines
the movement parameters.
If the procedure is not correctly concluded (e.g. due to excessive
friction during door movement), the unit signals a fault status
(the SET UP LED flashes slowly). In this case, the procedure must
be repeated after the cause is eliminated.
LEARNING WITH LOGIC “E” (SEMI-AUTOMATIC LOGIC)
AUTOMATIC LEARNING WITH LOGIC “E” (SEMI-AUTOMATIC
LOGIC)
Press the SET UP push-button for one second.
The SET UP LED starts to flash when you release the
push-button.
1) After 8 seconds the operator automatically closes the door
until the stop point is detected.
2) The operator begins the opening movement. Wait until the
stop point is reached, or give an OPEN command in the
position where you wish to stop motion.
3) The operator closes the door.
4) Wait for the door to reach the stop point and for the
operator to stop.
If the learning procedure terminated positively, the SET UP LED
stops flashing and stays lighted for 5 seconds.
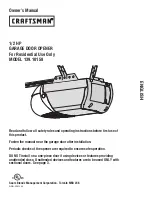
Fig. 5
Fig. 4
Radio signal programming push-button OPEN B.
RADIO SET UP LED signalling that the OPEN B radio signal is stored in the memory.
Radio signal programming push-button OPEN A.
RADIO SET UP LED signalling that the OPEN A radio signal is stored in the memory.
LED signalling the SET UP stage.
LED signalling photocells status.
LED signalling STOP.
LED signalling OPEN A.
OPEN push-button to totally open sectional door.
SET UP push-button for programming operating logics and learning work times.