background image

pg. 4


TEACH A WORKING REMOTE TO A NEW KEYPAD 


1.


First you will need to put the NEW 

keypad in “

Learning

” mode.


(#  1234  #  9  #  1)


2.


Place the working 

remote into “

Programming

” 

mode and then press and HOLD the working 
button to start transmitting the code. 
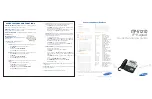
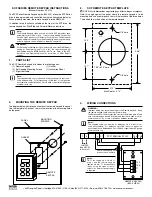
3.


Place the remote on top of the existing keypad 
as shown in the image. 

4.


On the new keypad, press and hold # for 5 
seconds. The


Green LED on the new keypad will 

turn on for 0.5 sec and will beep once to confirm 
the procedure was successful. 

7.


 The first time you use the NEW keypad you will 
need to activate the channel.  To do this you need to 

 enter the user code 

followed by the letter E, wait until green LED turns off, then press E again. 


PROGRAMMING SUMMARY  

 
RESTORE FACTORY SETTINGS 
#  PWD  #  5  #  5  # 
 
CHANGE THE PWD 
#  PWD  #  4  #  newPWD  #  newPWD  # 
 
DELETE A USER CODE 
#  PWD  #  2  #  code  #  code  # 
 
DELET ALL USER CODES 
#  PWD  #  3  #  3  # 


Summary of Contents for CENTSYS XKP

Page 1: ... allows one 4 digit code to be entered to activate one radio channel The keypad has 12 programming functions Below is a list of functions that can be selected when programming These instructions will only cover functions 1 4 8 9 For all other instructions please refer to the full manual 1 Store a user code 2 Delete a user code 3 Delete all user codes 4 Change the password 5 Restore factory setting...

Page 2: ...he code 9 8 7 6 E as the activation code for your gate After 60 sec the keypad will exit programming mode or you can press E for a quick exit Teach the Keypad to a Receiver Card 8 This will allow you to program Channel 1 of the keypad to your receiver card During this process the keypad needs to be at least 30cm away from the receiver 1234 8 1 place the receiver into learn mode then press and hold...

Page 3: ...channel To do this you need to enter the user code followed by the letter E wait until green LED turns off then press E again TEACH A WORKING KEYPAD TO A NEW REMOTE 1 First you will need to put the working keypad in Teaching mode 1234 8 1 2 Place the NEW remote into Programming mode 3 Place the remote on top of the existing keypad as shown in the image 4 On the existing keypad press and hold 5 On ...

Page 4: ... On the new keypad press and hold for 5 seconds The Green LED on the new keypad will turn on for 0 5 sec and will beep once to confirm the procedure was successful 7 The first time you use the NEW keypad you will need to activate the channel To do this you need to enter the user code followed by the letter E wait until green LED turns off then press E again PROGRAMMING SUMMARY RESTORE FACTORY SETT...

Reviews: