background image

ANOMALIE DI FUNZIONAMENTO   

Operating anomalies

Defauts de fonctionnement

Anomalias de funcionamiento   

Funktionierenden Abweichungen

14

Il miscelatore non eroga 

sufficiente acqua calda o 

acqua fredda:

- Verificare che tutte le 

specifiche di funzionamento 

e di installazione indicate sulle 

istruzioni siano rispettate.

- Con l’acqua tutta aperta, 

muovere la maniglia di 

regolazione della temperatura, 

nella posizione di temperatura 

minima (tutta fredda). Dopo 

qualche secondo, muovere 

alternativamente la maniglia da 

tutta fredda a tutta calda per 

alcune volte. Verificare se dopo 

questa operazione il miscelatore 

funziona correttamente.

- Se l’anomalia persiste, smontare 

il miscelatore e verificare che 

le valvole di non ritorno e i filtri, 

funzionino correttamente e 

non presentino sporco al loro 

interno. Se le valvole e i filtri sono 

pulite, smontare la cartuccia 

termostatica e procedere nella 

pulizia dei suoi componenti, 

seguendo le procedure indicate 

nelle istruzioni (vedi pag.10).

- Se la temperatura dell’acqua 

erogata (con maniglia di 

regolazione su posizione 38°C) 

è diversa, procedere con 

la ritaratura della cartuccia 

termostatica seguendo la 

procedura indicata nelle 

istruzioni (vedi pag.12).

A rubinetto chiuso il miscelatore 

perde acqua dall’uscita 

principale:

- Chiudere l’acqua calda e 

fredda, smontare la maniglia e 

il vitone di chiusura, verificare 

se siamo in presenza di sporco, 

pulire bene e rimontare. 

NEL CASO LE ANOMALIE NON 

VENGANO RISOLTE CONTATTARE 

IL SERVIZIO CLIENTI F.LLI FRATTINI.

The mixer does not supply 

enough hot or cold water:

- Check that all operating and 

installation instruction are strictly 

observed

- With the operating handle on, 

move the handle (temperature 

adjusting) to the minimum 

temperature (cold water). After 

few seconds, move alternatively 

the handle from cold to hot 

water and repeat again for 

many times. Then check whether 

the mixer is now operating 

correctly.

- If the problem carries on, 

disassemble the mixer and verify 

that the non-return valves and 

filters are correctly operating 

and are not dirty inside. If they 

are clean, disassemble the 

thermostatic cartridge and 

clean the components, following 

the procedure shown in the 

instructions (see page. 10).

- If the temperature of the water 

(with the temperature adjusting 

handle positioned at 38°C) is 

different, adjust the temperature 

of the thermostatic cartridge 

following the procedure as 

indicated in the instructions (see 

page 12).

The mixer handle is closed 

but water is leaking from the 

principal outlet:

- Turn off the hot and cold water, 

remove the handle and the on 

off cartridge. Check if there are 

some dirty and impurities then 

clean and assemble again.

IF THE ANOMALIES CANNOT 

BE SOLVED, CONTACT THE 

CUSTOMER SERVICE OF F.LLI 

FRATTINI.

Le mitigeur ne débite pas 

suffisamment eau chaude 

ou eau froide:

- Vérifier que toutes 

les instructions pour le 

fonctionnement et l’installation 

indiqués dans ce manuel soient 

respectées.

- Avec l’eau ouverte, déplacer 

la poignée de graduation 

température dans la position de 

température minimale (froide). 

Après quelques secondes, 

déplacer alternativement la 

poignée de froide à la chaude 

pour quelque fois. Vérifier si 

après cette opération le mitigeur 

fonctionne correctement.

- Si le problème persiste, 

démonter le mitigeur et vérifier 

que les clapets anti-retour et 

les filtres ne sont pas sales et ils 

fonctionnent correctement. Si 

clapets et filtres sont propres, 

démonter la cartouche 

thermostatique et nettoyer 

ses components, en suivant la 

procédure indiquée dans ce 

manuel (voir page 10).

- Si la température de l’eau 

mitigée (avec la poignée de 

graduation sur la position 38°C) 

est différente, tarer de nouveau 

la cartouche thermostatique en 

suivant la procédure indiquée 

dans ce manuel.

Mitigeur fermé, l’eau coule par la 

sortie principale:

- Fermer l’eau chaude et froide, 

démonter la poignée et la 

cartouche de fermeture, vérifier 

s’il y a des impuretés et nettoyer, 

enfin assembler de nouveau.

DANS LE CAS OU LES PROBLEMES 

PERSISTENT CONTACTER LE 

SERVICE CLIENTS DE F.LLI FRATTINI.

IT

EN

FR

Summary of Contents for 53730

Page 1: ...t sorgfalt Werden an den endverbraucher gegeben Conservar con diligencia Entregar a l utilizador final ISTRUZIONI DI INSTALLAZIONE MISCELATORE INCASSO DOCCIA 2 3 VIE 2 3 WAY BUILT IN SHOWER MIXER INSTALLATION INSTRUCTIONS MITIGUER A ENCASTRER 2 3 VOIES INSTRUCTION PUOR INSTALLATION 2 3 WEGE UP DUSCHENMISCHER INSTALLATIONSAWEISUNGEN MEZCLADOR EMPOTRADO DUCHA 2 3 VIAS ...

Page 2: ...uation du thermostate Secuencia para la calibracion del termostato Gradeinteilungsequenz des Thermostats ANOMALIE DI FUNZIONAMENTO Operating anomalies Defauts de fonctionnement Anomalias de funcionamiento Funktionierenden Abweichungen DATI DI PORTATA E DISEGNI TECNICI Flow rate and technical drawings Debit de l eau et dessins Datos de portada y dibujos dimensionales Durchflussmenge Daten und Techn...

Page 3: ...a température 20 C 60 C Différence minimale entre température d arrivée de l eau chaude et de la température maximale de l eau mélangée est de 10 C Si la pression de l eau dépasse les 5 bar il est recommandé d installer un détendeur de pression Pressions de fonctionnement Maximum 5 bar Minimum 1 bar Recommandée 3 bar Pour garantir un fonctionnement optimal du mitigeur il est très important que les...

Page 4: ...2 OPZIONI DI COLLEGAMENTO Connection options Branchements Opcion de conexion Verbindungs Wahl CALDA HOT FREDDA COLD min 1000 2000 2200 PIANO DOCCIA SHOWER TRAY ...

Page 5: ... USCITA A SINISTRA LEFT OUTLET SORTIE A GAUCHE SALIDA A LA IZQUIERDA LINKS AUSGANG USCITA A DESTRA RIGHT OUTLET SORTIE A DROITE SALIDA A LA DERECHA RECHTS AUSGANG USCITA AMBO I LATI OUTLET ON BOTH SIDES SORTIE SUR LES DEUX COTES SALIDAS A AMBOS LADOS AUSGANG BEI BEIDERSEITS G3 4 G3 4 G3 4 G3 4 ...

Page 6: ...he tap to the system to ensure a good operation Purger les tuyauteries avant de brancher le robinet à l installation pour garantir un bon fonctionnement Limpiar la tuberìas antes de conectar el grifo en el sistema para aseguar un buen funcionamiento Vor der Installation der Armatur sind alle Rohrleitungen gut durchzuspulen um eine gute Funktion zu gewahrleisten ...

Page 7: ...MONTAGGIO Installation Installation Montaje Einbau 5 1 2 3 4 ...

Page 8: ...6 MONTAGGIO Installation Installation Montaje Einbau 5 6 7 8 ...

Page 9: ...6 Installation of the additional parts art 99730 99736 Installation des modules additionnels art 99730 99736 Instalacion de los modulos adicionales art 99730 99736 Zusatz Module Art 99730 99736 Installation 7 1 2 Utilizzare Teflon per collegamento ...

Page 10: ...99736 Installation of the additional parts art 99731 99736 Installation des modules additionnels art 99731 99736 Instalacion de los modulos adicionales art 99731 99736 Zusatz Module Art 99731 99736 Installation Utilizzare Teflon per collegamento ...

Page 11: ...PULIZIA FILTRI Filters cleaning Nettoyage des filtres Limpieza filtros Reinigung des Filters 9 ...

Page 12: ...RTUCCIA TERMOSTATICA Maintenance and replacement of the thermostatic cartridge Entretien et remplacement cartouche thermostatique Mantenimiento sustitucion cartucha termostatica Wartung und Austausch der Kartusche Thermostat Oberteil ...

Page 13: ...SOSTITUZIONE VITONE Headwork replacement Remplacement de la tête du robinet Sustitucion viton Austausch der Oberteil 11 ...

Page 14: ... la calibracion del termostato Gradeinteilungsequenz des Thermostats 12 POSIZIONE DI RIFERIMENTO REFERENCE POSITION POSITION DE REFERENCE REFERENZPOSITION POSICION DE REFERENCIA ANELLO DI SICUREZZA 38 C 38 C SAFETY RING ANNEAU DE SECURITE 38 C 38 C SICHERHEITSRING ANILLO DE SECURIDAD 38 C ...

Page 15: ...la cartouche thermostatique Vérifier que l anneau de sécurité température 38 C soit positionné comme indiqué dans la figure Replacer la poignée en faisant attention que la marque des 38 C sur la poignée correspond avec la marque sur le corps extérieur et sur la plaque encastré Visser la vis et monter la plaquette avec la poignée arrêtée Abrir la manija de descargo del mezclador y medir la temperat...

Page 16: ...em carries on disassemble the mixer and verify that the non return valves and filters are correctly operating and are not dirty inside If they are clean disassemble the thermostatic cartridge and clean the components following the procedure shown in the instructions see page 10 If the temperature of the water with the temperature adjusting handle positioned at 38 C is different adjust the temperat...

Page 17: ...iedad limpiar bien y remontar EN CASO DE QUE LAS ANOMALIAS NO VENGAN RESUELTAS CONTACTAR EL SERVICIO CLIENTE F LLI FRATTINI Der Mischer liefert nicht genügend Heißwasser oder kaltes Wasser Alles Gebrauchs und Montage Vorschriften prüfen ausschließlich beobachtet werden Mit dem Handgriff an die Temperaturgriff drehen zu Minimal kaltes Wasser Nach einigen Sekunden den Handgriff von kaltem auf heiß W...

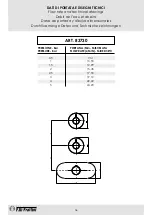
Page 18: ...eau et dessins Datos de portada y dibujos dimensionales Durchflussmenge Daten und Technische zeichnungen PRESSIONE Bar PRESSURE Bar ART 83730 0 5 1 1 5 2 2 5 3 4 5 7 14 10 55 12 99 15 45 17 55 19 12 22 22 24 23 PORTATA L Min MISCELATA FLOW RATE L MIN MIXED 38 C 120 120 190 75 75 75 ...

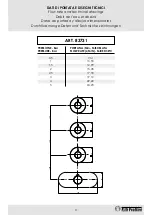
Page 19: ... et dessins Datos de portada y dibujos dimensionales Durchflussmenge Daten und Technische zeichnungen PRESSIONE Bar PRESSURE Bar ART 83731 0 5 1 1 5 2 2 5 3 4 5 7 14 10 55 12 99 15 45 17 55 19 12 22 22 24 23 PORTATA L Min MISCELATA FLOW RATE L MIN MIXED 38 C 120 120 120 190 75 75 75 75 ...

Page 20: ...Produttori di rubinetteria Made in Italy da oltre 60 anni Via Roma 125 28017 San Maurizio d Opaglio NO ITALY tel 0322 96127 fax 0322 967272 www frattini it info frattini it D766B20082 ...

Reviews: