


5
4. HARDWARE OVERVIEW
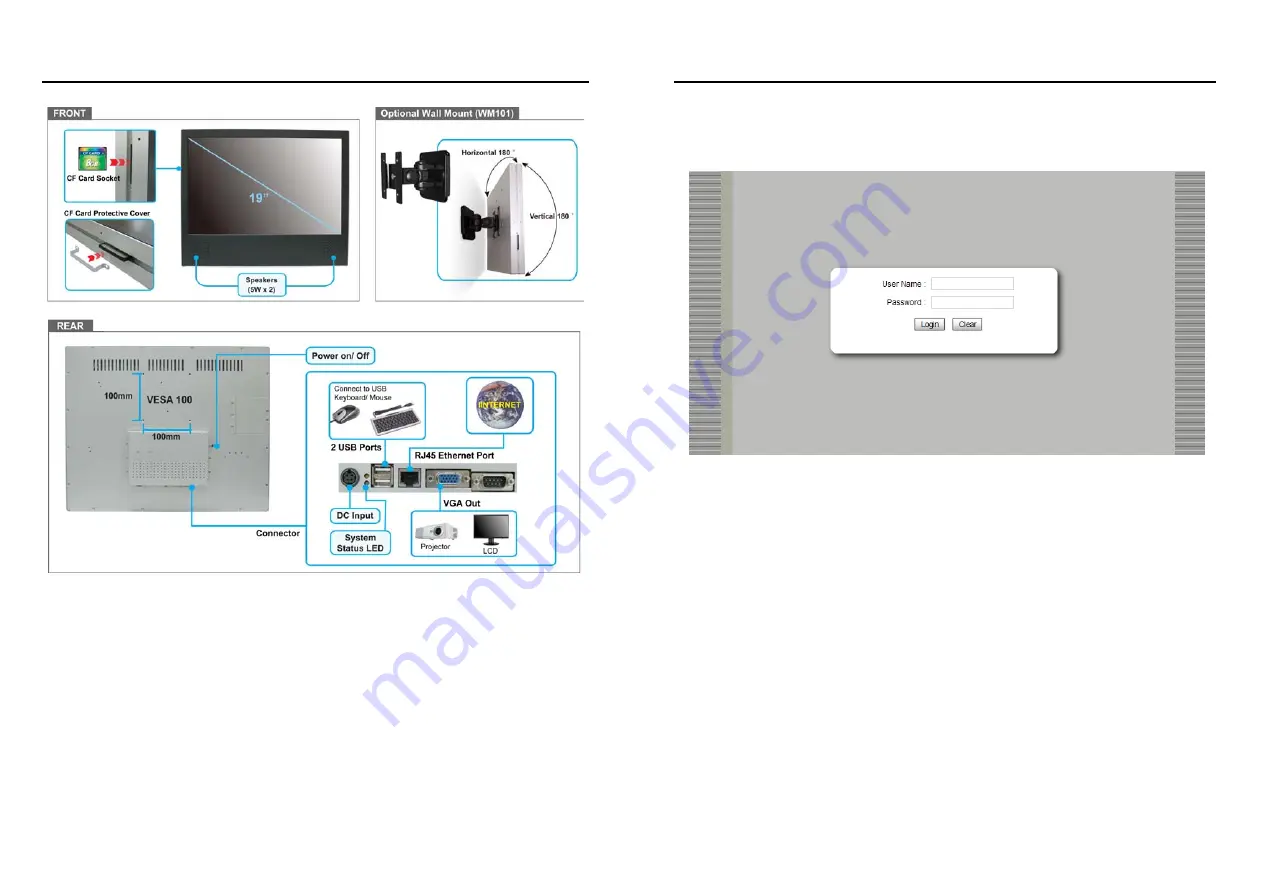
CF Card Socket:
Supports CF card, up to 8 GB.
Speakers:
Build-in speakers (5W x 2).
VESA Hole:
Provides VESA Hole (100 x 100 mm) for wall-mounted purpose.
Power On/ Off:
Press the button to turn on/ off the unit.
DC Input:
Connect the provided power adapter (DC 12V, 7A).
System Status LED:
Indicates network access, storage access and power status
USB Port:
Supports x 2 USB interfaces for connecting keyboard and mouse
RJ45 Ethernet Port:
For connects to 10Base-T Ethernet cabling or 100Base-TX Fast Ethernet
cabling.
VGA Output:
Supports one VGA output for external monitor.
6
5. SETTING UP
5.1 Entering the Management Console
User could enter the management console, ether on PAE15/ 17/ 19/ 22V.I.P start up or when it is
running. About the methods to enter the management console are list below:
Entering the Management Console on Startup:
Step1:
Connect the keyboard to the USB port of PAE15/ 17/ 19/ 22V.I.P before start it.
Step2:
Remove the CF card if there is any CF card inserted to the CF socket.
Step3:
Boot the PAE15/ 17/ 19/ 22V.I.P and wait for the login console appear.
Step4:
Enter the “User Name” and “Password” and click on the “Login” button. (The default user name
and password are Admin/ Admin)
Step5:
Click on the “Clear” button for clearing the “User Name” and “Password” text box if the user
inputted the wrong user name and password.
Entering the Management Console when PAE15/ 17/ 19/ 22V.I.P is running:
Step1:
Connect the keyboard to the USB port of PAE15/ 17/ 19/ 22V.I.P.
Step2:
Press “Ctrl” and “E” key simultaneously for switching the PAE15/ 17/ 19/ 22V.I.P from playing
mode to management mode.
Step3:
Enter the “User Name” and “Password” and click on the “Login” button. (The default user name
and password are Admin/ Admin)
Step4:
Click on the “Clear” button for clearing the “User Name” and “Password” text box if the user
inputted the wrong user name and password.


