background image


7. SETTING UP                                                             


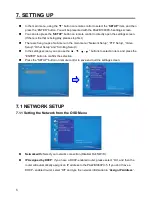
In the main menu, using the “▼” button on remote control to select the “

SETUP

” item, and then 

press the “ENTER” button. You will be presented with the PA22B1080PX-5 settings screen. 


You can also press the “

SETUP

” button on remote control to directly open the settings screen. 

(If there is file that is being play, please stop first.) 


There are five groups of sub-

menu in the main menu (“Network Setup”, “FTP Setup”, “Video 

Setup”, “Other Setup” and “Scrolling Setup”). 


In the settings screen, you can use the “▲

▼ ” buttons to select an item, and press the 

“ENTER” button to confirm the selection. 


Press the “SETUP” button on remote control to save and quit the settings screen. 


7.1 NETWORK SETUP 

7.1.1 Setting the Network from the OSD Menu   


Network with: 

Select your network connection (Disable/ RJ45/ WiFi). 


IP Assigned by DHCP: 

If you have a DHCP-

enabled router, please select “On”, and then the 

router will automatically assigns an IP address to the PA22B1080PX-5

. If you don’t have a 

DHCP 

–enabled router, select “Off” and type the network information in “

Assign IP Address

”.


Summary of Contents for PA22B1080PX Series

Page 1: ...1 EYEZONE PA22B1080PX 5 User Manual Aug 10 10...

Page 2: ...n the CF Card 18 8 2 Multiple Display Zones 21 8 3 Video In 22 8 4 FTP Auto Download Function 24 8 5 RS232 Function 27 8 6 Log Setup 27 9 Http Command Function 28 9 1 Control 29 9 2 Network 30 9 3 Ser...

Page 3: ...from CF memory card without a computer The media files can be automatically updated at the specific time from an FTP server What s more the PA22B1080PX 5 supports multiple display zones you can play t...

Page 4: ...played Connect using an Ethernet network cable at up to 100Mbps Supports CF memory cards Suggest using the high speed 150X CF card Supports HTTP Control Function Supports Auto Key Lock Function Export...

Page 5: ...card with contents RS 232 Connector Used for computer control with ASCII command Video Audio Input Connects to video sources TV Box or DVD player DC Input For the power adapter DC 12V 4 16A RJ 45 Eth...

Page 6: ...playback Select the repeat mode Rewind forward movie or music files Stop playback Show the information of the file selected Search video movie timeframe Zoom in out on the movie or picture Pause the p...

Page 7: ...Status 1 If the AUTOPLAY Movie Picture All Files MultiLayer Video In function is enabled and there are media files on the CF card or the PA22B1080PX 5 is already connected to the display device the PA...

Page 8: ...tup Other Setup and Scrolling Setup In the settings screen you can use the buttons to select an item and press the ENTER button to confirm the selection Press the SETUP button on remote control to sav...

Page 9: ...ask and Gateway Default Gateway for the PA22B1080PX 5 Enter the same values of the Subnet Mask and Gateway and be careful not to enter the values of IP address that are already used by other devices o...

Page 10: ...driver CD into your CD ROM drive then the autorun function will start up the shell program If the autorun window does not display please execute the Autorun exe program to bring out the autorun scree...

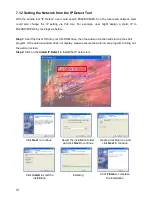
Page 11: ...under a DHCP enabled network user sometimes does not know which IP address is assigned to PA22B1080PX 5 User could also use this tool as a Finder for locating the IP address of PA22B1080PX 5 By pressi...

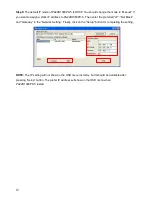
Page 12: ...PA22B1080PX 5 Then enter the preferred IP Net Mask and Gateway in the Network Setting Finally click on the Setup button for completing the setting NOTE The IP setting will not show on the OSD menu ins...

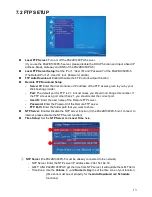
Page 13: ...his number If the FTP site uses a port other than 21 you should enter the correct port User ID Enter the user name of the Remote FTP server Password Enter the Password of the Remote FTP server FTP Pat...

Page 14: ...dland GMT 06 00 Astana Dakar GMT 03 00 Greenland GMT 08 00 Irkutsk Ulan Bator GMT 03 00 Buenos Aires Georgetown GMT 08 00 Kuala Lumpur Singapore GMT 03 00 Brasilia GMT 08 00 Taipei GMT 02 00 Mid Atlan...

Page 15: ...card automatically after power on Pictures Play picture files on the CF card automatically after power on slideshow function All Files Play all files movie and picture files on the CF card automatica...

Page 16: ...RJ45 Step4 Copy the completed file HDPlayerSetting txt from PC to CF card Insert the CF card to the PA22B1080PX 5 the PA22B1080PX 5 will apply the new settings automatically Play Button Only for used...

Page 17: ...olling text and the pictures are on the right Picture Slide Set the mode of picture slideshow By Slide Time Match Video Scrolling text Select the font Latin1 Latin2 Japanese Greek that the user wants...

Page 18: ...Step 2 Select the type of data VIDEO AUDIO PICTURES you want to play and then press the ENTER button on remote control to take you into the VIDEO LIBRARY AUDIO LIBRARY or PICTURE LIBRARY Note If the...

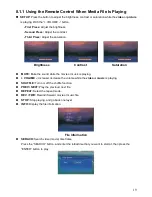
Page 19: ...on MUTE Mute the sound while the movie or music is playing VOLUME Increase decrease the volume while the video or music is playing SHUFFLE Turn on off the shuffle function PREV NEXT Play the previous...

Page 20: ...20 PAUSE STEP Pause the playback or play frame by frame ZOOM Zoom in out on the movie or picture Original Size First Press ZOOM 01 Second Press ZOOM 02 Third Press ZOOM 03...

Page 21: ...the picture files 0 png 9 png If you select the Match Video item of the picture slide mode the file name of the picture must be the same of the corresponding movie file Text File Use the Notepad to cr...

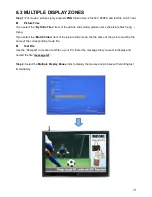
Page 22: ...Video In item to directly play the live videos on your screen Mode 2 Play live videos with scrolling text Step 1 Connects the Video source DVD Player or TV Box to video input of PA22B1080PX 5 Step 2...

Page 23: ...d set the picture slide mode to By Slide Time refer to section 7 4 Scrolling Text Setup and named the picture files 0 png 9 png supports up to 10 pictures Step 3 Use the Notepad to create a text file...

Page 24: ...the PA15 17 19 22B1080PX is 00 10 and the entered value is 45 15 The PA15 17 19 22B1080PX will connect to the FTP server and check whether the commands file in the FTP server at 00 45 than again every...

Page 25: ...Latin1 Set the font of scrolling text Please enter Latin1 Latin2 Japanese or Greek background Off Enable or disable the scrolling text background On Enable the background Off Disable the background mo...

Page 26: ...iles command file ex d0013fe089253 txt schedule ini message1 txt to the FTP server The PA22B1080PX will read the command file ex d0013fe089253 txt and download the specified files NOTE The filename of...

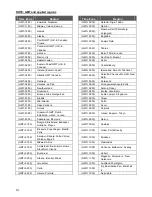
Page 27: ...lay P PAUSE STEP l LEFT i INFO x STOP r RIGHT m NTSC PAL f FFW s ENTER SEARCH b REW C CLEAR XXXXX XXX Play The File xxxxx xxx is the file name NOTE Must include the round brackets number Play the file...

Page 28: ...or firewall and open a port 80 for the PA22B1080PX 5 The following figure is an example please refer to your user s manual of router for opening ports Start IE Browser on PC and type the HTTP site or...

Page 29: ...ay mode Enable Enable or disable the auto play function Movies Play movie files on the CF card automatically after power on Pictures Play picture files on the CF card automatically after power on All...

Page 30: ...reless General Setup Enable DHCP Enable or disable the DHCP function IP Subnet Gateway DNS server Enter the fixed IP address Subnet Gateway and DNS for the PA22B1080PX 5 Wireless Setup SSID Enter the...

Page 31: ...FTP server Password Enter the password of the remote FTP server Local FTP Server Setup Enable Turn on off the PA22B1080PX 5 server Port Enter the port of the PA22B1080PX 5 ID Enter the user name of t...

Page 32: ...32 9 4 TIME NTP Server Enable Enable or disable the NTP server function GMT Server Enter the NTP server IP address like 66 187 233 4 Time Zone Set the time zone of your location...

Page 33: ...he password of the PA22B1080PX 5 default password admin Web Auth Select the Enable Auth checkbox you will need to enter the username root and password admin to login Scrolling Text Enter the message t...

Page 34: ...es not display please execute the Autorun exe program to bring out the autorun screen Step2 Click on the Install Schedule Maker to install the schedule software Step3 After installing the schedule sof...

Page 35: ...o choose a video file or HDMI input The following diagram appears Click on Add Video In button for instructing the player to play the HDMI input only Click the Browser button to search for files that...

Page 36: ...nt to modify in the list and press the Modify button Remove Click this button to remove the file from the list Select the file that you want to remove from the list and press the Remove button to dele...

Page 37: ...2 Advance Schedule In the Advance Schedule mode you can select files that you want to play and can also set up the play times and the initial and end time of each file There are Time Setup and File S...

Page 38: ...etup Or you can add video in schedule by pressing Add Video In button for instructing the player to play the Video In in a specific period of time Step 3 Repeat the steps 1 and 2 to add other files or...

Page 39: ...e Check the date time of the schedule for conflict or error No any schedule file in advance schedule Can t Save There is no schedule file in the advance schedule Please add files that you want to play...

Page 40: ...s are a01 xxx 33 xxx b55 xxx 1abc xxx 07 xxx and A01 xxx xxx is extension of the file Default File 07 xxx Demo File 1 1abc xxx Demo File 2 33 xxx Demo File 3 A01 xxx Demo File 4 a01 xxx Demo File 5 b5...

Page 41: ...the wireless 5 Touch Sensor Buttons Put 6 demo files on CF card 1 default file and 5 demo files NOTE The files are sorted by filename in ascending order alphanumerically numbers upper case letters lo...

Page 42: ...while powered on Step 2 Press one of the touch sensor buttons 1 5 to play the corresponding demo file Step 3 The PA22B1080PX 5 supports two options Repeat Default Repeat All when the demo file finish...

Page 43: ...is set properly No Responding while pressing the wireless touch sensor buttons 1 Confirm the polarity of the battery 2 Check that there are no obstacles between the touch sensor buttons and the sensor...

Reviews: