background image


U

SER

M

ANUAL


H.264


R

EAL 

T

IME 

DVR 

65 

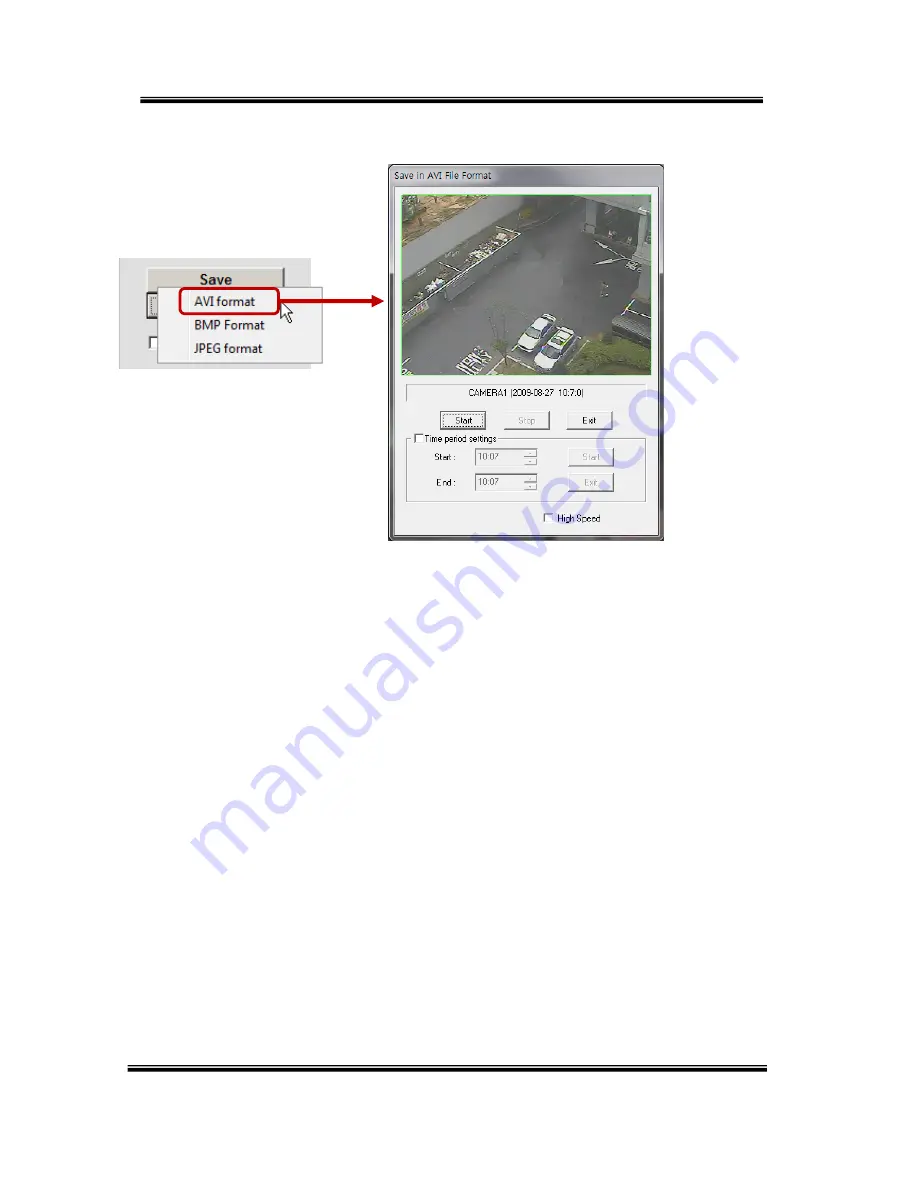
4. Saving as AVI file dialog box 


  Camera name/Date/Time which is currently displayed. 

  Starting AVI saving (File name is requested when you click on this button.) 

 Stopping 

AVI 

saving 

  Closing Save as AVI dialog box (It will be closed automatically after stopping AVI file if it is 

being saved.) 

  Specifying time period to save AVI file. 

  Starting time to save AVI file. 

  Stopping time to save AVI file. 

  Starting periodic AVI file saving 

  Closing after finishing AVI file saving. 

  Increasing AVI saving speed with reducing displaying frame rate. 

Summary of Contents for HX-04

Page 1: ...e ey ye em ma ax x H HX X S Se er ri ie es s M Mo od de el l H HX X 0 04 4 0 08 8 SecureYour Life Protect Your Dreams H 264 DIGITAL VIDEO RECORDER U Us se er r s s M Ma an nu ua al l Rev 1 0 ...

Page 2: ... damaged cable unstable installation etc are identified please contact your nearest service center It can cause an electric shock or a fire Because the cable connected to this device can be damaged keep at least 15cm of clearance between where the product is installed and where the power outlet is It can cause a fire an electric shock or an injury Install the product in a cool location not exposed...

Page 3: ...uctions in the literature accompanying the appliance THE GRAPHIC SYMBOLS WITH SUPPLEMENTAL MARKING ARE ON THE BOTTOM OF THE SYSTEM WARNING TO PREVENT FIRE OF SHOCK HAZARD DO NOT EXPOSETHE UNIT TO RAIN OR MOISTURE This equipment has been tested and found to comply with the limits for a Class A digital device pursuant to part 15 of the FCC Rules These limits are designed to provide reasonable protec...

Page 4: ...ct at a location close to a product or broadcast receiver with strong electric or magnetic wave Do not put heavy objects on top of the product It can cause a problem to the product Install the product at a flat and stable location The product may not operate normally The product at a location with appropriate level of temperature and humidity Do not install the product where the temperature is too...

Page 5: ...itial settings 12 1 7 RS 485 connection 13 1 8 Control port Output connection 13 1 9 Sensor Input connection 13 1 10 About internal hard disk 14 Chapter 2 Main system application 2 1 Operation 19 Start up 19 Shutdown 21 2 2 Live Display 22 2 3 System setting 28 System 28 Video Audio 32 Event 37 Network 45 User 50 2 4 PTZ control 53 2 5 Search playback backup 55 Time search 55 Event search 56 Backu...

Page 6: ...n 62 Web viewer monitoring window 62 Web viewer search window 63 Search menu 64 Saving as AVI file 65 Chapter 4 Using smart phone 4 1 Functional description 67 Real time monitoring 67 Chapter 5 Appendix 5 1 Check before requesting for service 69 5 2 Recommended device to use 72 5 3 Factory default 74 5 4 Product specification 79 ...

Page 7: ... 3 Front side 9 1 4 Rear side 10 1 5 Remote Controller 11 1 6 Connection and initial setting 12 1 7 RS 485 connection 13 1 8 Control port Output connection 13 1 9 Sensor Input connection 13 1 10 About internal hard disk 14 C CH HA AP PT TE ER R 1 1 I In ns st ta al ll la at ti io on n ...

Page 8: ...tion Real time video display and recording network transmission and back up can be performed simultaneously z Easy search functions Date Time search Calendar search event search z Recording before event Can be 2 seconds z Recording after event Can be only up 10 seconds z The operating condition pre check function according to the change in motion detection and movement detection z Can set recordin...

Page 9: ...CHANNEL SELECTION 1 4ch selection push 1 5 4 8 is each 1 4 buttons 5 8 You should push CH 1 5 5th channel SPLIT Used to channel screen division 1 4 6 9 Auto Sequential PLAYBACK BUTTONS Used for operation in playback mode Record It is used for recoding data LIVE SEARCH Used to change to live search mode BUTTONS Used to control PTZ zoom in out of time bar and change configurations AUTO OK BUTTONS Us...

Page 10: ...NUAL H 264 REAL TIME DVR 10 1 4 Rear side E Sata port for External HDD Camera input Spot output up Main Monitor output Down Audio in and out VGA Network Port USB Port RS485 SENSOR INPUT RELAY OUTPUT Power input ...

Page 11: ... cancel button about 3 seconds then light of power button turns on 2 Enter two digit numbers which is the id of remote controller using number keys You have to input 0 first when you are to input one digit number Ex In case you want to use 2 as ID input 02 3 Every time you press the number key the light of power button will blink 4 Stopping blinking means that the id is saved ...

Page 12: ...ices can be connected to this device in numerous methods Refer to the user manual of the camera or other external device for addition information on connection methods z When installing the camera check whether the power of the camera is turned off z After installing the monitor turn on the power of the DVR 4CH 8CH ...

Page 13: ...to use PTZ camera and keyboard at the same time 1 8 Control port output connection For interface and auto control with the external sensor the interfacing control output port Set value from Setup Æ Event Æ Sensor Motion Video loss menu and the RELAY port are connected If the control device Alarm light amplified siren external relay etc is NC Normal Close type connect to the control output NC Norma...

Page 14: ...lacing or moving the HDD The recorded data can be lost In this case turn on the power with the original hard disk that was used while the power outage occurred And then add replace or move the HDD z Because the hard disk is a high precision device the parts inside the disk can be damaged at the slightest impact Please read the following precautions in detail and follow the directions Do not direct...

Page 15: ...cket to hard disk Connect the SATA cable to the hard disk Set the SATA cable connection port to lower direction to install the hard disk to the bracket Connect the bracket marked as L To the left side of hard disk Connect the bracket marked as R to the right side of hard disk Connect power cable Connect SATA cable ...

Page 16: ...en the screws on the left and right side of the bracket holding the hard disk Separate the hard disk from the bracket holding the hard disk In the reverse order of removing the hard disk assemble the new hard disk After replacing the hard disk turn on the power of the device Reference Each SATA cable must be connected to the connecting port precisely Do not vertically put the hard disk in upright ...

Page 17: ...rer Model name Capacity Seagate ST3250312CS 250GB ST3250310CS ST3320613AS 320GB ST3500312CS 500GB ST3750330SV 750GB ST31000322CS 1TB ST31000528AS ST31500341AS 1 5TB ST32000542AS 2TB Notice HDD not in the recommended list may not work properly even if it is detected by DVR Caution When you select the hard drive in use for resetting the video data saved previously will be deleted Therefore you must ...

Page 18: ...2 2 Live Display 21 2 3 System setting 27 System 27 Video Audio 32 Event 37 Network 45 User 50 2 4 PTZ Control 53 2 5 Search playback and backup 55 Time search 55 Event search 56 Backup 57 C CH HA AP PT TE ER R 2 2 M Ma ai in n s sy ys st te em m a ap pp pl li ic ca at ti io on n ...

Page 19: ...er button to turn on this device then it boots with power indicator light turned on 2 After booting Login window will be displayed Notice without login by any user DVR works as guest mode and only the live display can be controlled After login by admin DVR setting is enabled ...

Page 20: ...admin with password 000000 Click button then you will see the screen keypad as right 3 Input password by using virtual keypad on screen 4 Click Login button to execute DVR system and you will see live screen I admin for system administrator Access rights to Live Search and Setup II guest Access rights to Live only III user1 user2 user3 for general user Access rights can be set by administrator ...

Page 21: ...Press Log out button in Main Menu while you are logged in then logout window will be displayed as below A Selection Select Logout or Shutdown B User Display current user has logged C Password Input password 2 Click OK button to Logout or Shutdown A B C ...

Page 22: ...nnel name you can do so by selecting Setup Æ Video Audio Æ Camera Status icon OSD Status icon shows current status of camera recording OSD feature Item Icon Description Camera Audio icon Motion icon PTZ icon Recording Continuous recording Emergency recording Recording by motion No recording Recording by sensor ...

Page 23: ...ontroller It shows current live view as real time Current date time A It shows current date time You can change date time setting at Setting Æ System Æ Date Time System control toolbar Live screen 1 Menu Click Menu bar to see system control bar 2 Set up You can set up DVR systems 3 Search You can enter the search menu 4 PTZ You can enter PTZ operation menu ...

Page 24: ... and information of DVR This shows the system log in DVR Click button from live screen to show the list of system log You can see the log of previous date or next date by using buttons You can see the previous or next log list by using buttons Click OK button to close window ...

Page 25: ...t comes in it will be automatically detected and cannot be set by user h HDD capacity It displays the capacity of hard disk and current utilization ratio i HDD status It displays the status of HDD which is shown Good or Error according to the status of HDD If you want to use 2HDD you can put extra SATA or e SATA port 7 Log out please go to 2 1Æ 2 shut down You can log out of the system 8 Time bar ...

Page 26: ...2 Live screen Click Live button to switch to live screen 3 Date time search Click Search button to select the date and time to playback Refer to Chapter 2 5 Search playback and backup 4 Event search Refer to 2 Event search at Chapter 2 5 Search playback and backup 5 Back up Click Backup to run backup recorded data Refer to Chapter 2 5 Search playback and backup 6 Menu Click the bar You can see sea...

Page 27: ...Stop Click this button to stop playback 13 Forward playback Click this button to playback forward as normal speed 14 Fast forward playback Click this button to playback fast forward The speed of fast forward playback can be set to one of the following X2 X4 X8 and X16 15 Next frame It displays next frame and pause 1 step forward play System control bar is shown when mouse pointer moves to lower po...

Page 28: ...m configuration by this menu Use button to change configuration A Language Select display language B Remote ID ID can be selected from 00 to 99 C Auto switching interval Set the interval camera switching D Spot out You can set up channel to see spot out monitor E Button sounds Select the use of button sounds F Use retain days Preserve an outdated data is automatically deleted A Data retain days Da...

Page 29: ...keypad as below A Date Time Specify current date and time B Time zone Specify the time zone C NTP Server It supports using internet time server to synchronize time D Format Specify the display format of date time Ex Setting as DD MM YYYY AM PM will displays 16 12 2010 AM 12 00 Daylight saving time is applied automatically according to corresponding location setting ...

Page 30: ...for updating firmware A File Select a firmware file to update using buttons after putting USB Memory stick B Refresh Read list of files from USB memory C OK Starts updating firmware with selected file Setting update It is used to import or export setting values ...

Page 31: ...es C Remove recorded data Remove all recorded data D Remove all factory default Delete entire data in the system and restore as factory default Caution USB memory stick is needed to update F W or setting values Once you disconnected and reconnect USB memory you should press Import button to read list of file from USB memory USB is not detected Message will be shown when you are to run updating wit...

Page 32: ...play audio and PTZ can be configured Camera You can specify channel name of camera A Camera no Select the camera number to change name B Camera name Input camera name Maximum 12 characters C Audio Select camera to associate with each audio input Recording You can specify recording configuration ...

Page 33: ...lity for selected camera Very high High Normal Low Very low E Normal frame rate You can specify recording frame rate when recording method is continuous for selected camera Frame rate cannot exceed event frame rate F Event frame rate You can specify recording frame rate when recording method is event for selected camera G Click Apply all button to apply setting to all cameras Color You can adjust ...

Page 34: ...are camera name status icon current date time video loss and transparency of OSD If transparency is 10 the OSD is displayed most transparently On the other hand if the transparency is 100 the OSD is displayed as opaque Display You can set the position of current date time and each channel name ...

Page 35: ...Panning or tilting camera C Use OSD of camera D Zoom Zoom in or out E Focus Focus near or far F Iris Iris in or out G Speed Specify the speed of panning and tilting PTZ camera 1 6 H Protocol Selecting PTZ protocol Supporting 15 protocols i LG Multix_E LG Co Ltd ii LG Multix LG Co Ltd iii LPT A100L LG Co Ltd iv LVC C100 C200HM LG Electric Inc v HSDN251 Honeywell Co Ltd vi MD200 2000 1200 800 Sony C...

Page 36: ...V1305R DC V1300RB CRX 1013 VICON I Device ID Specify the device address of PTZ camera J Baud rate Specify the speed of serial communication bps The default baud rate value is 9600 bps It can be set as one of these values 1200 2400 4800 9600 19200 38400 57600 115200 bps Notice Basically DVR support one RS 485 port for PTZ connection ...

Page 37: ... sensor C Type Specify the sensor type is N O or N C i N O Normal Open The type of input device is opened normally ii N C Normal Close The type of output device is closed normally D Activate alarm Check if you want to use alarm when event occurs E Latency time Setting the duration time of alarm output from event occurs 1 10 Sec OFF F Activate alert Setting sound a buzzer when event occurs from inp...

Page 38: ...e processing when event occurs from input device A Sensor no Selecting sensor number 1 4 B Channels Setting association with selected sensor event C Alarm Setting association with the sensor input D Alert Setting sound a buzzer when event occurs from input device ...

Page 39: ...hen motion is detected A Camera no Selecting camera which is associated event B Channels Setting association with selected motion detection event C Alarm Setting association channel with motion detection D Alert Setting sound a buzzer when event occurs with motion detection ...

Page 40: ...ion detection Red motion zone Grey non motion zone A Channels Selecting a channel to set motion zone B Sensitivity Setting the motion sensitivity Very high High Normal Low Very low C Pixel sensitivity Setting the detailed motion sensitivity by block unit Very high High Normal Low D Select all Selecting entire area E Unselect all Unselecting entire area ...

Page 41: ...ssing when video loss A Camera no Selecting camera which is associated with video loss event B Channels Selecting channels to record when video loss event occur from the specified camera C Alarm Setting alarm out when video loss D Alert Setting sound a buzzer when video loss ...

Page 42: ...em shutdown event D Login Enabling or disabling the login event E Logout Enabling or disabling the logout event F HDD full Enabling or disabling the HDD full event G Sensor Enabling or disabling the sensor detection event H Alarm Enabling or disabling the alarm output event I Motion Enabling or disabling the motion detection event J Alert Enabling or disabling the alert event K Abnormal shutdown E...

Page 43: ...ording method for all time C Click time label to change recording method for all days D Click Apply button to apply current setting to selected channel E Click Copy button to apply current setting to another channel C Continuous recording method H Continuous recording event recording method Motion Sensor E Event recording method if event Motion Sensor happens recording works N No Recording ...

Page 44: ...ton Selected date shows as yellow colored rectangle H To delete specific date in the holiday list select date on the holiday list and click Delete button Selected holiday date shows as blue green colored rectangle I Click OK button to save current holiday setting and back to schedule menu J Click Cancel button to cancel current holiday setting and back to schedule menu ...

Page 45: ...isabled and set each value automatically For static IP IP Address Enter IP address received from ISP using screen keyboard Subnet mask Enter subnet mask received from ISP using screen keyboard Gateway Enter gateway received from ISP using screen keyboard DNS Enter the DNS IP address received from ISP using screen keyboard MAC address This is hardware specific unique address of network device so us...

Page 46: ...ng for web playback and live ports can be done automatically 2 PPPoE ii Specifying user id and password for PPPoE 1 Status It displays current connection status of PPPoE 2 User ID Input user id for PPPoE account 3 Password Input password Caution UPnP IGD feature will be disabled if IP router does not support UPnP IGD or it turned off it in the router settings UPnP does not work if DMZ feature of I...

Page 47: ...asily using host name instead of IP address with DDNS 4 Mode Enabling or disabling DDNS 5 Server IP address of DDNS 6 Port TCP port number of DDNS 7 Domain The domain name of DVR device 8 Interval Setting the interval of IP address updating In case of DYNdns you must put User and Password If you want more information about DYNdns you can visit dyndns website PPPOE ...

Page 48: ... IP address and TCP port number of CMS 9 Mode Enabling or disabling event report to the central monitoring center when event occurs 10 IP address The IP address of the central monitoring center 11 Port The TCP port number of the central monitoring center ...

Page 49: ...me of SMTP server 14 Port Setting the TCP port number of SMTP Default value is 25 15 Account Setting the E mail account registered in SMPT server 16 Password Setting the password of the E mail account 17 Sender Setting the E mail address of sender 18 Receiver Setting the E mail address of receiver 19 Test E mail Click to send testing E mail then receiver can check the testing E mail SMTP server do...

Page 50: ...USER S MANUAL H 264 REAL TIME DVR 50 5 User You can create new user modify authority delete user User list You can view the list of all users Create user ...

Page 51: ... Authority items Specify each authority item for the user id A Setup B Manual alarm C Search D Backup E Network F Multi login G PTZ H Audio E Cameras Specify the cameras which the user can see Modify authority A User ID Select a user id to modify authority B Password Change password using keypad button C Authority items Specify each authority item for the user id A Setup B Manual alarm C Search D ...

Page 52: ...USER S MANUAL H 264 REAL TIME DVR 52 F Multi login G PTZ H Audio D Cameras Specify the cameras which the user can see Delete user Select user id to delete ...

Page 53: ...oller to close the PTZ control window Click this spin control to select PTZ camera 1 4 Click this spin control to specify the moving speed of PTZ camera 1 6 Click this button to show the OSD menu of camera Supported cameras LG Multix LG Multix_E Pelco D Pelco P Click these direction buttons to pan or tilt camera Click to control zoom in or out Click to control the focus of camera manually Click to...

Page 54: ...o 16 The maximum preset number is different according to the specification of camera Moving camera to preset position 1 Select the preset number to move using button 2 Click button GO Moving camera to preset position is only available when the camera supports preset feature Deleting preset position 1 Select the preset number to delete using preset number button 2 Click button CLEAR Deleting preset...

Page 55: ... will be displayed D Select time you want to search whenever you chick the recorded time table the preview window is shown E Then click OK button to playback F Click Cancel button to return to live view screen G Move cursor by pressing Up Down button on the remote controller Using remote controller on the calendar Left Right change date change month Using remote controller on the timebar Left Righ...

Page 56: ...menu bar B Use buttons on the upper right side to select camera to search C Check sensor motion check box below to filter out the events D Move to previous or next page using and buttons E Select a data to search from the list Click the mouse button to move to the corresponding recorded data F Click Play button and the searched data will be played ...

Page 57: ...iod F Specify ending date time of backup period G If duplicated data exists in the backup data period select one data from Start duplicated data or End duplicated data H After finishing setting for backup click OK button I When backup is started the screen moves from search to real time live mode and the icon and text will be shown as backup progress J The message Backup completed will be shown wh...

Page 58: ... ending date time The backup period cannot exceed 24 hours The USB memory should be formatted as FAT32 Maximum size of backup data is depends on the storage media to be used In case of USB memory stick only free space is used If there s duplicated data at the same time stamp you can select specific data position with the dialog box as below Select data position with spin box and then click OK butt...

Page 59: ...b viewer installation 60 3 2 Functional description 62 1 Web viewer monitoring window 62 2 Web viewer search window 63 3 Search menu 64 4 Saving as AVI file dialog box 65 C CH HA AP PT TE ER R 3 3 W We eb b v vi ie ew we er r ...

Page 60: ...ore the installation 1 Web viewer installation Enter the DVR IP address in the Web address window and then the following Active X installation window will be displayed When you click on the Active X install button the following window will be displayed Press the Install button ...

Page 61: ...ted the Web initialization screen will be displayed General installation recommended Enter the ID and password Multi login is not enabled and you must log in to the DVR with an unused ID Default admin user1 user2 user3 Caution Web Viewer and CMS cannot be used at the same time Max 3 users are allowed to access DVR simultaneously ...

Page 62: ... you logged in as admin Enable or disable incoming audio Default value is disable Zoom control Focus Iris control Iris control Preset Click Go button after selecting preset number at combo box Start Stop touring Rotation between each preset positions Preset and touring are available after preset is set on the device Pan tilt control Up down left and right buttons Controlling moving speed when pan ...

Page 63: ... Date Time selection button to play back Refer to 3 Search dialog box Enable or disable incoming audio Default value is disabled Pause button Forward play button Backward play button Displaying only key frame Fast forward play button Fast backward play button Switching to monitor window Logout Click the mike icon and you say microphone DVR can export Audio but Audio export isn t recorded in DVR ...

Page 64: ...f graph It can be scaled from 2 hours to 24 hours by minute unit Displaying selected data time Displaying calendar The dates are shown in bold if recorded data exist Description of the color of the recorded data graph OK button Video is played immediately when you selected data time which has recorded data Progress bar which shows loading progress ...

Page 65: ...n this button Stopping AVI saving Closing Save as AVI dialog box It will be closed automatically after stopping AVI file if it is being saved Specifying time period to save AVI file Starting time to save AVI file Stopping time to save AVI file Starting periodic AVI file saving Closing after finishing AVI file saving Increasing AVI saving speed with reducing displaying frame rate ...

Page 66: ...USER S MANUAL H 264 REAL TIME DVR 66 4 1 Functional description 67 1 Real time monitoring 67 C CH HA AP PT TE ER R 4 4 U Us si in ng g s sm ma ar rt t p ph ho on ne e ...

Page 67: ...hone and enter DVR IP address Enter id and password and click login button the real time monitoring screen will be shown If you want to change the picture Push A button and you can change The pictures with B A B NOTICE You can download smart phone application i Smart viewer in application stores please use smart phone application manual for using i Smart viewer Supporting smart phone Blackberry iP...

Page 68: ...MANUAL H 264 REAL TIME DVR 68 5 1 Check before requesting for service 69 5 2 Recommended device to use 72 5 3 Factory Default 74 5 4 Product specification 79 C CH HA AP PT TE ER R 5 5 A Ap pp pe en nd di ix x ...

Page 69: ...video of the camera is not displayed Check whether the video output port of the camera is correctly connected to the device Check whether the power supply of the camera is connected correctly Check whether the resolution is set to 1024x768 in VGA environment setting Check if there is any issue with the video cable between the device and the camera Reboot this device Video of camera is displayed on...

Page 70: ...he existing camera connected to the system has an issue Check whether the video cable connecting the device and the camera is damaged Check whether there is a cable with high voltage near the video cable It can cause noise in the video or cause deterioration in the video quality Check whether the video cable connected between the device and the camera is the cable for correct usage If the power ca...

Page 71: ...iders does not support sent email from the commercial SMTP server In this case use a public SMTP server When the E mail transmission fails even with the SMTP server setting z If you see a message saying Please check the SMTP information or internet cable Check the SMTP server address Check the SMTP port number Check the network setting z If the E mail cannot be received without any error message C...

Page 72: ...8GB 5 PRINCETON PFU STS1G 1GB 6 DATA TB ST1GB I O 7 FM Semiconductor MLC gold 8 SAMSUNG SUM M4GPV 4GB SUM LWW 8GB 9 Transcend JetFlash V10 10 IMATION Atom USB Drive MLC 11 Sky Digital SKY DRVx2 32G 12 LG XTICK 8GB Notice USB flash drive not in the recommended list may not work properly even if it is detected by DVR Caution z For some monitor TCs the screen output size may not fit z For monitors th...

Page 73: ...ectronics Inc LG x x x HSDN251 Honeywell Co Ltd Honeywell MD200 2000 1200 800 Sony Co Ltd Sony x x x New Born NEW BORN HIGHTECH New Born WVCS850 Panasonic Dongyang PLECO D PELCO Co Ltd PELCO PLECO P PELCO Co Ltd PELCO SCC 641 SCC 643 SAMSUNG Co Ltd SAMSUNG SPD 2300 3000 3300 SAMSUNG Co Ltd SAMSUNG SUNGJIN SUNGJIN Co Ltd SUNGJIN x x x DSC 200 QUATECH QUATECH V1305R DC V1311RB CRX 1013 VICON VICON x...

Page 74: ...Date Time Date Time Time zone GMT 00 00 GMT 12 00 NTP Server Off Pool ntp org Off Format YYYY MM DD 24Hours YYYY MM DD AM PM MM DD YYYY 24Hours MM DD YYYY AM PM DD MM YYYY 24Hours DD MM YYYY AM PM F W Update File File name None Setting update Import None Disable Enable None Export Disable Enable Disable Initialization Remove system log Check Uncheck Uncheck Remove settings Check Uncheck Uncheck Re...

Page 75: ...30 CIF 30 Half D1 30 D1 15 Color Camera no 1 4 1 8 1 Brightness 0 100 50 Contrast 0 100 42 Saturation 0 100 56 Hue 0 100 51 OSD Camera name Check Uncheck Check Icon Check Uncheck Check Current date time Check Uncheck Check Video loss Check Uncheck Check Transparency 10 100 80 Display Time bar position Left Center Right Center Channel name position CH1 CH4 CH8 Left top Left bottom Right bottom Left...

Page 76: ...c 10sec Sensor Sensor no 1 4 1 Camera link CH1 CH4 CH8 Check Uncheck CH1 Alarm Check Uncheck Uncheck Alert Check Uncheck Uncheck Motion Camera no 1 4 8 1 Camera link CH1 CH4 CH8 Check Uncheck CH1 Alarm Check Uncheck Uncheck Alert Check Uncheck Uncheck Motion zone Camera 1 4 8 1 Sensitivity Very low Low Normal High Very high Normal Motion zone Select all Unselect all Select all Video loss Camera no...

Page 77: ...IP address Subnet mask Gateway DNS MAC address Web port 80 Playback port 9091 Live port 9092 UPnp IGD Check Uncheck Uncheck PPPoE Status Disconnect Connect User ID Password DDNS Server www dvrdns net www dyndns com www dvrd ns net Mode On Off Off Port 65500 Domain Interval 1 60min 5min Mode On Off Off User ID Password Domain Host Interval 10min 10min CMS Mode On Off Off IP address Port 0 E mail Mo...

Page 78: ...k Check Multi login Check Uncheck Uncheck PTZ Check Uncheck Check Audio Check Uncheck Check Channel CH1 CH4 CH8 Check Uncheck Check Modify authority Select user User ID Password Authority Setup Check Uncheck Alarm Check Uncheck Search Check Uncheck Backup Check Uncheck Network Check Uncheck Multi login Check Uncheck Uncheck PTZ Check Uncheck Audio Check Uncheck Channel CH1 CH4 CH8 Check Uncheck Ch...

Page 79: ... AUDIO INPUT OUTPUT 1 line 1 line 4 line 1 line SENSOR INPUT ALARM OUTPUT 4 line NC NO selectable 1 line NC NO selectable Display Mode 1 4 and auto sequential 1 4 9 and auto sequential BACKUP MEDIA USB storage Network STORAGE MEDIA 1 SATA HDD RECORDING MODE Continuous Alarm Motion Instant panic OPERATION CONTROL Mouse and Remote controller COMMUNICATION PORT RS 485 NETWORK LAN Ethernet RJ 45 10 10...

Reviews: