background image


XTP T VGA Transmitter • XTP System Configuration Software

29

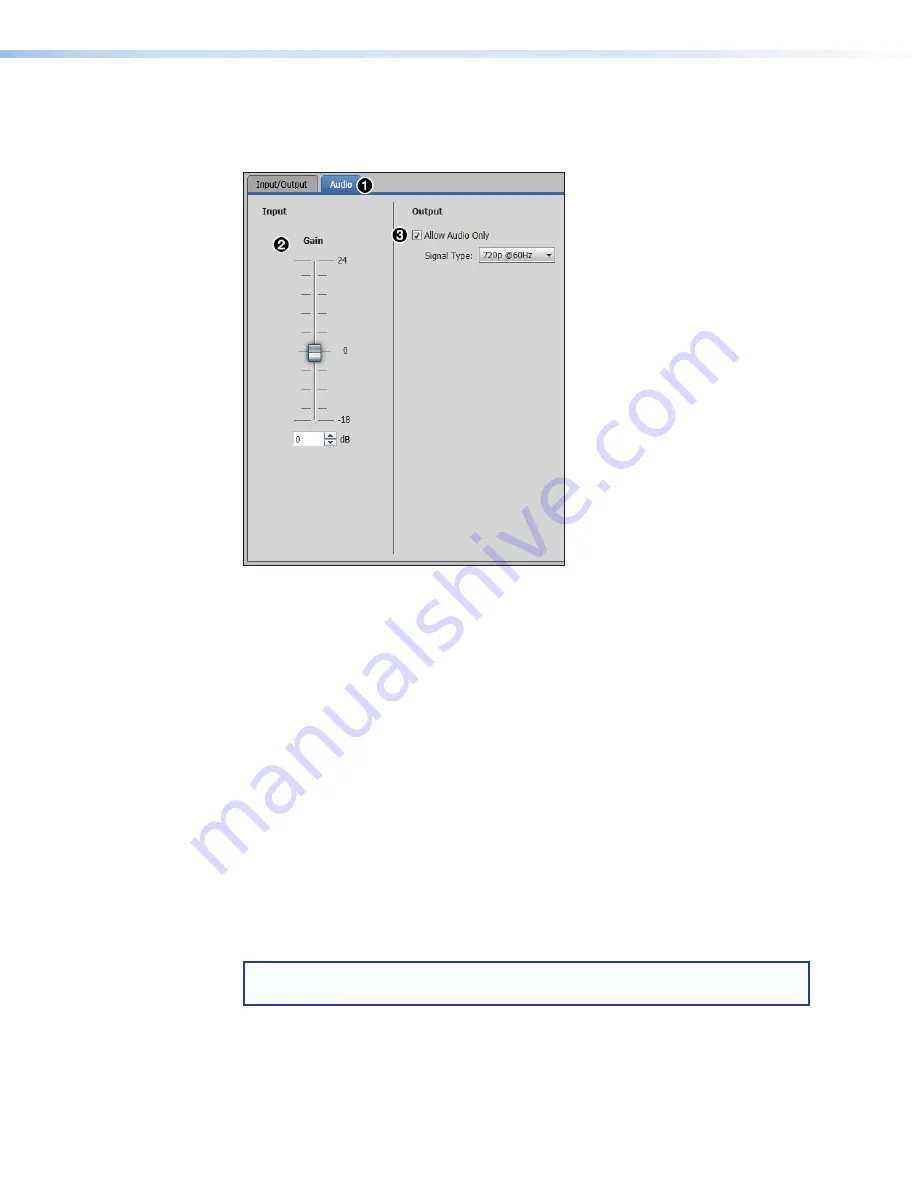
Audio tab

Click the 

Audio

 tab (see figure 25, 

1

) to open the 

Audio

 screen. It contains input gain and 

output audio only options.

Figure 25. 

Audio Tab

Input panel

The analog input gain fader has a gain range of -18 to +24 dB. Adjustments are applied in  
1 dB increments. The default setting is 0 dB.

2


Input Gain

 —


Click and drag the handle of the 

Gain

 slider, enter a value in the field, or 

click the 

Up

 or 

Down

 arrow to adjust the analog input gain.

Output panel

The transmitter uses a black signal to simulate a 720p or 1080p, 50 Hz or 60 Hz signal so 
audio can be passed without video.

3


Allow Audio Only

 —


Select the 

Allow Audio Only

 check box to allow audio only 

to be output. When enabled, select the desired resolution and refresh rate from the 

Signal Type

 drop-down list to emulate in place of video.

Factory reset

Click the 

Factory Reset

 button (see 

figure 23

2

 on page 27) to reset the transmitter to 

factory settings except for firmware.

NOTE:

  This is the same as the 

E

ZXXX

 SIS command (see 

Reset mode

 on  

page 20).

Summary of Contents for XTP T VGA

Page 1: ...User Guide XTP T VGA XTP Systems XTP VGA Transmitter 68 2091 01 Rev E 01 19...

Page 2: ...encia 68 290 01 en el sitio Web de Extron www extron com Instructions de s curit Fran ais AVERTISSEMENT Ce pictogramme lorsqu il est utilis sur le produit signale l utilisateur la pr sence l int rieur...

Page 3: ...IP Intercom IP Link Key Minder LinkLicense LockIt MediaLink MediaPort NetPA PlenumVault PoleVault PowerCage PURE3 Quantum Show Me SoundField SpeedMount SpeedSwitch StudioStation System INTEGRATOR Tea...

Page 4: ...tion manual may cause harmful interference to radio communications Operation of this equipment in a residential area is likely to cause interference This interference must be corrected at the expense...

Page 5: ...mples of computer or device responses used in this guide the character 0 is used for the number zero and O is the capital letter o Computer responses and directory paths that do not have variables are...

Page 6: ......

Page 7: ...erview 15 Host to Device and Device to Host Communication 15 Error Responses 15 Using Command and Response Tables for SIS Commands 16 Symbol Definitions 16 Command and Response Tables for SIS Commands...

Page 8: ...XTP T VGA Transmitter Contents xii...

Page 9: ...ncoming analog formats and applies SD Pro processing to deinterlace 480i and 576i video signals for reliable display on a variety of output devices To simplify integration the XTP transmitter features...

Page 10: ...maximum video resolutions and refresh rates for various XTP systems Output Non 4K 4K Fiber 4K PLUS Input Analog 1920x1200 60 Hz 1920x1200 60 Hz 1920x1200 60 Hz Non 4K Digital 2048x1080 60 Hz 2048x108...

Page 11: ...gh Provides a local monitor output enabling the input signal to be monitored without the need for a separate distribution amplifier EDID Minder Automatically manages EDID communication between connect...

Page 12: ...5 E XTP output connector page 5 F LAN connector page 5 G Power connector and LED page 5 Figure 2 XTP T VGA Rear Panel Connectors A Universal video connector Connect a video source to the 15 pin HD co...

Page 13: ...GA outputs a video signal or a test pattern Link LED indicator Lights yellow when XTP devices are connected and communication is established ATTENTION Do not connect this connector to a computer data...

Page 14: ...4 15 Pin HD Connector Pins Pinout Table for 15 pin HD Connectors Pin RGBHV RGBS RGsB Component S video Composite 1 Red Red Red R Y 2 Green Green Green Sync Y Luma Video 3 Blue Blue Blue B Y Chroma 4...

Page 15: ...4 Blue 5 White blue 6 Green 7 White brown 8 Brown Figure 5 Twisted Pair Cable Termination Supported cables The XTP T VGA is compatible with shielded twisted pair F UTP SF UTP and S FTP and unshielded...

Page 16: ...onductor STP cable with a minimum bandwidth of 400 MHz Terminate cables with shielded connectors to the TIA EIA T568B standard see figure 5 on the previous page Limit the use of more than two pass thr...

Page 17: ...below for wiring considerations Tx Rx Pins Rx Tx RS 232 Rx Tx Tx Rx Rx Tx Custom IR Device RS 232 Device G G G IR Figure 6 Wiring the RS 232 and IR Over XTP Connector ATTENTION The length of the expos...

Page 18: ...considerations or remotely through the XTP connector with a power injector or a matrix switcher Local power SECTION A A A A Power Supply Output Cord 2 Pole Captive Screw Connector Ridges Smooth Tie Wr...

Page 19: ...e installation must always be in accordance with the applicable provisions of National Electrical Code ANSI NFPA 70 article 725 and the Canadian Electrical Code part 1 section 16 The power supply shal...

Page 20: ...232 IR Rx Tx AUDIO LOOP THRU UNIVERSAL XTP T VGA LAN SIG LINK XTP OUT RESET INPUTS OVER XTP LAN SIG LINK XTP IN POWER 12V HDMI 1A MAX Rx G Tx RS 232 IR Rx Tx L R 1 2 OVER XTP AUDIO OFF ON S PDIF RESE...

Page 21: ...cator Lights when a composite video signal is detected S video LED indicator Lights when an S video signal is detected YUV LED indicator Lights when a component video signal is detected RGB LED indica...

Page 22: ...rpose and Notes Factory Reset 1 Hold down the recessed Reset button while applying power to the device NOTE After a mode 1 reset update the device with the latest firmware version DO NOT operate the f...

Page 23: ...ost to Device and Device to Host Communication SIS commands consist of one or more characters per field No special characters are required to begin or end a command sequence When the XTP T VGA determi...

Page 24: ...mand Commands can be entered back to back in a string with no spaces Figure 11 shows the hexadecimal equivalent of ASCII characters used in the command and response tables NOTE Uppercase and lowercase...

Page 25: ...solution EAX AFMT AfmtAX Set the black video signal resolution to X View black video signal resolution EAAFMT AfmtAX View the black video signal resolution Black video signal for audio only NOTE The t...

Page 26: ...ent YUVi S video and NTSC composite video Set brightness EX BRIT BritX Set the brightness to X Increase value E BRIT BritX Increase the brightness value by one Decrease value E BRIT BritX Decrease the...

Page 27: ...ve the image down by one Decrease value E VCTR VctrX Move the image up by one View vertical shift EVCTR VctrX Show vertical location of the first active pixel Image reset Execute an image reset 1A Aad...

Page 28: ...g J TstX1 View the current test pattern setting Reset mode System reset EZXXX Zpx Resets unit to factory default Status View input signal presence 0LS FrqX1 View the presence of an input signal View f...

Page 29: ...onfiguration Software is available for download on the Extron website www extron com To download the software from the Extron website locate it on the Download Center page or go to the XTP System Conf...

Page 30: ...een By default the installation creates a directory in the Program Files or Program Files x86 folder Software Product Page Figure 14 XTP System Configuration Software Product Page 1 In the Search fiel...

Page 31: ...creen is used to establish communication with an XTP device through a USB connection Ensure the receiver is connected and powered on before attempting to connect to it Figure 15 Connections Screen To...

Page 32: ...isconnect The Connections screen opens NOTE If the device is already disconnected the Disconnect option is disabled until a device is connected Exit This option disconnects the switcher from the softw...

Page 33: ...The Update Firmware dialog box opens Figure 19 Update Firmware Dialog Box 3 Click the Select file from computer icon to select a firmware file from the connected host device The Browse dialog box open...

Page 34: ...is option provides basic information about the XTP System Configuration Software including version number and copyright information Figure 22 About Dialog Box 1 From the Help menu select About the Sof...

Page 35: ...to the PC running the XTP software Click the Device Settings icon see figure 23 1 on the Global Navigation Bar to open the Device Settings screen Figure 23 Device Settings Screen Input Output tab Clic...

Page 36: ...ting or click the Up and Down arrows to change the value in the field 6 Image Reset Click the Image Reset button see figure 24 6 to reset color tint brightness contrast phase horizontal shift and vert...

Page 37: ...eld or click the Up or Down arrow to adjust the analog input gain Output panel The transmitter uses a black signal to simulate a 720p or 1080p 50 Hz or 60 Hz signal so audio can be passed without vide...

Page 38: ...ll firmware version Signal Information section 3 Signal Present Displays the signal presence of the input 4 Signal Type Displays the current signal type setting see Input Configuration panel on page 2...

Page 39: ...in yellow Figure 26 EDID Minder Screen Assign EDID to the input 1 Select an available EDID setting represented by a blue green or yellow output display icon from the Favorites Connected Outputs or Av...

Page 40: ...EDID setting into the Favorites panel EDID filters The filters see figure 27 can be used to easily locate a specific EDID setting 1 Resolution filter 2 Refresh Rate filter 3 Video Format filter 4 Audi...

Page 41: ...ure If installed in a closed or multi unit rack assembly the operating ambient temperature of the rack environment may be greater than room ambient temperature Therefore install the XTP T VGA in an en...

Page 42: ...b Emirates Dubai This Limited Warranty does not apply if the fault has been caused by misuse improper handling care electrical or mechanical abuse abnormal operating conditions or if modifications wer...

Reviews: