


To compare settings saved by Auto Memory with settings that are saved for input
presets and user presets, see the table in Presets (see
Input and user presets
on
page 85).
•
HDCP Authorized
— Select this check box for digital inputs 1, 2, and 4 in order to
have the input report as an HDCP Authorized device. If the box is not selected the
source will output unencrypted video (if the content is not encrypted). This allows
the SMP 351 to record more content.
NOTE:
The HDCP Authorized option is available only for HDMI inputs.
•
Audio Mute
— Select this check box to mute the input audio.
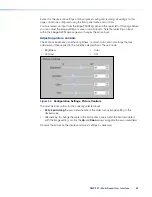
7.
Configure the audio settings for each input as applicable:
•
From the
Audio
Mode
drop-down list, select the type of audio (
Off
[none],
Analog
Stereo
, or
Digital
Stereo
) .
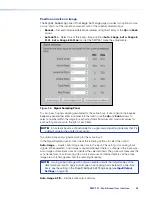
•
Set the analog and digital audio gain — Enter the amount of audio gain or
attenuation (from -18 dB to +24 dB) in the appropriate field (
Analog
Audio
Level
(dB)
or
Digital
Audio
Level
(dB)
) or use the
Up
and
Down
arrows to
increment or decrement the value.
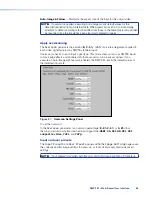
HDMI preview output refresh rate
To set the refresh rate for the local HDMI preview output:
1.
Open the
Input/Output
Settings
page.
2.
Expand the
Preview
Output
Configuration
panel.
3.
Select the output refresh rate (either 50 Hz or 60 Hz) from the
Refresh
Rate
drop-down list in the
Preview
Output
Configuration
panel.
NOTE:
The resolution of the local (preview) output follows (is based on) the archive
encoding resolution.
Configuring the On-screen Displays
In the
OSD
Configuration
panel you can change a variety of settings for both the input
switching OSD and the universal OSD, which can be selected as a "test pattern" and
displayed over the other images.
Input switching OSD duration
When a new input is selected for either channel, the SMP 351 can briefly display the names
of the active inputs on screen. The input switching OSD is a gray rectangle with white
text overlaid atop the source video content. It appears in the upper left of the screen and
includes text such as "Input 1 active" on the first line and "Input 3 active" on the second line,
depending on which inputs are currently selected.
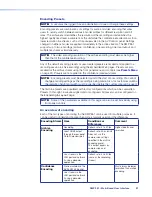
To set the length of time to show the input switching OSD:
1.
Open the
Input/Output
Settings
page.
2.
Expand the
OSD
Configuration
panel and look in the
Input
Switching
OSD
panel.
3.
Enter the desired number of seconds into the
How
many
seconds
should
Input
Switch
OSD
be
displayed?
field or click the
Up
and
Down
arrows to adjust the
value.
SMP 351 • Web-Based User Interface
78