background image


3

3. 

Press the keyboard <

Enter

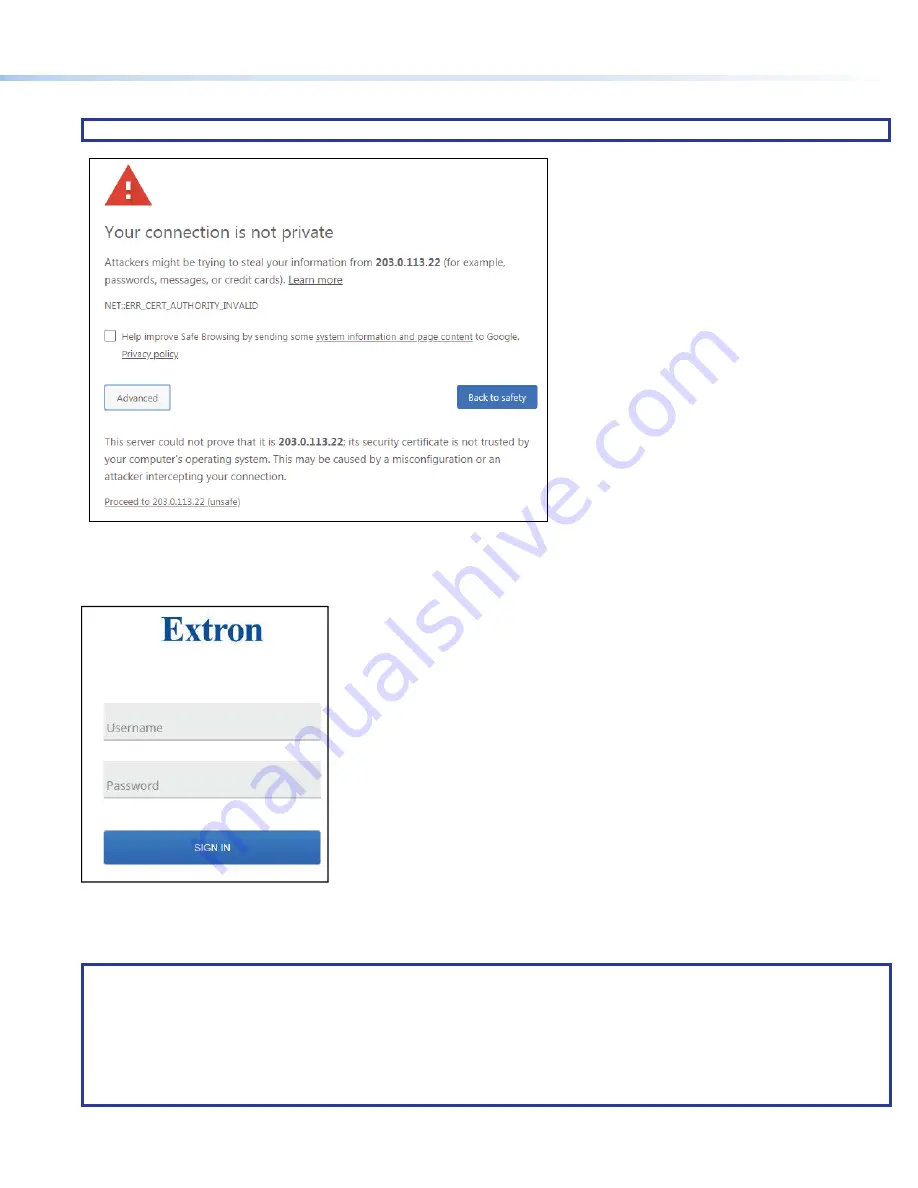
> key. The browser displays a privacy error message (see figure 3).

NOTE:


Figure 3 shows this message in the Chrome browser. On other browsers, the display may be different.

2

2

2

2

2

2

2

2

2

2

2

2

2

2

2

2

2

2

1

1

1

1

1

1

1

1

1

1

1

1

1

1

1

1

1

1

Figure 3. 

Privacy Error Message

4. 

Click 

Advanced

 (see figure 3, 

1

). The button changes to 

Hide


Advanced

 and explanatory text and a link appear below the buttton.

5. 

Click 

Proceed


to


<

IP


address

>


(unsafe)

 (

2

). The browser opens to the 

Login

 dialog box (see figure 4).

1

1

1

1

1

1

1

1

1

1

1

1

1

1

1

1

1

1

2

2

2

2

2

2

2

2

2

2

2

2

2

2

2

2

2

2

3

3

3

3

3

3

3

3

3

3

3

3

3

3

3

3

3

3

Figure 4. 

Login Dialog Box

6. 

Enter the 

Username

 (see figure 4, 

1

) and 

Password

 (

2

) and click 

Sign


In

 (

3

). The browser opens the embedded HTML pages 

(see 

figure 5

 on the next page).

NOTES:

• 

The default Username is 

admin

.

• 

The factory configured passwords for all accounts on this device have been set to the device serial number. If the password 
is reset, the NAVigator defaults to the default password, which is 

extron

.

• 

Usernames and passwords are case sensitive.

• 

The HTML page may open with any panel open on the right side of the page (for example 

Device


Settings

, see 

figure 5

A

).

Summary of Contents for NAVigator

Page 1: ...the network switch or using an optional PI 140 Power Injector B NAV PoE port Connect this port to your AV LAN network for connection to streaming endpoints 5 Pin 1 2 3 6 7 8 4 Wire color White green G...

Page 2: ...and creation of a NAV system Discovery of endpoints and connection to the NAVigator can be done via the embedded HTML pages Creating a NAV system using the NAVigator and its embedded HTML pages is a f...

Page 3: ...dialog box see figure 4 1 1 1 1 1 1 1 1 1 1 1 1 1 1 1 1 1 1 2 2 2 2 2 2 2 2 2 2 2 2 2 2 2 2 2 2 3 3 3 3 3 3 3 3 3 3 3 3 3 3 3 3 3 3 Figure 4 Login Dialog Box 6 Enter the Username see figure 4 1 and Pa...

Page 4: ...uide available at www extron com Network Connection settings View and change connection settings as follows 1 On the home page if necessary click the Menu link see figure 5 1 Click Settings 2 The Devi...

Page 5: ...t see figure 7 1 The Edit button changes to Save 4 If desired click on the DHCP switch 2 to toggle Dynamic Host Configuration Protocol on and off 5 If desired click in the desired editable field 3 and...

Page 6: ...page 7 This can help identify the device Press and release the button again to clear the highlight 1 On the home page if necessary click the Menu link see figure 8 1 Click Endpoints 2 Discover Endpoi...

Page 7: ...NAVigator assigns the endpoints and reports success on the endpoints panel Configure selected endpoint communication settings Configure endpoints as follows 1 On the Endpoints page click the All check...

Page 8: ...figure 12 1 and the Network link see figure 13 1 as necessary to make changes to the settings shown on the figures as desired 4 Click in one or more fields to be edited and make changes as necessary...

Page 9: ...ight of the Endpoints panel 2 Click the IP Address link in the Device Details panel 2 The HTML page opens a new tab in the browser that is connected to the endpoint 3 The HTML page for the endpoint be...

Page 10: ...k the Ties link see figure 15 1 below 3 3 3 3 3 3 3 3 3 3 3 3 3 3 3 3 3 3 1 1 1 1 1 1 1 1 1 1 1 1 1 1 1 1 1 1 2 2 2 2 2 2 2 2 2 2 2 2 2 2 2 2 2 2 Figure 15 Create Ties 2 Click to select the desired Se...

Reviews: