Extron electronics HDP 101 4K User Manual Download Page 7


7

HDP 101 4K • User Guide (Continued)

Product Configuration Software

The HDP 101 4K uses Extron Product Configuration Software (PCS) to configure and reset the unit, as well as upload firmware.

Download Software from the Extron Website

Visit 

www.extron.com

 to download the latest version of PCS.

NOTE:

  Also download the latest versions of software and firmware for the HDP 101 4K. To update firmware, use PCS or 

download and install Firmware Loader.

1. 

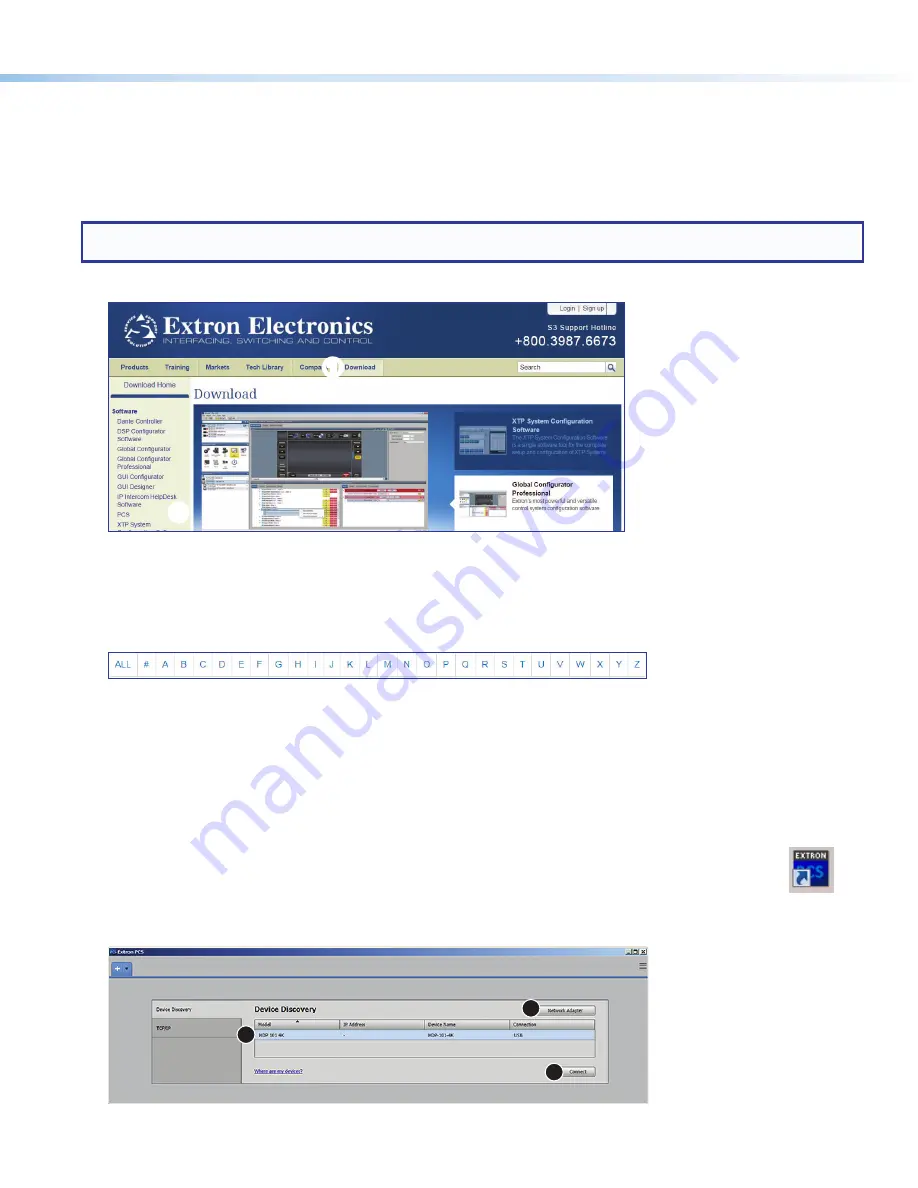
Click the 

Download

 link at the top of the 

Extron website

 (see figure 5 , 

1

).

1

1

2

2

Figure 5. 

Software and Firmware Links on Download Page

2. 

Click the appropriate link on the left sidebar menu (

2

).

For software, either click the 

Software

 link at the top of the sidebar or, if the software is listed in the sidebar, click directly on 

that link (for example, see the 

PCS

 link in figure 5 , 

2

).

3. 

If there is no direct link to the software or firmware, scroll down to the alphabetic navigation bar (see figure 6).

Figure 6. 

Alphabetic Navigation Bar

4. 

Click the appropriate letter to locate the software or firmware (for example, click 

H

 for the HDP 101 4K).

5. 

Click 

Download

 and follow the on-screen instructions.

Using PCS

1. 

Connect the control PC, with PCS installed, to the HDP 101 4K. The Windows-based PCS communicates with the device via 
the Front Panel Configuration port (see 

figure 2

A


page 3) with a standard USB mini-B connector.

2. 

Open PCS on the control PC from the PCS icon loaded on the desktop (optional, see image on the right) or 
from the Start menu:

Start

>

Programs

>

Extron


Electronics

>

Extron


Product


Configuration


Software

>

Extron


Product


Configuration


Software

The 

Product

 Configuration 

Software

 opens to the 

Device


Discovery

 screen:

1

2

3

Figure 7. 

PCS Device Discovery Screen

5  

6  

7  

Summary of Contents for HDP 101 4K

Page 1: ...ompliance Guide on the Extron website Specifications Product specifications are available on the Extron website www extron com Features Provides connectivity between HDMI sources and DisplayPort displ...

Page 2: ...wer compatibility with high demonstrated reliability and low power consumption for reduced operating costs Application Diagram Laptop DisplayPort Extron HDP 101 4K HDMI to DisplayPort Converter POWER...

Page 3: ...autoris e annule toute conformit r glementaire et peut endommager la source d alimentation ainsi que l unit If not provided with a power supply this product is intended for use with a UL Listed power...

Page 4: ...ers When the HDP 101 4K is first switched on it sends the message Copyright 2018 Extron Electronics HDP 101 4K Vx xx 60 xxxx xx Vx xx is the firmware version number 60 xxxx xx is the part number of th...

Page 5: ...Slot HDMI 1080p 60 Hz 2 Ch Default 2 Output 3 User Loaded Slot Manually populated via PCS X Verbose mode 0 Clear none 1 Verbose mode default 2 Tagged responses for queries 3 Verbose mode and tagged re...

Page 6: ...r Queries Query part number N X Pno X Verbose mode 2 3 Query Firmware version Q n nn Query Firmware version with build Q n nn nnnn Query model name 1i HDP 101 4K Inf01 HDP101 4K Verbose mode 2 3 Query...

Page 7: ...k directly on that link for example see the PCS link in figure 5 2 3 If there is no direct link to the software or firmware scroll down to the alphabetic navigation bar see figure 6 Figure 6 Alphabeti...

Page 8: ...Main Menu The configuration pages have a global navigation bar see figure 8 from which each of the individual configuration pages can be accessed These pages are 1 Input Output Configuration 2 EDID M...

Page 9: ...navigation bar to open the EDID Minder page EDID can be set to match output rate a custom user defined EDID or a factory setting 1 2 3 4 5 6 7 8 9 Figure 11 EDID Minder Page Filtering Available EDID...

Page 10: ...ick the Add EDID to Library button see figure 11 9 on the previous page The Browse Add EDID to Library window opens see figure 12 1 2 Figure 12 Browse Add EDID to the Library Window 2 Navigate to the...

Reviews: