background image

Port Number

Description

1

Power Supply Module #1

2

Power Supply Module #2

3

Mgmt Port, 1 GbE RJ45 (eth0)

4

Port 4 (not used, plugged)

5

Video Connector

6

RJ45 Serial-A Port

7

USB 2.0/3.0 Ports

8

RMM4 NIC Port (not used, plugged)

9

Data Port 1, 1GbE RJ45(esa0)

10

Data Port 2, 1GbE RJ45(esa0)

11

Data Port 3, 1/10GbE SFP+(esa2)

12

Data Port 4, 1/10GbE SFP+(esa3)

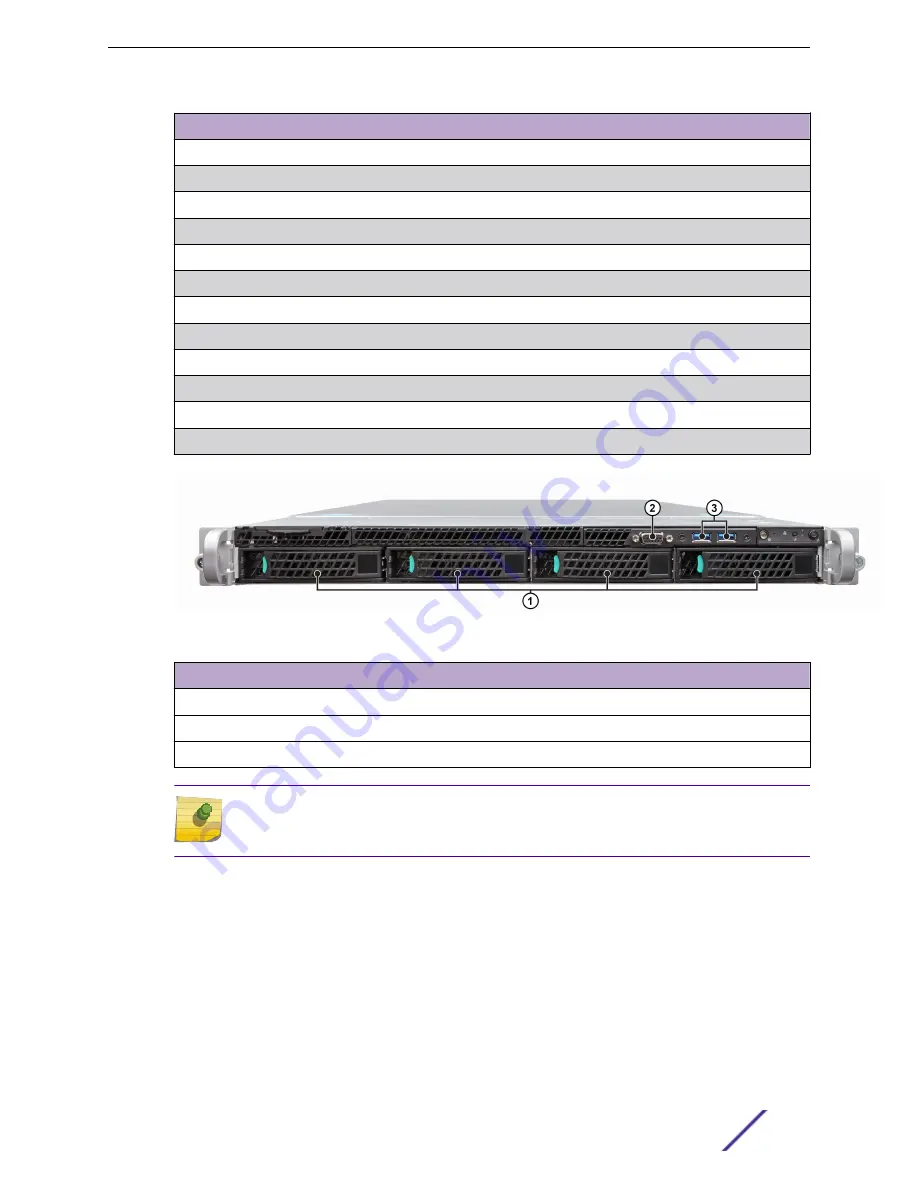
Figure 2: C5215 Front Panel Layout

Port Number

Description

1

Hard Disk Drive Bays (only the Hard Drive slot on the left is used)

2

Front Video Connector

3

USB 2.0/3.0 Ports

Note
Although the appliance has five USB connectors (two on the front panel and three on the
back panel), only one USB connector can be in use at any one time.

Installation Process

ExtremeWireless™ Appliance C5215 Installation Guide

10

Summary of Contents for ExtremeWireless C5215

Page 1: ...ExtremeWireless Appliance C5215 Installation Guide 9035111 Published November 2017...

Page 2: ...es including any product names mentioned in this document are the property of their respective owners and may be trademarks or registered trademarks of their respective companies owners For additional...

Page 3: ...12 Removing a Power Supply Module 13 Replacing a Power Supply 14 Chapter 3 Configuring the C5215 Controller 16 Configuring the Management Interface 16 Configuring the C5215 System 17 Connecting the D...

Page 4: ...you see the word enter in this guide you must type something and then press the Return or Enter key Do not press the Return or Enter key when an instruction simply says type Key names Key names are wr...

Page 5: ...mmediate Support Phone 1 800 998 2408 toll free in U S and Canada or 1 408 579 2826 For the support phone number in your country visit www extremenetworks com support contact Email support extremenetw...

Page 6: ...lier versions and legacy products www extremenetworks com support documentation archives Release Notes www extremenetworks com support release notes Open Source Declarations Some software files have b...

Page 7: ...main requirement or that are just starting and plan to upgrade core access capacity at a later time Features The C5215 controller is based on the Intel R1304 1 U Server and has the following features...

Page 8: ...ntents 2 Mount the appliance in a rack 3 Connect the controller to a power source 4 Verify the hard drive LED indicator patterns 5 Attach the optional front bezel 6 Install a power supply module 7 Lea...

Page 9: ...cable clamp tie into the hole in the bracket to anchor the tie 2 Connect the two AC power cables to power supplies 1 and 2 These two power supplies combine to create a redundant power supply Note The...

Page 10: ...esa0 11 Data Port 3 1 10GbE SFP esa2 12 Data Port 4 1 10GbE SFP esa3 Figure 2 C5215 Front Panel Layout Port Number Description 1 Hard Disk Drive Bays only the Hard Drive slot on the left is used 2 Fr...

Page 11: ...t panel bezel which can be attached to the front of the chassis by snapping it on the rack handles A key lock allows you to lock the bezel in place to restrict access to the controls You can monitor t...

Page 12: ...Lock the bezel if needed Installing a Power Supply Module Follow this procedure to install a power supply module to a C5215 controller 1 If an Insert is installed remove it from the chassis power sup...

Page 13: ...two power supply modules Both power supply modules need to be operating in a 1 1 Redundant configuration Note Currently the C5215 controller unit ships with just one power supply and you have the opt...

Page 14: ...ime in a system that is powered on Note The system ships with just one power supply and you have the option to purchase the additional power supply Ordering Part No 30522 WS PSI C5215 750W 01 Each pow...

Page 15: ...s continued LED Pattern Power Supply Condition Amber Power supply critical event causing a shutdown failure OCP OVP fan fail 2Hz Blinking Green Power supply firmware updating Installation Process Extr...

Page 16: ...f the appliance 2 Configure the Ethernet port of the laptop with a statically assigned unused IP address in the 192 168 10 0 24 subnet 3 Launch your web browser and type https 192 168 10 1 5825 192 16...

Page 17: ...ppropriately configured 1 Using the Extreme Networks Wireless Assistant configure the IP addresses of the appliance s data ports esa0 esa3 a Configure the default IP addresses to be the relevant subne...

Page 18: ...transceiver connector do not remove it at this time 2 Hold the transceiver so that the connector will seat properly 3 Carefully align the transceiver with the port slot 4 Push the transceiver into the...

Page 19: ...Status Indication Network Speed Right Off 10 Mbps Green 100 Mbps Amber 1000 Mbps Link Activity Left Off No link Solid Green Active link Blinking Green Data traffic activity Table 9 SFP Port LEDs Data...

Page 20: ...Redundant Power Supplies Weight 40 lb Mean Time Between Failure MTBF 132 000 hours Admin interface 10 100 1000 Gbps Data ports Two 10 100 1000 Gbps interfaces Data 1 Data 2 Two SFP interfaces Data 3 D...

Page 21: ...when the equipment is operated in a commercial environment This product uses generates and can radiate radio frequency energy and if not installed and used in accordance with the manufacturer s instr...

Page 22: ...ce by Information Technology Equipment VCCI If this equipment is used in a domestic environment radio disturbance may arise When such trouble occurs the user may be required to take corrective actions...

Page 23: ...Other Country Specific Compliance Standards Approvals and Declarations Regulatory Information ExtremeWireless Appliance C5215 Installation Guide 23...

Page 24: ...c equipment is required 2 When this product has reached the end of its serviceable life it cannot be disposed of as unsorted municipal waste It must be collected and treated separately 3 It has been d...

Reviews: