background image

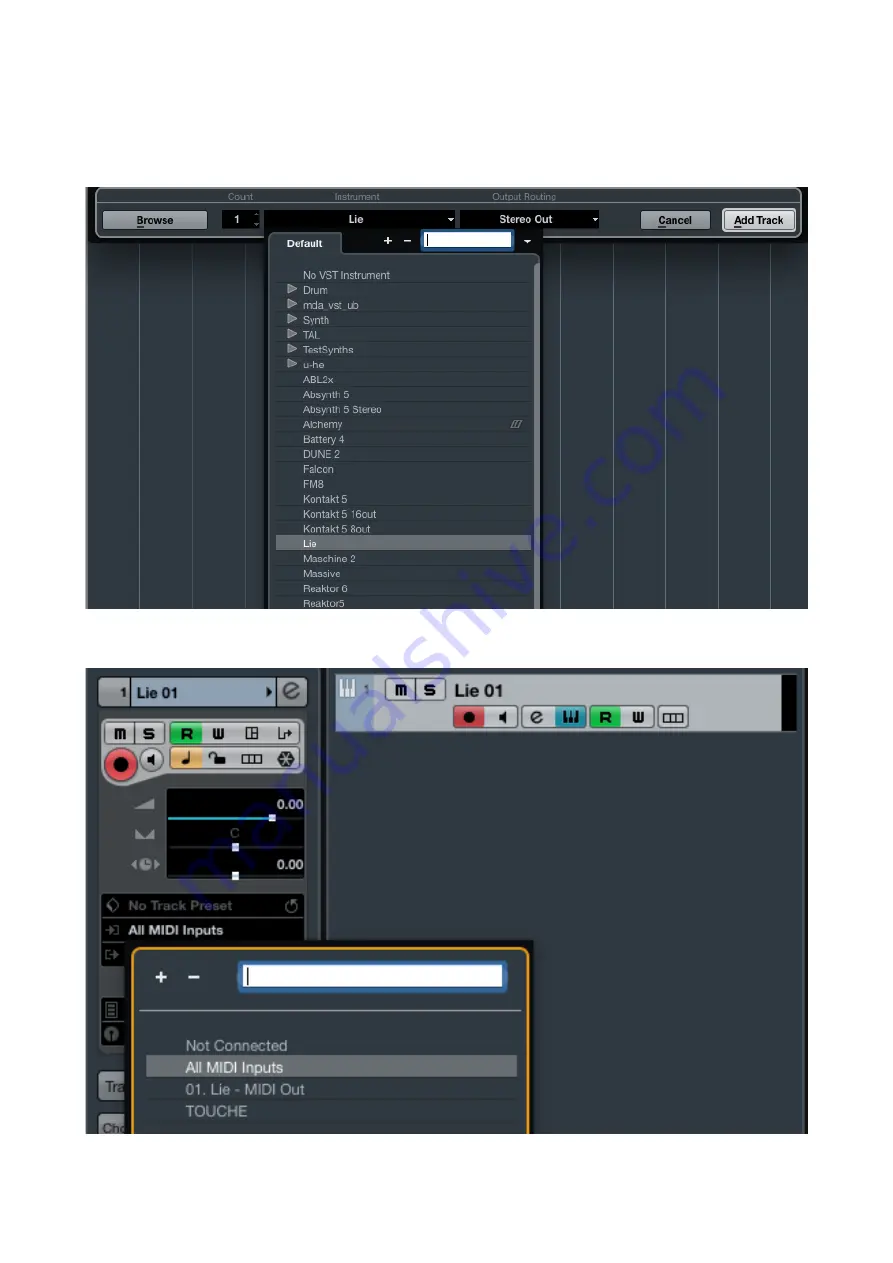
4.1.3. Cubase  

To load Lié in Cubase , you must add a new MIDI track or click on the instrument selection from an existing track. 
Choose the synth part layer and select Lié.  

Make sure that your track is armed and that the MIDI IN of your Track is on "All MIDI Input". 

Expressive E

Touché User Manual v.1.1

Page    of  

25 29

Summary of Contents for Expressive E Touche

Page 1: ...U S E R M A N U A L ...

Page 2: ...ton is a trademark of Ableton AG Mac MacOS OS X GarageBand Logic are registered trademarks of Apple Inc All other trademarks are the property of their respective owners and use of them does not imply any affiliation with or endorsement by them Document authored by the Expressive E team EXPRESSIVE SAS Atrium 104 Avenue de la Résistance 93100 MONTREUIL France www expressivee com Expressive E Touché U...

Page 3: ... 3 1 Buttons 9 2 3 2 Encoder 9 2 3 3 LEDs 9 2 4 Connectivity 10 2 4 1 Ports 10 2 4 2 Data 11 3 Lié 12 3 1 Overview 12 3 1 1 What is Lié 12 3 1 2 System Requirements 12 3 1 3 Plug in Formats 12 3 2 Interface 13 3 2 1 Menu 13 3 2 2 Settings 14 3 2 3 Browser 15 3 2 4 Slot Center 16 3 2 5 Plug In Preset Specificities 17 3 2 6 Hardware Preset Specificities 18 3 2 7 Memory View 20 3 2 8 Scope 21 3 2 9 S...

Page 4: ...23 4 1 2 Logic Pro 24 4 1 3 Cubase 25 4 2 Creating a sound 27 4 3 Adjusting your sensitivity 29 4 3 1 By Parameter 29 4 3 2 For the Top and Bottom Shiftings 29 4 3 3 For the Left and Right Shiftings 29 Expressive E Touché User Manual v 1 1 Page of 4 29 ...

Page 5: ...ow the instructions as well Once Lié is installed launch your DAW Lié should appear in your Plug in folder If not it might be because your DAW doesn t automatically scan for new plug ins Scan them to refresh your plug in list learn more at DAW Setup The rest position of your Touché is calibrated when you power Touché Therefore when plugging Touché to your computer please make sure that Touché is i...

Page 6: ...ps hand made LFOs etc Each of the four Shiftings can be independently mapped to one or several parameters of your synthesisers 2 1 2 Slave and Standalone You can use your Touché in Slave mode when using it with Lié or as a Standalone Slave Touché is connected to Lié Touché behaves as specified in Lié Standalone Touché is not connected to Lié Touché behaves as specified in the currently selected pr...

Page 7: ...the end close from the Encoder and the Buttons the top is the opposite You can also play with both at the same time by pressing in the middle After pressing if you release all pressure it will naturally recover its equilibrium position Depending on which part of the Skin you apply pressure on the pressure will be more or less distributed onto the top or bottom Shiftings thanks to a lever arm mecha...

Page 8: ...ché s pressure feedback One is located just under the Skin another is underneath Touché inside the little trapdoor Both cylinders can be removed from their support by releasing them from their rail Do not try to take them off directly by pulling them or you might irreversibly damage them 2 2 5 Slider Under the Skin you will find a Slider which allows you to adjust the sensitivity of the left and ri...

Page 9: ...ivity steps and the four LEDs will display the sensitivity steps whenever you turn the Encoder by being incrementally lit from left to right Learn more in the Adjusting your sensitivity section The Encoder also gives you a special feature called Freeze pushing the Encoder will freeze the data sent from the four Shiftings Touché shows that it is freeze mode when its four LEDs are blinking If you re...

Page 10: ...ace this kind of problem we recommend to use the anti ground loop adapter supplied Connect the anti ground loop adaptor to Touché as follows The Ground Loop Adaptor possesses three ends Two male USB connectors one female USB connector Plug the longest segment of the two male connectors to an electrical outlet and the shortest segment to your computer then plug the female connector to Touché s stan...

Page 11: ...C 18 Right shifting CC 19 MIDI and CV outputs sends data according to the selected Hardware Preset within Lié Please refer to the Hardware Preset section to learn how to set up the MIDI and CV outputs of Touché in a Hardware Preset When Touché is in Standalone mode its MIDI USB and CV outputs send data according to the selected preset in the memory Please refer to the Memory View section to learn ...

Page 12: ...s provided software presets were made in partnership with UVI Falcon and are ready to be played within UVI Workstation included in Lié s package 3 1 2 System Requirements Minimum required to run Lié Processor Intel Core i5 1 4Ghz or equivalent RAM 4GB memory OS macOS 10 10 and above Minimum required to Workstation Processor Intel Core i5 2 5Ghz or equivalent RAM 4GB memory recommended 8GB 1GB hard...

Page 13: ... empty plug in preset in order to use Lié with your software instruments NEW HARDWARE PRESET Opens an empty hardware Preset in order to use Lié with your hardware instruments SAVE PRESET Saves changes of an existing preset It will overwrite the current preset file SAVE AS PRESET Saves your current preset to a new file which will be displayed in the Browser LOAD PRESET Lets you load a preset from t...

Page 14: ...e preset folder in the Finder Presets available in the Browser are saved in this folder Preset Folder Refresh Updates Lié s Browser Updating the Browser is useful when you make changes in the Preset Folder whilst Lié is still open System report Creates a system report file when you click on Get Logger file The file will be created on the desktop named expressiveeLogfile zip It is an useful file to...

Page 15: ...lter allows you to refine your search by selecting one or more instrument For example selecting Diva and UVI Workstation will show all the presets created with Diva and UVI Workstation TAG Tags allow you to find presets by types of sound If you select several tags only the presets which contains all the tags will appear in the preset list For example when the first two tags from the list are selec...

Page 16: ... time 3 Min Max When a parameter is assigned to a slot a grey slider appear which controls the parameter value When a Shifting is selected the original position of the parameter is shown by a colour arrow Furthermore two sliders appear They allow you to modify the min and max values of the parameter controlled by Touché 4 Curves Click on this button to display the Sensitivity Curve for the chosen ...

Page 17: ...ult sound from the preset 5 Clear Resets all curves and assignations If you wish to keep the current settings please save your configuration as a preset before proceeding 3 2 5 Plug In Preset Specificities 1 Instrument Selection Click on the drop down list at the top right of the Slot Center to display the list of your scanned plug ins Then click on the name of a plug in to load it You must scan y...

Page 18: ...elected them to each Slot You can un map any parameter by clicking on the colour circle 3 2 6 Hardware Preset Specificities 1 MIDI Page In the MIDI Page the Slot Center looks just the same as for a plug in preset except that you choose CC numbers instead of plug in parameters Which CC numbers you should use depends on which device you are using You will find more informations in its user manual or...

Page 19: ... your the hardware preset from Touché with a specific preset from your synthesiser Program Changes messages are sent via the selected MIDI Channel 3 CV Page On the CV page there are four Slots available corresponding to the four CV outputs of Touché For each Slot instead of parameters you can choose between different voltage ranges There are four different voltage ranges 0V 5V 5V 5V 0V 10V 10V 10V A...

Page 20: ...ew first click on one slot it will turn to white and double click on a Hardware Preset in the Browser The preset is now displayed inside the slot A click on the cancelling cross next to the slot will restore the default preset A click on Delete All will the restore the default preset in all slots Once you re done click on SAVE IN TOUCHE to save those presets in Touché s internal memory Do not disc...

Page 21: ...ht Shiftings control the pitch parameter A movement to the right will increase the pitch and a movement to the left will decrease it The pitchbend range depends on the instrument whether it s a hosted plug in or a hardware synthesiser Being a MIDI parameter the pitch bend it is not available in CV You can still reproduce this effect with the CV outputs by using both left and right Shiftings on one ...

Page 22: ...output A dot will move showing you at which point of the curve you are In other words the more you press the more the dot will go to the right following the colour line 1 Drop down list Displays a selection of pre defined curves 2 Bending Allows you to switch from a linear formula to an exponential or logarithmic formula 3 Hand Draw allows you to draw a curve directly by hand 4 Min Max Lets you fi...

Page 23: ...ating with Lié check that your track is armed and make sure that the audio engine is on If not choose an audio device from Live s audio Preferences Live Preferences Audio You can also check that the Track MIDI input of Touché is On Live Preferences Link MIDI If you can t find Lié in your Plug in list make sure that you have set the right plug in path in Live s preferences Click on Live Preferences...

Page 24: ...k Make sure your track is armed and the MIDI IN of your Track is on All MIDI Input You can know play with Touché and Lié If you can t find Lié in your Plug ins make sure Lié is activated click on Preferences Audio Unit Manager Expressive E Touché User Manual v 1 1 Page of 24 29 ...

Page 25: ...MIDI track or click on the instrument selection from an existing track Choose the synth part layer and select Lié Make sure that your track is armed and that the MIDI IN of your Track is on All MIDI Input Expressive E Touché User Manual v 1 1 Page of 25 29 ...

Page 26: ...t plug in path Devices Plug in Manager VST Instruments Settings If Touché is not communicating with Lié check that your track is armed and make sure that the MIDI IN of Touché is active in Device Device Setup MIDI MIDI Port Setup Expressive E Touché User Manual v 1 1 Page of 26 29 ...

Page 27: ...4 2 Creating a sound 1 Click on NEW PLUGIN PRESET in the Menu 2 Select your Plugin Expressive E Touché User Manual v 1 1 Page of 27 29 ...

Page 28: ... selecting them from the drop down list above one Slot 4 Or by clicking on the Instrument View in the Toolbar to use our mapping features 5 Assign parameters to Shiftings for each Slot you wish to use Expressive E Touché User Manual v 1 1 Page of 28 29 ...

Page 29: ...lity level of top and bottom Shiftings by turning the Encoder Increasing sensitivity will decrease the amount of pressure needed to reach the Shifting s peak value with a higher level of sensitivity you will need a smaller depth to reach the maximum of the Shifting At maximum sensitivity a slight push only a few millimetres is enough to reach the maximum value of the Shifting whereas at minimum se...

Reviews: