background image

Functional characteristics 

MMA welding 


32 

Item No.: 099-002046-EWM01


5.2.4


Antistick


Anti-stick prevents the electrode from annealing.


If the electrode sticks in spite of the Arcforce device, the 
machine automatically switches over to the minimum 
current within about 1 second to prevent the electrode 
from overheating. Check the welding current setting 
and correct according to the welding task!


5.2.5


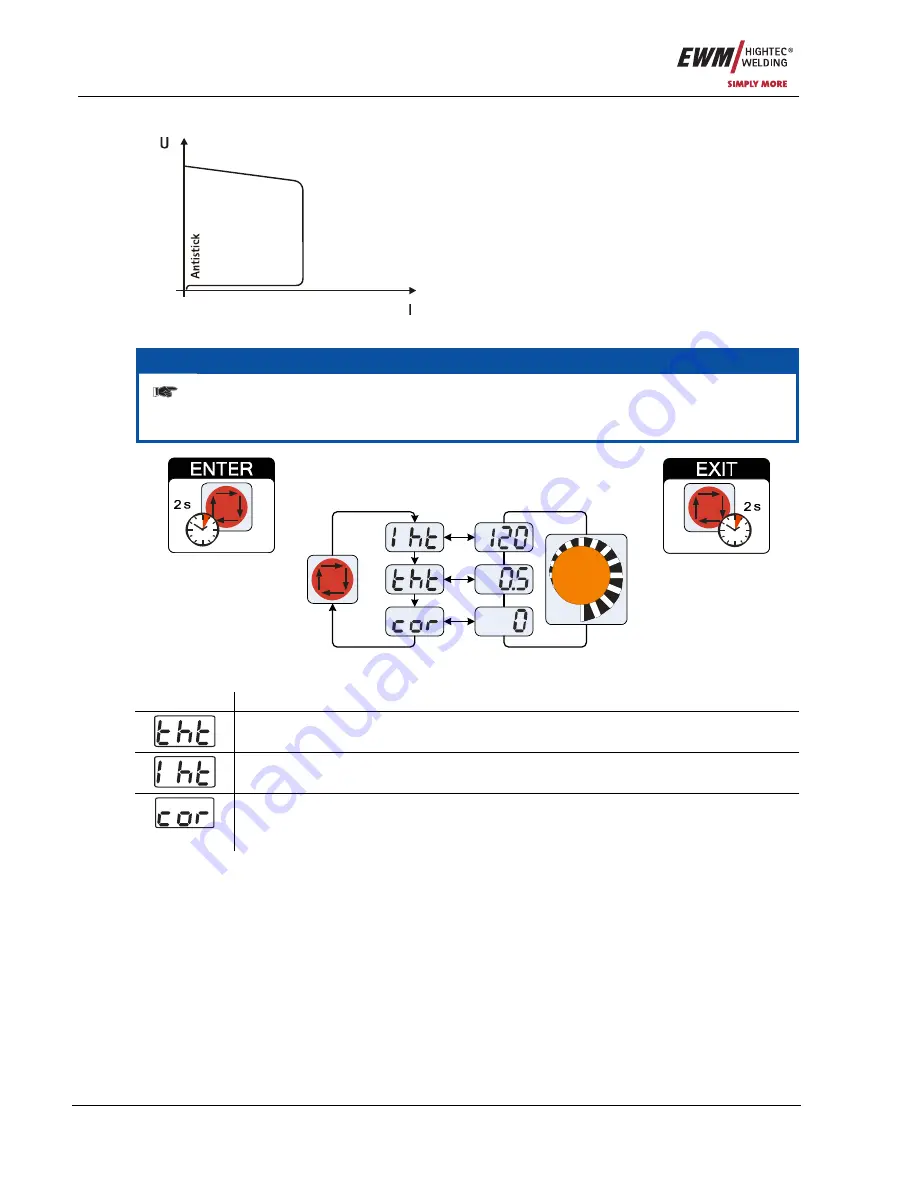
Advanced settings 


NOTE 


  To change the advanced setting parameters, hold down the "Welding parameters" button 

for 2 seconds after selecting the welding process. 
The following diagram shows the setting options. 


Figure 5-9


Display Setting/selection 


Hotstart time 
Hotstart time setting (0,1 s to 20,0 s) 


Hotstart current 
Hotstart current setting (50 % to 200 %) 


Arcforce correction (setting -10 to 10, factory setting 0) 
•  Increase value > harder arc 
•  Decrease value > softer arc 

Summary of Contents for Picotig 180

Page 1: ...ppropriate safety regulations The machines bear the conformity mark and thus comply with the EC Low Voltage Directive 2006 95 EG EC EMC Directive 2004 108 EG In compliance with IEC 60974 EN 60974 VDE...

Page 2: ...y and a three year warranty Continual further development and optimisation has made us Germany s market leader in the manufacture of light arc welding machines We have manufacturing training and servi...

Page 3: ...ields CE EWM HIGHTEC WELDING GMBH D 56271 M NDERSBACH TYP ART SNR PROJ GEPR FT CONTROL Name of Customer company Adress Post code Place Country Stamp Signature of EWM distibutor Date of purchase Name o...

Page 4: ...lements 19 4 3 1 Welding data display 20 5 Functional characteristics 21 5 1 TIG welding 21 5 1 1 Selection and adjustment 21 5 1 2 TIG automatic cut out 21 5 1 3 Arc ignition 22 5 1 3 1 HF ignition 2...

Page 5: ...uring the open circuit voltage 45 7 3 5 Measurement of insulation resistance 45 7 3 6 Measuring the leakage current protective conductor and contact current 46 7 3 7 Measurement of protective conducto...

Page 6: ...warning symbol The hazard is also highlighted using a symbol in the page margin CAUTION Working or operating procedures which must be closely observed to prevent possible minor personal injury The sa...

Page 7: ...ns Item No 099 002046 EWM01 7 Instructions and lists detailing step by step actions in given situations can be recognised by bullet points e g Insert the welding current lead socket into the relevant...

Page 8: ...h can result in potentially fatal electric shocks and burns on contact Even low voltages can cause you to get a shock and lead to accidents Do not touch any live parts in or on the machine Connection...

Page 9: ...easily flammable objects such as matches or lighters Keep appropriate fire extinguishing equipment to hand in the working area Thoroughly remove any residue of flammable substances from the workpiece...

Page 10: ...k at regular intervals that users are working in a safety conscious way Damage due to the use of non genuine parts The manufacturer s warranty becomes void if non genuine parts are used Only use syste...

Page 11: ...ipping over and injuring persons or being damaged itself during movement and set up Tilt resistance is guaranteed up to an angle of 10 according to IEC 60974 1 3 10 Set up and transport the machine on...

Page 12: ...of dust acid corrosive gases or substances may damage the equipment Avoid high volumes of smoke vapour oil vapour and grinding dust Avoid ambient air containing salt sea air Non permissible ambient c...

Page 13: ...alternation 10 min 60 DC 6 min welding 4 min break Open circuit voltage 90 V Mains voltage tolerances 1 x 230 V 40 to 15 1 x 240 V 40 to 10 Frequency 50 60 Hz Mains fuse safety fuse slow blow 1 x 16...

Page 14: ...100 A 100 110 A 35 90 A 60 80 A 100 Load alternation 10 min 60 DC 6 min welding 4 min break Open circuit voltage 90 V Mains voltage tolerances 1 x 230 V 20 to 15 1 x 240 V 20 to 10 1 x 115 V 15 to 15...

Page 15: ...Connection socket welding current TIG Connection for workpiece lead MMA Electrode holder or workpiece lead connection 4 Cooling air outlet 5 Machine feet 6 Connection socket 5 pole Standard TIG torch...

Page 16: ...description If necessary the optional connection may need to be retrofitted see Accessories chapter 4 3 2 1 5 Figure 4 2 Item Symbol Description 0 1 Main switch machine on off 2 Connection socket 19 p...

Page 17: ...on socket welding current TIG Connection for workpiece lead MMA Electrode holder or workpiece lead connection 4 Connection socket 5 pole Standard TIG torch control lead 5 G connecting nipple Shielding...

Page 18: ...description If necessary the optional connection may need to be retrofitted see Accessories chapter 4 3 2 1 5 Figure 4 4 Item Symbol Description 0 1 Main switch machine on off 2 Connection socket 19...

Page 19: ...ct the welding parameters depending on the welding process and operating mode used 4 AMP sec Welding parameter setting rotary transducer Setting of welding current and other welding parameter and thei...

Page 20: ...or the welding current after approx 5 seconds Advanced parameters are shown with an alternate display of the welding parameter and its value abbreviation of parameter is displayed for approx 2 sec par...

Page 21: ...Set down slope time Setting range 0 0 s to 20 0 s Select gas post flow time sec AMP sec Set gas post flow time Setting range 0 0 s to 20 0 s NOTE This completes the basic settings and you can now sta...

Page 22: ...ued depending on the operating mode selected End the welding process Release or press the torch trigger depending on the operating mode selected 5 1 3 2 Liftarc ignition a b c Figure 5 2 The arc is ig...

Page 23: ...timise other parameter values for the welding task see also Advanced settings chapter TIG welding 5 1 4 1 Legend Symbol Meaning Gas pre flows factory setting 0 5 s see advanced settings on how to chan...

Page 24: ...The welding current increases with the adjusted up slope time to the main current AMP If torch trigger 2 is pressed in addition to torch trigger 1 during the main current phase the welding current dr...

Page 25: ...om main current AMP to secondary current AMP Press torch trigger 2 or Tap torch trigger 1 for tapping mode see also chapter Tapping function 3rd cycle Press torch trigger 1 The main current drops with...

Page 26: ...ent modes see chapter Setting the torch mode and up down speed Explanation of symbols Operating elements Symbol Description BRT 1 Press torch trigger BRT 1 Tap torch trigger BRT 2 Tap and press torch...

Page 27: ...ch time it is switched on Exit the menu Exit Software version of the machine control Version display example 2 4 version 2 4 Torch configuration menu Set welding torch functions Torch mode Modes 1 3 w...

Page 28: ...ing elements Welding current On Off BRT 1 Secondary current Latched mode 1 factory set BRT 1 Standard torch with two torch triggers Diagram Operating elements Explanation of symbols BRT1 torch trigger...

Page 29: ...torch trigger 2 Functions mode Operating elements Welding current On Off BRT 1 Secondary current BRT 2 Secondary current tapping mode Latched mode 1 factory set BRT 1 Welding current On Off BRT 1 BRT...

Page 30: ...tions Figure 5 7 Display Setting selection Switch ignition mode on HF ignition off Liftarc Switch on Switching on machine function Switch off Switching off machine function Gas pre flow time Setting r...

Page 31: ...the ignition of the stick electrodes using an increased hotstart current After striking the stick electrode the arc ignites with hotstart current iht for the preset hotstart time tht and then reduces...

Page 32: ...welding current setting and correct according to the welding task 5 2 5 Advanced settings NOTE To change the advanced setting parameters hold down the Welding parameters button for 2 seconds after se...

Page 33: ...t into the remote control connection socket on the welding machine or wire feed unit and lock it only when the machine is switched off The remote control is detected automatically when the welding mac...

Page 34: ...e the machine against dirt and damage The protective dust cap must be fitted if there is no accessory component being operated on that connection The cap must be replaced if faulty or if lost 6 2 Area...

Page 35: ...Commissioning Area of application proper usage Item No 099 002046 EWM01 35 MMA arc welding...

Page 36: ...g socket that has a correctly fitted protective conductor If a mains plug must be fitted this may only be carried out by an electrician in accordance with the relevant national provisions or regulatio...

Page 37: ...ion 3 Connection socket 5 pole Standard TIG torch control lead 4 Connection socket for welding current Workpiece lead connection Insert the welding current plug on the welding torch into the welding c...

Page 38: ...welding current Workpiece lead connection Insert the welding current plug on the welding torch into the welding current connection socket and lock by turning to the right Remove yellow protective cap...

Page 39: ...r to the welding torch is a fundamental requirement for optimum welding results In addition a blocked shielding gas supply may result in the welding torch being destroyed Always re fit the yellow prot...

Page 40: ...sulated from persons animals or equipment during the setting procedure NOTE Incorrect shielding gas setting If the shielding gas setting is too low or too high this can introduce air to the weld pool...

Page 41: ...tion 0 1 Connection socket welding current Workpiece lead or electrode holder connection 2 Connection socket for welding current Electrode holder or workpiece lead connection 3 G connecting nipple Shi...

Page 42: ...ode holder connection 2 Connection socket for welding current Electrode holder or workpiece lead connection 3 G connecting nipple Shielding gas connection with yellow insulating cap for TIG welding to...

Page 43: ...s one who because of his training knowledge and experience is able to recognise the dangers that can occur while testing welding power sources as well as possible subsequent damage and who is able to...

Page 44: ...ard but is also specific to arc welding equipment NOTE The former term of repetition test has been replaced due to a change in the corresponding standard with Inspection and testing during operation I...

Page 45: ...lding current sockets The voltmeter must display mean values and have an internal resistance 1 M In the case of step switch controlled devices set the maximum output voltage step switch Adjust the pot...

Page 46: ...nductor current 5 mA 2 Leakage current from the welding sockets separately to PE 10 mA 7 3 7 Measurement of protective conductor resistance Measure between the plug earthed contact and accessible live...

Page 47: ...en ordering spare parts please quote the machine type serial number and item number of the machine as well as the type designation and item number of the spare part We hereby certify that we have corr...

Page 48: ...urpose According to German law law governing the distribution taking back and environmentally correct disposal of electric and electronic equipment ElektroG from 16 03 2005 used machines are to be pla...

Page 49: ...ll additional parts used by EWM but manufactured by other companies e g motors pumps fans torches etc Non reproducible software errors and parts subject to mechanical ageing are excluded from the warr...

Page 50: ...remote control remote control extension cable coolant etc The warranty does not apply to products that are damaged due to accidents misuse improper operation incorrect installation use of force disre...

Page 51: ...or message Possible cause Remedy E 0 No error Ensure that torch trigger 1 is not being pressed E 4 Temperature error Allow machine to cool down E 5 Excess mains voltage E 6 Insufficient mains voltage...

Page 52: ...ll customised welding parameters that are stored will be replaced by the factory settings Figure 9 1 Display Setting selection Calibration The machine will be calibrated for approx 2 seconds each time...

Page 53: ...9 002046 EWM01 53 9 3 Display machine control software version Figure 9 2 Display Setting selection Calibration The machine will be calibrated for approx 2 seconds each time it is switched on Exit the...

Page 54: ...Foot operated remote control current with connection cable 094 006680 00000 RA5 19POL 5M Remote control e g connection cable 092 001470 00005 RA10 19POL 10M Remote control e g connection cable 092 00...

Page 55: ...n Y1 Gas 1 2 PEPE PE 2n2F PE X3 1 X3 2 X3 3 X3 4 AC1 AC2 L1 N PE X2 1 X2 2 24V L1 Ud 26V Schutz bei 400V Netz 15V 8V 26V 24V 0V24 SPW10 KK HS KK LS X1 Steuersatz L ftersteuerung KK Dioden D C 1 8 2 A1...

Page 56: ...1 115V 1 4 115V Y1 Gas 1 2 PEPE PE Ringkern Ringkern R1 2 4 1 3 I2 I2 15V 8V 26V 24V 0V24 SPW10 KK HS KK LS KK Dioden DW DW Temp Nachlauf Temp Trafo UZWK 15V 0V2 Ud I Prim Sek Temp AC2 AC1 L1 Ud 26V...

Page 57: ...he event of unau thorised modifications improperly con ducted repairs non observance of the deadlines for the repetition test and or non permitted conversion work not specifically authorised by EWM Pa...

Reviews: