background image

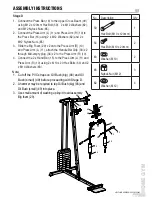
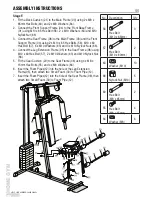
Stage D

1.  Connect the Press Bar (16) to the Upper Cross Beam (09) 

using M12 x 120mm Hex Bolt (59).  2 x M12 Washers (62), 
and M12 Nylock Nuts (65).

2.  Connect the Press Arm (L) (11) and Press Arm (R) (10) to 

the Press Bar (16) using 2 x M12 Washers (62) and 2 x  
M12 Nylock Nuts (65).

3.  Slide the Big Foam (29) x 2 onto the Press Arm (R) (10) 

and Press Arm (L) (11), attach the Handle Bar Grip (33) x 2 
through Mid-empty plug (34) x 2 to the Press Arm (R) (10).

4.  Connect the 2 x Hand Bar (15) to the Press Arm(L) (11) and 

Press Arm (R) (10) using 2 x M10 x 20 Hex Bolts (54) and 2 
x M10 Washers (63).

ASSEMBLY INSTRUCTIONS

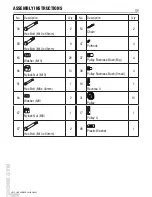
No. Description

Q'ty

59

Hex Bolt (M10 x 120mm)

1

54

Hex Bolt (M10 x 20mm)

2

63

Washer (M10)

2

65

Nylock Nut (M12)

3

62

Washer (M12)

4

11

HOME GYM

HELP LINE NUMBER: 08456 400800

ev

-700     

62

65

16

32

11

54

15

33

29

29

34

10

09

***

***

*

***

***

*

* * *

*

* * *

* * * * *

* * *

* * * * *

* * *

* **

***

***

*

***

***

*

***

***

*

***

***

*

***

***

*

***

***

*

***

***

*

***

***

*

***

***

*

***

***

*

***

***

*

62

65

59

Note:

1.   Cut off the PVC straps on Oil Bush (big) (48) and Oil 

2.   A hammer may be required to tap Oil Bush (big) (48) and 

Bush (small) (49) before proceeding with Stage D.

Oil Bush (small) (49) into place.

3.   Use small amount of washing up liquid to aid assembly 

Big foam (29).

Summary of Contents for ev-700

Page 1: ...CAUTION BEFORE USING THIS EQUIPMENT CAREFULLY FOLLOW THE INSTRUCTIONS AND READ ALL PRECAUTIONS THEN RETAIN FOR FUTURE REFERENCE MAXIMUM USER S WEIGHT LOAD 110 KG ev 700 HOME GYM COMPLIES WITH EN 957...

Page 2: ......

Page 3: ...MATION P 04 BEFORE YOU BEGIN P 05 PARTS LIST DRAWINGS P 06 ASSEMBLY INSTRUCTIONS P 08 WARM UP AND COOL DOWN WORKOUT GUIDELINES P 17 TRAINING INSTRUCTIONS P 18 EXERCISE PROGRAM P 19 EXPLODED DRAWING P...

Page 4: ...ch use check that the fasteners are properly tightened and that none are protruding Regularly check the condition of the parts that are most susceptible to wear and tear 7 Do not store this product in...

Page 5: ...ull Yes it s a proven fact that a regular exercise program can improve your physical and mental health Too often our busy lifestyles limit our time and opportunity to exercise EVERLAST HOME GYM provid...

Page 6: ...45 Outside End Cap Cap PARTS LIST DRAWINGS 6 HOME GYM HELP LINE NUMBER 08456 400800 ev 700...

Page 7: ...Nylock Nut M12 3pcs Nylock Nut M8 2pcs Nylock Nut M10 28pcs PARTS LIST DRAWINGS NOTE Please check all parts are present prior to commencing assembly 7 HOME GYM HELP LINE NUMBER 08456 400800 ev 700...

Page 8: ...e 02 secure them with 2 x M10 x 20mm Hex Bolts 54 2 x M10 Washers 63 2 Connect the Front Base Frame 01 and the Back Base Frame 02 together using 2 x M10 x 65mm Hex Bolts 56 4 x M10 Washers 63 and 2 x...

Page 9: ...ach the Selector Shaft Bush 25 onto the top hole of the Selector Shaft 07 using Selector Shaft Pin 24 Slide the Top Weight Plate 23 onto the Weight Guide Tubes 06 and locate the Selector Shaft 07 in p...

Page 10: ...0 x 65mm Hex Bolts 56 4 x M10 Washers 63 and 2 x M10 Nylock Nuts 66 2 Connect the Weight Guide Tube 06 to the Upper Cross Beam 09 using 2 x M10 x 20mm Hex Bolt 54 2 x M10 Washers 63 3 Connect the Pres...

Page 11: ...nect the 2 x Hand Bar 15 to the Press Arm L 11 and Press Arm R 10 using 2 x M10 x 20 Hex Bolts 54 and 2 x M10 Washers 63 ASSEMBLY INSTRUCTIONS No Description Q ty 59 Hex Bolt M10 x 120mm 1 54 Hex Bolt...

Page 12: ...to the Seat Frame 08 using M10 x 60 Hex Bolt 57 2 x M10 Washers 63 and M10 Nylock Nut 66 5 Fit the Seat Cushion 20 to the Seat Frame 08 using 4 x M8 x 15mm Hex Bolts 55 and 4 x M8 Washers 64 6 Insert...

Page 13: ...o 11 31 and Pulley U 17 using one M10 x 45mm Hex Bolt 58 two M10 Washers 63 and one M10 Nylock Nut 66 3 Assembly The Gable 3750mm 50 a With the Cable 3750mm 50 in groove of Pulley 31 through Leg Exten...

Page 14: ...45mm 9 47 Pothook 4 63 Washer M10 26 37 Pulley Fastness Bush Big 4 66 Nylock Nut M10 13 38 Pulley Fastness Bush Small 4 61 Hex Bolt M8 x 40mm 1 18 Reverse U 1 64 Washer M8 2 31 Pulley 13 67 Nylock Nu...

Page 15: ...ASSEMBLY INSTRUCTIONS Recheck all bolts and nuts are tightened securely before using this equipment 15 HOME GYM HELP LINE NUMBER 08456 400800 ev 700...

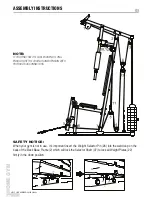
Page 16: ...THHOOK AS CONNECTORS 16 HOME GYM HELP LINE NUMBER 08456 400800 ev 700 SAFETY NOTICE When your gym is not in use It s important insert the Weight Selector Pin 26 into the weld loop on the back of the B...

Page 17: ...toward your toes as far as possible Hold for 15 counts then relax Repeat 3 times Stretches Hamstrings back of knees and back 2 Hamstring Stretch Sit with one leg extended Bring the sole of the opposit...

Page 18: ...eats quickly and you breathe deeply An aerobic exercise should be part of your entire exercise routine WEIGHT TRAINING Along with aerobic exercising which helps get rid of and keep off the excess fat...

Page 19: ...se the lock lever bench press The arms out and lean forward 45 move back so your lower back is supported against the pad From this position push directly up The push must be directly over head 3 Butte...

Page 20: ...hs under roll pads Arch your back and pull the bear to the back of your neck 6 Leg extensions Sit upright with your legs over the top roller pads and your feet hooked in behind the bottom roller pads...

Page 21: ...t bar with chain to high pulley grip the bar keeping your elbows at your side press the bar down until your arms are fully extended return the weight to its starting position using control 9 Triceps e...

Page 22: ...EXPLODED DRAWING 22 HOME GYM HELP LINE NUMBER 08456 400800 ev 700...

Page 23: ...EV 700 15 Hand Bar 2 EV 700 49 Oil Bush Small 2 EV 700 16 Press Bar 1 EV 700 50 Cable 3750mm 1 EV 700 17 Pulley U 1 EV 700 51 Cable 2720mm 1 EV 700 18 Reverse U 1 EV 700 52 Upper Cable 2370mm 1 EV 70...

Page 24: ......

Reviews: