background image

13

For queries or additional product information, please call our Service Centre on: 

087 997 0865

Please have your model name on hand.

www.everlast.com

COMPUTER FUNCTION

n

n

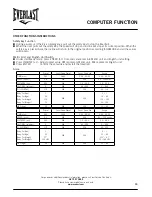
This chart is about Age and Pulse Value (default value) for HRC Function :

Age

BPM

Age

BPM

Age

BPM

Age

BPM

H

preset

L

H

preset

L

H

preset

L

H

preset

L

13

197

124

124

31

180

113

113

49

162

103

103

67

145

92

92

14

196

124

124

32

179

113

113

50

162

102

102

68

144

91

91

15

195

123

123

33

178

112

112

51

161

101

101

69

143

91

91

16

194

122

122

34

177

112

112

52

160

101

101

70

143

90

90

17

193

122

122

35

176

111

111

53

159

100

100

71

142

90

89

18

192

121

121

36

175

110

110

54

158

100

100

72

141

90

89

19

191

121

121

37

174

110

110

55

157

99

99

73

140

90

88

20

190

120

120

38

173

109

109

56

156

98

98

74

139

90

88

21

189

119

119

39

172

109

109

57

155

98

98

75

138

90

87

22

188

119

119

40

171

108

108

58

154

97

97

76

137

90

86

23

187

118

118

41

170

107

107

59

153

97

97

77

136

90

86

24

186

118

118

42

169

107

107

60

152

96

96

78

135

90

85

25

185

117

117

43

168

106

106

61

151

95

95

79

134

90

85

26

184

116

116

44

167

106

106

62

150

95

95

80

133

90

84

27

183

116

116

45

166

105

105

63

149

94

94

28

182

115

115

46

165

104

104

64

148

94

94

29

181

115

115

47

164

104

104

65

147

93

93

30

181

114

114

48

163

103

103

66

146

92

92

USER MODE

General Mode

n

n

Press Program Fast Key  : Switch Program1-Program10, Time Countdown, Distance Countdown, Calories 

Countdown, HRC 65%~HRC 85%, HRC Target, USER1, USER2, BODYFAT.

n

n

Press U1, U2 

: Under start/ready mode, use U1 to switch to USER1, use U2 to switch to USER2 

after set, enter into time setting automatically.

n

n

Press START 

: Count down for 3 seconds and enter into sport mode.

n

n

Press STOP/RESET 

: Return to start/ready mode.

n

n

User window displays the current selected User Number.

Setting Mode

n

n

Preset time is 30 minutes.

n

n

Press SPEED (+/-)  : After entering into time setting mode, adjust target time (20:00 ~ 99:00). After entering 

into Profile setting mode, set Speed or Incline value.

n

n

Press START 

: Count down for 3 seconds and enter into sport mode.

n

n

Press STOP/RESET  : Return to start/ready mode.

n

n

Press Enter 

: Switch time setting, speed setting segment, incline setting segment.

Sport Mode

n

n

Press SPEED (+/-)  : Set speed.

n

n

Press INCLINE (+/-) : Set incline.

n

n

Press STOP/RESET  : Stop running.

n

n

Press START 

: Count down for 3 seconds and enter into sport mode.

n

n

Press Fast Key 

: Speed fast key adjustment : 1-10 km/hr

Incline fast key adjustment : L0, L2, L4, L6, L8, L10

BODY FAT Mode

General Mode

n

n

Press Program Fast Key  : Switch Program1-Program10, Time Countdown, Distance Countdown, Calories 

Countdown, HRC 65%~HRC 85%, HRC Target, USER1, USER2, BODYFAT.

n

n

Press Body Fat 

: Use BodyFat to switch to BODY FAT mode.

n

n

Press STOP 

: Return to start/ready mode.

n

n

Under BODY FAT mode  : Dot Matrix displays BODY FAT.

Summary of Contents for 10346

Page 1: ...ill help you get the best from your equipment and ensure safe and correct assembly use and maintenance If you need help or have damaged or missing parts call the service centre on 087 997 0865 Please...

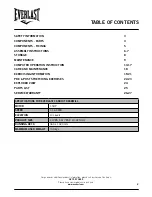
Page 2: ...SPEED 1 16 KM H ELEVATION 13 Levels PRODUCT SIZE L 1785 X W 785 X H 1425 mm RUNNING DECK 460 x 1320 mm MAXIMUM USER WEIGHT 130 kgs SAFETY INFORMATION 3 COMPONENTS PARTS 4 COMPONENTS FIXINGS 5 ASSEMBL...

Page 3: ...ssed the required IEC passed the required IEC and South African LOA USE It is the responsibility of the owner to ensure that all users of this product are properly informed as to how to use this produ...

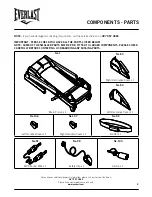
Page 4: ...7 997 0865 IMPORTANT PLEASE CHECK YOU HAVE ALL THE PARTS LISTED BELOW NOTE SOME OF THE SMALLER PARTS MAY BE PRE FITTED TO LARGER COMPONENTS PLEASE CHECK CAREFULLY BEFORE CONTACTING US REGARDING ANY MI...

Page 5: ...ponents call the service division on 087 997 0865 IMPORTANT PLEASE CHECK YOU HAVE ALL THE PARTS LISTED BELOW NOTE SOME OF THE SMALLER PARTS MAY BE PRE FITTED TO LARGER COMPONENTS PLEASE CHECK CAREFULL...

Page 6: ...LY REMOVE ALL PACKING MATERIAL AND CHECK EACH PART WITH THE MANUAL FIRST 3 REMEMBER SOME PARTS ARE PRE FITTED TO LARGER COMPONENTS STEP 1 WARNING After assembling the treadmill the loincloth can be un...

Page 7: ...65 Please have your model name on hand www everlast com ASSEMBLY INSTRUCTIONS STEP 2 1 Tighten the Left Right Decorative Cover 93 94 with 6 x Screw 103 2 Cover Left Right Handrail Cover 106 107 on the...

Page 8: ...treadmill frame to ensure balance and press down If the user is finding it difficult to lower the treadmill they should administer a light rocking motion and slowly lower the treadmill to the ground I...

Page 9: ...ter be sure to follow above steps The position of the running belt might not stay precisely in the center It could run slightly towards the left or right sides The situation varies with how end users...

Page 10: ...into Manual mode Window Display n n Weight Setting Upper dot matrix displays WT Lower dot matrix displays KG in Metric Unit and LBS in English Unit n n Age Setting Upper dot matrix displays AGE n n Wi...

Page 11: ...into setting n n Press START Count down for 3 seconds and enter into sport mode n n Press STOP RESET Return to start ready mode n n Under different mode the corresponding window volume label symbol is...

Page 12: ...Switch Program1 Program10 Time Countdown Distance Countdown Calories Countdown HRC65 HRC85 HRC Target USER1 USER2 BODYFAT n n Press HRC HRC mode includes heart rate 65 75 85 Target Under start ready...

Page 13: ...92 USER MODE General Mode n n Press Program Fast Key Switch Program1 Program10 Time Countdown Distance Countdown Calories Countdown HRC 65 HRC 85 HRC Target USER1 USER2 BODYFAT n n Press U1 U2 Under s...

Page 14: ...Count down for 3 seconds and enter into sport mode n n Press STOP RESET Return to start ready mode Sport Mode n n Press COOL DOWN Enter into COOL DOWN mode Cool Down Mode n n Press STOP RESET Stop run...

Page 15: ...et value KM represents Metric unit MIL represents English unit n n Press ENTER Confirm the set value and restart the treadmill Scale Preset Count Down Preset Count Down Set Range TIME min s 0 00 20 00...

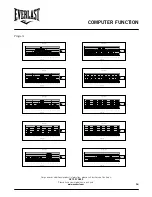
Page 16: ...PROGRAM4 0 1 2 3 4 5 6 1 2 3 4 5 6 7 8 9 10 11 12 13 14 15 16 17 18 19 20 SEGMENT SPEED INCLINE PROGRAM5 0 2 4 6 8 10 1 2 3 4 5 6 7 8 9 10 11 12 13 14 15 16 17 18 19 20 SEGMENT SPEED INCLINE PROGRAM6...

Page 17: ...70 10 30 70 90 30 50 90 10 50 70 10 30 70 90 30 50 90 7 2 2 2 4 4 6 6 6 8 8 8 6 6 4 4 4 2 2 2 2 8 30 30 90 30 30 90 90 30 30 90 30 30 90 30 30 90 90 30 30 90 8 2 4 4 2 4 6 6 4 2 4 4 6 8 6 6 4 2 4 4 2...

Page 18: ...before using the equipment replace any defective parts immediately and do not use the equipment again until it is in perfect working order 4 The equipment can be cleaned using a damp cloth and mild no...

Page 19: ...culty increase the amount of resistance TONING You can tone your muscles by pushing them to a moderate percentage of their capacity Select a moderate amount of resistance and increase the number of r...

Page 20: ...r energy level is the highest Each workout should be fol lowed by at least one day of rest Once you nd the schedule that is right for you stick with it EXERCISE FORM Maintaining proper form is an esse...

Page 21: ...to achieving the greatest results is to make exercise a regular and enjoyable part of your everyday life HEART RATE CHART YOUR AGE TARGET RANGE HR 50 85 MAX HEART RATE 20 100 170 BEATS PER MINUTE 200...

Page 22: ...s and push forwards Spread shoulder blades apart Chest addition Forearm raised slightly on xed object Lunge stance Move body forward beyond elbow Lats addition Relaxed elbow Lean slightly over away fr...

Page 23: ...the side of bottom LOWER BACK GLUTES Reach behind knees Lift bottom Pull knees right into chest KNEE ROLLS Keep knees and feet close together Gently roll to one side hold Repeat on the other side ABD...

Page 24: ...24 For queries or additional product information please call our Service Centre on 087 997 0865 Please have your model name on hand www everlast com EXPLODED VIEW...

Page 25: ...r 8x 16x1 5T 1 83 Front Pedal L 1 27 Pedal Extending Set 1 84 Front Pedal R 1 28 Truss Hex Screw M8xP1 25x25 1 85 Pedal Middle 2 29 Truss Hex Screw M8xP1 25x40 1 86 Rear Pedal L 1 30 Handrail Tube Ass...

Page 26: ...charged This limited warranty is void if a product is returned with removed damaged or tampered labels and or any alterations including the unauthorised removal of any component or external cover Only...

Page 27: ...will try identify the fault and will book a service team call out The service team will endeavour to fix the problem in your home on an agreed date and time Only if the fault cannot be repaired in th...

Reviews: