


EZN3160/3260
26
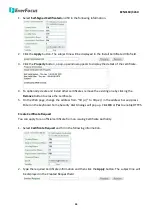
2.
Give the event a name, like “1”.
3.
In the “Event Triggered Type” field, click on Manual Trigger.
4.
Below this, check “Enable This Event”, “Enable Post-trigger Buffer”, and “Record to micro SD Card”.
For Alarm Input, Manual Trigger, and Tampering Detection trigger types, multiple events can be
created on the Event List but only one event can be enabled. For example, if you create three
Alarm Input trigger events, only one event under this trigger type can be enabled. The option of
Enable This Event
for the rest of two Alarm Input events will be grayed out and display ‘’This
Trigger Type has already been enabled.’’ To enable another event under the same type, uncheck to
disable the event first and check the desired event.
5.
To save your settings, click the
Create
button, and the Event will be listed in the Event List.
6.
Look at the “Post-trigger Buffer” at the bottom to make sure the buffer time is set to 10 seconds.
Click the
Apply
button.
7.
Click the
LiveView
button to go back to the Live View page.
8.
Get ready to click the
Trigger Event
button on the Live View page. Before you do, see if you can
find something in the view screen that will give you a visual time marker. For instance, if you can
get your hand in front of the camera’s lens, get ready to count down on your fingers.
9.
Click the
Trigger Event
button and slowly count down on your fingers in front of the lens (if you are
able to do so – if not, try to find visual cues on the view screen that will help you to mark the
moment you pushed the trigger). The recording period will be as long as the buffer time you
selected – the default period is 10 seconds.
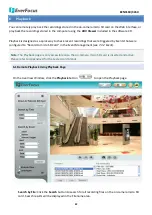
10.
Click the
Playback
button to open the Playback page.
11.
There are different ways to search for recording files on the camera’s micro SD card (i.e. the
Playback memory). For a recent recording like your test event, simply click the “Search” button
under the “Show All Files on micro SD Card” header.
12.
If the micro SD card is active and formatted correctly, the recording folder’s name (the recording
day’s date) will appear in the Filename area. Click on this folder to open it. If there are sub-folders,
click on the bottom one (the most recent would be at the bottom) until you can click on a file that
cannot open to another sub-level and shows data in the File Information area to the right. This
would be the file of the most recent recording event.
13.
To play this file, click the
Play
button below the video box. The test footage you have recorded
should start playing. Play time should be 10 seconds if you left the Post-trigger Buffer as 10
seconds.


