background image


EPN4122/4122i/4220/4220i/4220p/4220pi 

49 


7.3.4


HTTPS 

Hypertext Transfer Protocol Secure (HTTPS) is a combination of the Hypertext Transfer Protocol and 
the SSL/TLS protocol and provides encrypted communication and secure identification of a network 
web server.   


Before using the HTTPS function for communication with the IP camera, a Certificate must be created 
first. There are two ways to create and install a certificate: Create Self-Signed Certificate and Create 
Certificate Request

 
Create Self-Signed Certificate 
Please note that even though self-signed certificates are free and offer some protection, true security 
is only implemented after the installation of a signed certificate issued by a certificate authority. 


1.


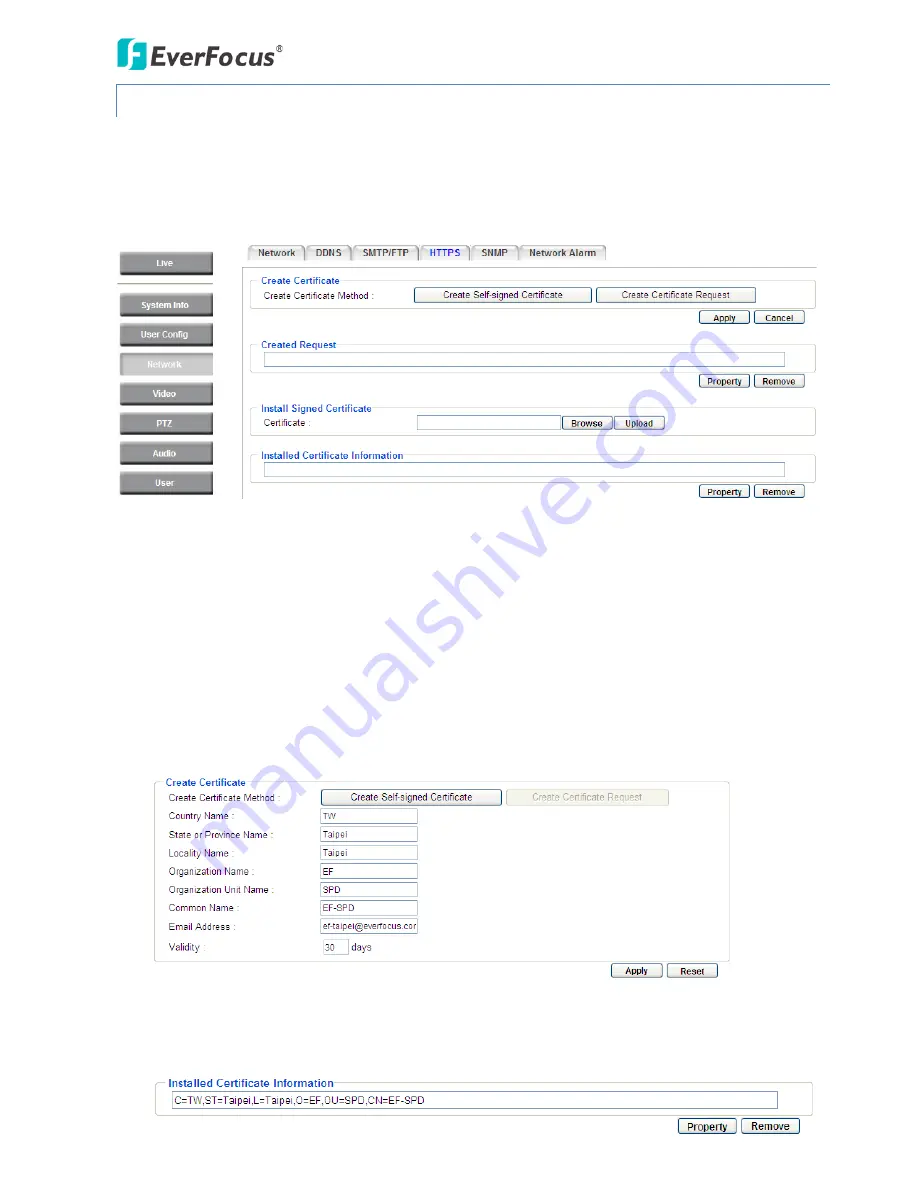
Click the Create Self-Signed Certificate button, the following dialog appears. 


2.


Type the required Certificate information and then click the Apply button. The subject line will be 
displayed in the Installed Certificate Information field. 


Summary of Contents for EPN4122

Page 1: ...EPN Series IP Speed Dome EPN4122 4122i 4220 4220i 4220p 4220pi User s Manual Copyright EverFocus Electronics Corp Release Date November 2013...

Page 2: ...of this manual may be reproduced or transmitted in any form or by any means without written permission of the EverFocus Electronics Corporation EverFocus 12F No 79 Sec 1 Shin Tai Wu Road Hsi Chih Tai...

Page 3: ...ccur in a particular installation If this equipment does cause harmful interference to radio or television reception which can be determined by turning the equipment off and on the user is encouraged...

Page 4: ...or in extreme cases fire 6 Cleaning For cameras with interchangeable lenses do not touch the surface of the sensor directly with the hands Use lens tissue or a cotton tipped applicator and ethanol to...

Page 5: ...3 Wall Mount Installation 14 3 5 4 Ceiling Mount Installation 17 4 Accessing the User Interface 21 4 1 Checking the Dynamic IP Address 21 4 2 Settings for Microsoft Internet Explorer 23 4 3 Connectin...

Page 6: ...io 80 7 7 User 81 7 7 1 User Information 81 7 7 2 IP Address Filter 83 7 8 Event 84 7 8 1 Event Settings 84 7 8 2 Motion Detection 88 7 8 3 Tamper Detection 89 7 8 4 Alarm I O 89 7 8 5 Schedule 90 7 9...

Page 7: ...function is designed for reducing the noises in the images allowing the camera to better distinguish between real motion and image noise and thus results in a possibility to store more video evidence...

Page 8: ...Tracking Motion Detection Wide Dynamic Range WDR Digital Slow Shutter DSS Built in Dynamic Noise Reduction DNR Digital Image Stabilizer DIS Privacy Zone Masking Excellent position accuracy of 0 1 deg...

Page 9: ...astic anchor x 6 Screw x 6 Box 2 Camera main body with a tool packet Tool packet Glove x 1 pair Desiccant pack x 3 Power terminal block x 1 Box 3 Outer housing Small Box Power adapter Software CD x 1...

Page 10: ...doors Pole mount adapter Used for installing a wall mount bracket to a pole indoors or outdoors Indoor ceiling pendant mount bracket Used for installing a speed dome against a ceiling Outdoor sunshiel...

Page 11: ...onnects to an RS 485 device such as EverFocus EKB500 keyboard 3 24 VAC Connects to the power adapter Note that different regions may use different ranges for AC voltage Be sure to check the voltage ra...

Page 12: ...rd can be used to develop applications for alarm input and output motion detection PTZ control or a variety of other functions CON3 1 2 3 4 5 6 7 8 9 10 11 12 Pin Assignment No Functions No Functions...

Page 13: ...lation should be handled by a qualified service agent and should be complied with all local regulations Service personnel should check potential problem such as surfaces strength surface materials fal...

Page 14: ...open the camera 3 5 2 1 Replacing the Desiccant Bags 1 On the Top Housing slightly press the black plastic socket backward and lift up the base board 2 Remove the desiccant bags from the top housing 3...

Page 15: ...card to the micro SD card slot 3 Screw back the black housing 3 5 2 3 Restoring to Factory Default There are two ways to restore all of the camera s settings to factory default values 1 Click the Defa...

Page 16: ...f the power when setting up the DIP Switch The new values will only take effect after restarting the camera DIP Switch Camera Main Body ID Address The ID address of the camera should be set to corresp...

Page 17: ...8 63 Switch Address Switch Address Switch Address Switch Address Switch Address Switch Address ON 1 2 3 4 5 6 7 8 Switch Address 65 ON 1 2 3 4 5 6 7 8 66 ON 1 2 3 4 5 6 7 8 67 ON 1 2 3 4 5 6 7 8 68 O...

Page 18: ...N 1 2 3 4 5 6 7 8 191 Switch Address Switch Address Switch Address Switch Address Switch Address Switch Address ON 1 2 3 4 5 6 7 8 Switch Address 193 ON 1 2 3 4 5 6 7 8 194 ON 1 2 3 4 5 6 7 8 195 ON 1...

Page 19: ...er including EVF Pelco D Pelco P A Type and Panasonic The default protocol is EVF DIP Switch Sticker on the Camera Main Body Note If you switch the three protocol switches to ON the camera will enter...

Page 20: ...nting the bracket base plate and then drill a through wall hole for inserting the camera cables You can optionally drill a second through wall hole to separate cable feeding see Step 4 3 Attach the wa...

Page 21: ...all and then through the holes of the bracket base plate Note 1 Related connectors may be required and prepared on your own for using the extension cables of the related devices 2 Microphones with ext...

Page 22: ...ion Top Housing Main Body Note 1 To release the main body press the two orange release buttons on both sides Make sure you are holding the main body firmly otherwise it will fall down 2 To protect the...

Page 23: ...the ceiling for supporting the camera s weight Make sure the ceiling is strong enough to easily support the weight of the bracket and the camera 1 Replace the desiccant bags inside the top housing See...

Page 24: ...ing on the top disk of the indoor recessed mount bracket by using the 3 short screws Top Disk 5 Use a cable or other mechanism to hang the indoor recessed mount bracket on the ceiling 6 Screw the 3 ro...

Page 25: ...outside of the main body Push the main body upward into the top housing until the orange catches on both sides click into position Top Housing Main Body Note 1 To release the main body press the two o...

Page 26: ...by twisting it clockwise 9 Slide the surface ring to the fillister and slightly turn it until it is firmly fixed Note When you turn on the power the camera will enter self inspection mode and run a s...

Page 27: ...IPU will automatically search the IP devices connected in the LAN 2 To access to the Live View window double click the IP address of the desired device the login window pops up Type the user ID and p...

Page 28: ...the selected camera will display Login Note 1 The default user ID is user1 and the default password is 11111111 2 If you select more than one camera that has the same user ID password you will be able...

Page 29: ...ase follow the steps below 1 On the computer click Start Control Panel System and Security Action Center click Change User Account Control Settings the User Account Control Settings window appears Adj...

Page 30: ...iveX controls field select Prompt In the Include local directory path when uploading files to a server field select Enable Click OK 4 In the Internet Options window click the Advanced tab and then dis...

Page 31: ...cted to a router and allows multiple users on and off site to see the IP camera on a LAN WAN Internet The camera must be assigned an IP address that is compatible with its LAN By setting up port forwa...

Page 32: ...f you have a dynamic IP address this connection may require that you use DDNS for a reliable connection Please refer to 7 3 2 DDNS One to One Connection Directly from PC to IP Camera You can connect d...

Page 33: ...of streams See 7 4 1 Multi Streaming 2 Click the button to play the recorded data directly from the on camera Micro SD SDHC card for this function to become active you have to insert a Micro SD SDHC c...

Page 34: ...save a snapshot of the video image currently being displayed The location on your computer where the snapshot data will be saved can be specified in Settings User Config see 7 2 2 Recording Snapshot...

Page 35: ...ld the mouse can zoom out the image Click n Go Mode Select this option to let the camera center on the point on the screen where you click with your mouse 11 Manual Control Trigger Event Click the Tri...

Page 36: ...Live View Config 13 Event signal icons above video screen When an alarm or motion event is triggered a signal icon will appear at the top right of the Live View window to alert the user Alarm event ic...

Page 37: ...to point pan 2 for endless 360 pan and then click the Go button Only one preset Auto Pan can be configured The endless pan will rotate horizontally around the currently selected vertical camera axis...

Page 38: ...onfigured point to point pan 2 for endless 360 pan and then click the Go button Note To use this function you have to set up an auto pan sequence on the PTZ Settings page See 7 5 PTZ To activate the A...

Page 39: ...ed in the software CD Playback is designed as a quick way to check recent recordings that were triggered by Events that were configured to Record to SD Card in the Settings Event Event Settings page s...

Page 40: ...file to highlight it its details will be displayed in the File Information area You can now click Play to play that specific file Pause Click this button to pause the playback Stop Click this button...

Page 41: ...section 6 2 2 below the grey letters should turn white IF NOT do the following 1 From the Live page click Settings System SD Card If no card has been inserted yet the Remove button should be faded in...

Page 42: ...you a visual time marker For instance if you can get your hand in front of the camera s lens get ready to count down on your fingers 12 Click the Trigger Event button and slowly count down on your fi...

Page 43: ...tem Name Descriptions 1 Snapshot Click to take and save a snapshot 2 Load File Click to load the recordings for playing back 3 Convert ARV to AVI Convert the recording from ARV format to AVI format 4...

Page 44: ...tem Info User Config Network Video Audio User Event and System Click the Live button can go back to the Live View Window 7 1 System Info The System Information and System Log can be checked on this pa...

Page 45: ...s The sequence number date time and event messages of the log event will be displayed in the System Log field The log will display the last 256 log events Click the Export button to export the system...

Page 46: ...The RTSP protocol uses UDP for camera data stream transmission RTP over TCP The RTSP protocol uses TCP for camera data stream transmission RTP over HTTP The RTSP protocol uses HTTP for camera data st...

Page 47: ...recording snapshot file when the disk storage capacity is full The user can set the storage capacity limitation in the in sentence field in the gray box below the Overwrite setting If the remaining h...

Page 48: ...ddress This address can change under certain circumstances For instance when the camera s network switch hub has to be rebooted Do not assign to the DHCP server the same IP addresses used for the othe...

Page 49: ...ress please enter it here Username Enter the account s username used only for PPPoE Password Used only for PPPoE IPv6 Enter the IPv6 details in this area if this applies to your system Click Apply to...

Page 50: ...cusddns com for the simplicity of setting up your IP cameras DDNS Settings Enable Check this box to enable the DDNS function Service ISP You can either apply for a host name from EverFocus or other DD...

Page 51: ...for remote access to the IP camera This function is available on most routers in the market and is often known as Port Forwarding To set up Port Forwarding please consult the manual of the router 2 In...

Page 52: ...r configuring the mail server that is used to send e mail text notifications and one image file from the camera to predefined addresses via SMTP Note that to enable e mail notification function you ha...

Page 53: ...eiver can recognize the sender when an Event message is received Attach Image Check this box if you want to attach an image when an alarm is triggered or an IP camera detects events This server requir...

Page 54: ...check PASV Mode Test FTP Server Click the Test button to send a testing file to the assigned FTP server Click Apply to apply the changes or Cancel to cancel the changes and return to the previous sett...

Page 55: ...ways to create and install a certificate Create Self Signed Certificate and Create Certificate Request Create Self Signed Certificate Please note that even though self signed certificates are free an...

Page 56: ...e change the address from http to https in the address bar and press Enter on the keyboard Some Security Alert dialogs will pop up Click OK or Yes to enable HTTPS Create Certificate Request You can ap...

Page 57: ...quest in PEM format and paste it to the certificate request field on the Web page of the 3rd party certification authority such as Symantec VeriSign Wait for the certificate authority to issue an SSL...

Page 58: ...Click either of the Enable buttons to enable either of the two Make your changes as desired Click on the Trap Address field to enter the digits if required 7 3 6 Network Alarm This function works wit...

Page 59: ...Stream 2 check the Enable box under the Stream 2 header Note If you connect to the camera via the Internet and experience a delay lag time in the video feed try to reduce the number of streams and th...

Page 60: ...les of that stream to be saved in AVI or ARV format Click Apply to apply the changes or Cancel to cancel the changes and return to the previous settings Time Stamp Settings You can select the Date Tim...

Page 61: ...Shutter Priority Select this option to manually set up the shutter speed The Iris value is automatically set up by default To set up the shutter speed click the Advanced tab and select a value from t...

Page 62: ...iddle or high for the WDR level For EPN4220 4220i OFF Select to disable the WDR function Auto Select to automatically switch on off the WDR function where intensity of illumination on the image varies...

Page 63: ...EPN4122 4122i 4220 4220i 4220p 4220pi 57 7 4 3 Advanced EPN4122 4122i...

Page 64: ...button on the right side to instruct the camera to the selected option This is like a semi automatic way to adjust the Lens Calibrate to suit the user Exposure Settings AE Mode Auto Select this option...

Page 65: ...to enable disable the BLC function Select a level for the BLC areas The selected areas in green will be applied with the BLC function ON HLC The Highlight Compensation HLC is used to reduce the bright...

Page 66: ...t mode black and white when the light levels fall to the specified level D N Level and back to Day mode color when the light levels rise to the specified level N D Level You can further setup the dela...

Page 67: ...EPN4122 4122i 4220 4220i 4220p 4220pi 61 EPN4220 4220i 4220p 4220pi...

Page 68: ...and shutter speed By default the Auto Exposure is set to Auto AES Iris Priority Select this option to manually set up the Iris value and turn off the Shutter Speed ALC Shutter Priority Select this op...

Page 69: ...s White Balance Settings Select the mode that delivers the best quality image for the camera s light environment You can click the Push button on the right side to instruct the camera to the selected...

Page 70: ...ng temperature sensitive images B W Select to view the video images in black and white Sharpness Select the sharpness level of the image A low sharpness level will deliver a softer less detailed image...

Page 71: ...ed in the ROI settings page To set up an ROI region 1 Select an ROI number from the ROI No drop down list 2 Click the Add button the mouse cursor will turn into a pen when you move it over the live im...

Page 72: ...ttings The modes vary among models Mode Select Color to make the masks appear as colored rectangles on the screen Select B W to make the masks appear as gray rectangles on the screen Select Mosaic to...

Page 73: ...r controlling the direction buttons Adjust zoom focus and Iris if necessary 5 To adjust the height width of the privacy mask click the buttons 6 Follow Step 2 to 5 to set up another Privacy Mask 7 Cli...

Page 74: ...s field Click the Program button to bring up the Preset panel see steps below Freeze Picture Select ON to freeze the live view during the camera moves among the preset positions the camera will start...

Page 75: ...ick the Preset No drop down list to select a number Or click on the number in the Page field to select a preset number To activate the Preset function on the Live View window click the Open button in...

Page 76: ...ght Position and then click the Set button next to Set Right Pos 5 Select Off from the Endless Mode drop down list 6 Enter a speed at which the camera will move during the Auto Pan sequence 7 Enter a...

Page 77: ...ition or after a Pattern sequence 6 Enter a speed at which the camera will move to the Preset position or first point of the Pattern sequence 7 Follow Step 3 to 6 to configure up to 16 positions for T...

Page 78: ...r can void the configuration for the entered Pattern No Click Go to view test the configured Pattern sequence To activate the Pattern function on the Live View window click the Open button in the PTZ...

Page 79: ...ition 1 TOUR1 PAT 1 Pattern 1 AUTOPAN and PREV MODE Auto Flip Select ON to tilt the camera by 180 using the direction controls on the PTZ Control window Owing to the mechanical design the camera will...

Page 80: ...s to force the camera to move to a certain position or to move in a setup sequence Area Setting You can configure up to eight zones on the camera view To set up a zone 1 Click the Program button the f...

Page 81: ...n the direction that you want to set as the camera s North position 0 on the horizontal axis 2 Click the Set button to turn that horizontal direction into the camera s North 3 Click the Default button...

Page 82: ...o Tracking in 5 Live View Window Note To best perform the Auto Tracking function it is recommended to mount the PTZ camera over 4 meters above the ground and to install it with a certain degree of dep...

Page 83: ...t Direction is to indicate the position of the Start Point Note If the user did not set up a start point or the start point is disabled the camera will go back to track monitor the initial point inste...

Page 84: ...settings Time Mask Check the box to enable the following Time Mask functions Zoom Control on Tracking The camera has two zoom control modes while tracking Keep current zoom ratio the current zoom rati...

Page 85: ...re returning to the Start Point 0 is returning to Start Point without any waiting Resume from manual stop The function is used to set up the Auto Tracking restart time 0 600 seconds If user manually o...

Page 86: ...Output cable Check the Enable Audio box to enable the camera s audio function The camera will now act as a digital bridge via the IP network between any connected audio input device and any connected...

Page 87: ...in in the Confirm field 3 Select an authority level for the user account from the Authority drop down list Supervisor Administrator The only difference between a supervisor and administrator is that a...

Page 88: ...user does not have access to the User Event and System pages Guest The lowest level of access which only allows the user access to the Live View page 4 Select Active or Disable from the Status drop do...

Page 89: ...d range or network in the Denied List and enter the exceptions in the Allowed List To set up the IP Address Filter 1 Select Denied List Click the Add button the following dialog box appears 2 Select a...

Page 90: ...an event occurs or an alarm is triggered You can also set up a schedule to automatically record the videos when an event occurs or an alarm is triggered 7 8 1 Event Settings You can create a total of...

Page 91: ...ction s when Auto Tracking events occur Fan Failure Select this option to trigger the to be specified below reaction s when Fan Failure events occur Enable This Event Select to activate the event Enab...

Page 92: ...igured on the User Config Recording Snapshot Export Settings if such a folder has been enabled and configured Note The recording will only be as long as the combined Pre and Post trigger Buffers and f...

Page 93: ...the amount of footage length of time after the event trigger moment that will be included in an event triggered video recording if that buffer and video recording has been enabled in the Event Config...

Page 94: ...ere you want your detection rectangle to end and then click The rectangular area with the selected color will appear This block will be an area inside which the camera will detect motion If you want t...

Page 95: ...et the number of seconds that an alarm signal will be active if the device is physically tampered moved covered up or out of focus 7 8 4 Alarm I O Use this page to set the type of trigger input and th...

Page 96: ...nfigured activated Schedule Recording events and keep all the other activated events active Schedule Recording Click this button to make every hour block you click on blue A blue block represents a Sc...

Page 97: ...field of the IP Utility software which is included in the software CD Set Time Zone Set the time zone of the camera s location Set Date Time Manually Set the date time here if you won t be using an NT...

Page 98: ...Daylight Saving Click Enable Daylight Saving to enable this schedule and select the dates when the region s daylight saving period begins and ends Click Apply to apply the changes or Cancel to cancel...

Page 99: ...FTP server entered in the FTP Repository Settings see 7 3 3 SMTP FTP Event Recording Select to send the impending storage shortage text notification to the checked locations in the Notification Over f...

Page 100: ...ave to be reconfigured Save Load Configuration Server Save To make a backup file of the machine s current configurations press Save to save all the configurations to a config file This will enable the...

Page 101: ...firmware upgrade file Click Upgrade to install the new firmware Note 1 Do not disconnect power to the unit during the upgrade sequence The unit will reboot automatically after the upgrade has complet...

Page 102: ...keyboard Action Select an item from the drop down list to define the function for each key on the keyboard Set Preset You can use the joystick on the keyboard to select a position and then press this...

Page 103: ...he tracking crosshairs on the screen Use the joystick on the keyboard to select the desired tracking object and press this key again to save the selection Toggle Full Screen Press this key to toggle b...

Page 104: ...odel and then click the Log in icon The Log in dialog box appears 3 Type the Username and Password Click the OK button the status of the selected camera will display Login Note 1 The default user ID i...

Page 105: ...4220pi 99 4 Click the Upgrade Firmware button a browsing window appears 5 Select the firmware file evb and then click Open The IPU will automatically upgrade the firmware The camera will reboot once t...

Page 106: ...icro SD SDHC Micro SD SDHC Lens Auto Iris DC Iris DC Iris Aperture F1 6 3 2 F1 6 3 5 Focus Length f 4 7mm W 103 4mm T f 4 7mm W 94mm T Optical Zoom 22x 20x Digital Zoom 16x 10x Angle of View H 58 16 W...

Page 107: ...me at Preset Position 1 99 second available Tour 16 groups Tour Point per Group 16 preset positions Pattern 4 patterns with 90 sec long each Network Interface 10 100 Base T Ethernet RJ 45 socket Suppo...

Page 108: ...30W Max 30W Max EPN4220 4220i 25W Max EPN4220p 4220pi Operating Temperature 40 C 50 C 95 40 F 122 F 95 outdoor 5 C 50 C 85 23 F 122 F 85 indoor Safety CE FCC Vandal Proof IK10 for outdoor models Weath...

Page 109: ...messages pop up When these error messages pop up follow the steps below to fix the problem 1 To enter the Registry Editor of your computer Click Start and type regedit in the Search Program and Files...

Page 110: ...4 3 Find the KeepAlive Timeout Dword by following the path HKEY_CURRENT_USER Sofware Microsoft Windows CurrentVersion Internet Settings 4 Double click KeepAlive Timeout and this window appears 5 Chang...

Page 111: ...multiple EPN Series cameras using an EverFocus EKB500 keyboard For details on how to connect the keyboard to the EPN Series camera please refer to EKB500 Universal Keyboard User s Manual RJ 45 Cable...

Page 112: ...ww everfocus co jp info everfocus co jp EverFocus Europe UK Unit 12 Spitfire Business Park Hawker Road Croydon Surrey CR0 4WD UK TEL 44 20 8649 9757 44 845 430 9999 FAX 44 20 8649 9907 www everfocusuk...

Reviews: