background image

Salt Bath 709 / 718 / 818 

Installation and Operating Manual 

North American Model


 June 2019 


Page 

17

 of 

36


Programming the TAP to Achieve Molten Salt 

 
You will program the TAP control to do 3 things: ramp-up (heat up) to your chosen molten temperature, heat to your chosen molten temperature itself and hold at 
your chosen molten temperature. Let’s discuss these 3 things one at a time and in order: 
 

Temperature Rate (Speed)

: The TAP uses a degrees-per-hour format for controlling the speed at which the heat will increase. Evenheat recommends a 

heating rate of no faster than 1000°F per hour (537°C per hour). 
 

Setpoint Temperature:

 The Setpoint is the actual temperature you are attempting to achieve for the heat treating process. Heat treat salts have working 

temperature ranges. The desired heat treat temperature of your material must be within the working range of your heat treat salts. 
 

DO NOT OVERHEAT YOUR SALTS

 – You must know the acceptable, safe working range temperatures of your salts. Do not program or otherwise 

allow the salts to reach a temperature higher than the acceptable and safe working temperature range. Nitrite containing salts are prone to 
explosion if over-heated. KNOW YOUR SALTS and operate the salt bath accordingly!  


Hold Time:

 Once the setpoint temperature has been achieved the salt bath is allowed to hold at that temperature for a period of time. It’s during this hold 

time that you will perform your heat treating process. The amount of hold time depends upon the amount of time you expect your heat treat session to 
last. Keep in mind that you can always abort the heat treat process via the TAP control at any time. 
 

Using the above information, program your TAP control to ramp-up at no faster than 1000°F/hr. to reach your heat treat temperature and hold for a period of time. 
Given that you are heating your salts for the first time use a hold time of 6 hours. You shouldn’t need this amount of time to complete the process and you can abort 
the process when you are complete. 
 
Start the heating process per instructions found in the TAP control users manual. 


Chamber Thermocouple Controls Heat-up 


You will note that the TAP control indicates “Chamber” when the process is started, as will always be the case. This means that the TAP control is working from the 
Chamber Thermocouple for its control information. The reason is that chamber heat is a reliable measure of temperature at start-up when the salts are in a solid 
form. Sensing the direct temperature of the solid salt does not/would not accurately reflect the heat being exposed to the salt pot and could lead to a heating rate 
that is too fast. 
 
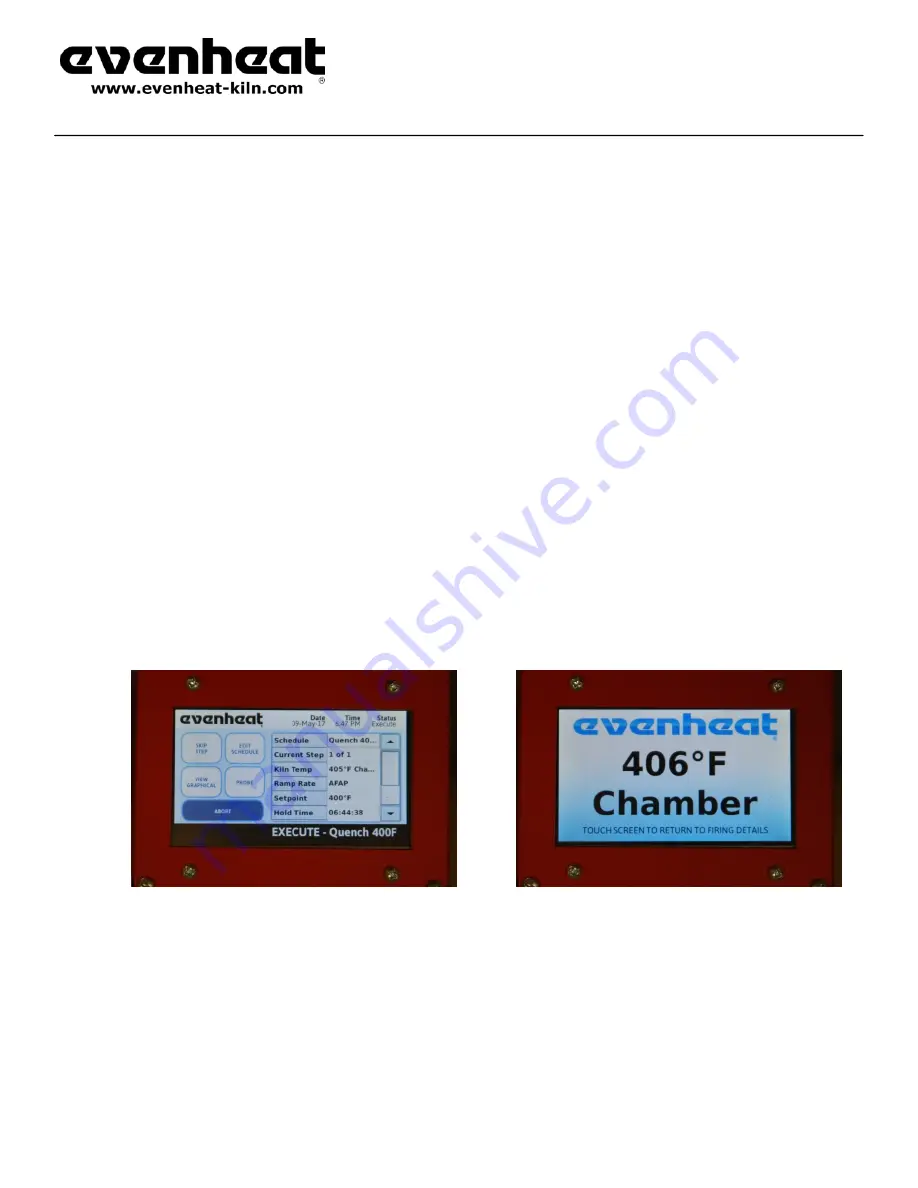
Generally, you will allow the TAP to use the Chamber thermocouple to control up the molten, setpoint temperature. 


You’ll note in the Kiln Temp row that “Cha…” is displayed. This 

indicates that the Chamber thermocouple is being used for control. 

After about 10 minutes of screen inactivity a large text 

screen appears and “Chamber” is prominently displayed. 


Summary of Contents for Salt Bath 709

Page 1: ...and Floor Easily Replaced 26 Charging Filling Your Salt Pot Salt Bath Maintenance 27 Put on Your Personal Protective Equipment 16 Salt Leaks 28 Turn on Any Ventilation Systems 16 Replacement Parts Li...

Page 2: ...ach Explosion Pressure Release Hazard This symbol alerts you to potential explosion and pressure release hazards Electric Shock Hazard This symbol alerts you to potential electric shock hazards Burn H...

Page 3: ...es The kilns operating voltage printed on the kilns nameplate must match the applied voltage actual electrical service voltage If it does not do not install or operate the kiln as potential electrical...

Page 4: ...ork piece holders must be constructed of carbon steels or stainless steels Do not attempt to heat treat any coated or plated steel Coatings and plating s include but are not limited to zinc galvanized...

Page 5: ...gn that you insert the Immersion thermocouple into the salt bath and control from the Immersion thermocouple Never fire a kiln unattended Do not attempt to insert any thermocouples or any other device...

Page 6: ...he ground connection at the salt pot is prone to corrosion with use Periodic inspection shall be made to ensure a sound electrical connection between the salt pot salt pot grounding lug hardware and t...

Page 7: ...North American Model June 2019 Page 7 of 36 Make a Square by Placing Frame Angles as Shown Attach Each Leg Using the Included Nuts and Bolts as Shown Place Plastic Feet on Each Leg as Shown Completed...

Page 8: ...thermocouple 1 8 diameter Inconel sheath bent at 90 Supplied with standard sized male thermocouple connector Note the grounding wire connected to the Inconel sheath This ground wire will be connected...

Page 9: ...Inconel sheath assembly and a 30 Type K lead assembly Both assemblies are supplied with standard sized male and female connectors Note the grounding wire connector on the thermocouple assembly and th...

Page 10: ...10 of 36 Chamber thermocouple assemblies properly assembled Insert the Chamber thermocouple into the chamber through the left rear corner as shown An insertion hole has been provided Plug the Chamber...

Page 11: ...ector on the thermocouple assembly and the green grounding wire included with the lead assembly The immersion thermocouple is also supplied with thermocouple mount The thermocouple mount properly plac...

Page 12: ...stud as shown At this point all 3 thermocouple grounds are attached to the ground stud Salt Pot Ground Strap Installation to Control Panel The salt pot is grounded to the control panel via a ground st...

Page 13: ...r other contaminants before using Salt pots should include a 0 250 hole 0 750 from the top of the pot This hole is designed to fit 20 hardware for the grounding lug Salt Pot grounding lug hardware att...

Page 14: ...ed and centered push the Over temp and Chamber thermocouples back into the chamber As noted earlier you may elect to allow the chamber thermocouple to make contact with the salt pot or not If not pull...

Page 15: ...d Strap Installation to Salt Pot Grounding Lug Connect the salt pot grounding strap to the salt pot ground lug as shown The connection should be tight We like to place the salt pot grounding lug point...

Page 16: ...no more than chamber depth We want to keep the surface of the molten salt at or below the bottom of the lid The pot does should extend beyond the lid but keeping the molten salt level within the boun...

Page 17: ...time that you will perform your heat treating process The amount of hold time depends upon the amount of time you expect your heat treat session to last Keep in mind that you can always abort the hea...

Page 18: ...control from that thermocouple Be sure at least 1 of the Immersion thermocouple is immersed within the molten salt If it isn t yet continue to add salts until it does and then proceed with this step A...

Page 19: ...you do plan to perform a heat treat session please read the following section entitled Standard Everyday Use for operational information Proper Shutdown When shutting down the salt bath heat treat kil...

Page 20: ...examine the firing data for correctness prior to committing to the process When developing a heat treat program we recommend that you not create any heating rates faster than 1000 F per hour Heating t...

Page 21: ...esulting in the molten salts being violently expelled out of the salt pot and into the surrounding area This presents a burn and fire hazard as well as potential personal injury or death Immersion The...

Page 22: ...uple is being used for control After about 10 minutes of screen inactivity a large text screen appears and Immersion is prominently displayed You may switch back and forth between the Chamber and Imme...

Page 23: ...s to be steel wire Whatever suspension method you do decide on it must be made of steel We would mention that we are not aware of any useful technique that simply places the work piece into the salt b...

Page 24: ...mbustible material We would suggest that you use care to avoid allowing dragout to run down the outside of the salt pot The refractory fiber gasketing material tends to stop the salts from reaching th...

Page 25: ...enerally it s better to try to keep it off the wall and surrounded with molten salt Over Temp Thermocouple Circuit Salt bath kilns include a dedicated over temperature thermocouple circuit The role of...

Page 26: ...Swing View allows for swiveling between a comfortable programming and use angle to a vertical position well suited for viewing at a distance across the shop We recommend placing the TAP control at the...

Page 27: ...The salt pot ground consists of a braided ground strap that is attached at both the salt pot and control panel Keep a close eye on the end that is connected to the salt pot Look for any loose connecti...

Page 28: ...lt pot leak may result in a short circuit with a corresponding trip of breakers or fuses It s for this reason that we supply grounds on the entire kiln chamber control panel thermocouples and salt pot...

Page 29: ...els SB 709 and SB 718 Repair Ring 07276 000 Elemented Brick Section for model 818 Repair Ring 07276 005 Lid for models SB 709 and SB 718 No Hole 00342 300 Lid for models SB 709 and SB 718 for 4 Pot Ho...

Page 30: ...Model June 2019 Page 30 of 36 Du Bois Chemicals Co gives the following melting point and working temperature range for Nu Sal as Melting Point 1230 F 665 C Working Temperature Range 1300 1650 F 704 89...

Page 31: ...Salt Bath 709 718 818 Installation and Operating Manual North American Model June 2019 Page 31 of 36 Nu Sal SDS page 2 of 7...

Page 32: ...Salt Bath 709 718 818 Installation and Operating Manual North American Model June 2019 Page 32 of 36 Nu Sal SDS page 3 of 7...

Page 33: ...Salt Bath 709 718 818 Installation and Operating Manual North American Model June 2019 Page 33 of 36 Nu Sal SDS page 4 of 7...

Page 34: ...Salt Bath 709 718 818 Installation and Operating Manual North American Model June 2019 Page 34 of 36 Nu Sal SDS page 5 of 7...

Page 35: ...Salt Bath 709 718 818 Installation and Operating Manual North American Model June 2019 Page 35 of 36 Nu Sal SDS page 6 of 7...

Page 36: ...Salt Bath 709 718 818 Installation and Operating Manual North American Model June 2019 Page 36 of 36 Nu Sal SDS page 7 of 7...

Reviews: