EuroLite DMX Move Control 512 PRO User Manual Download Page 59

System Settings 


www.eurolite.de 


59

11 

SYSTEM SETTINGS 


This  mode  allows  you  to  change  important  system 
settings for the controller. 


11.1 Calling the System Settings 

Keep  the  button 

MENU

  for  3  seconds  to  call  the 

system settings. 

● 

The display indicates the first menu item “01.Patch 
fixture”. 

Turn the 

PAN

 wheel to browse the menu items. 

Press  the 

ENTER

  button  to  select  the  desired 

menu item. 

Turn  the 

PAN

  wheel


to  change  a  setting  and 

confirm with 

ENTER

Shortly  press  the 

ESC

  button  to  abort  the  setting 

procedure and return to the main menu level.  

To save your settings and exit the system settings, 
keep the 

MENU

 button pressed for 3 seconds. 

 
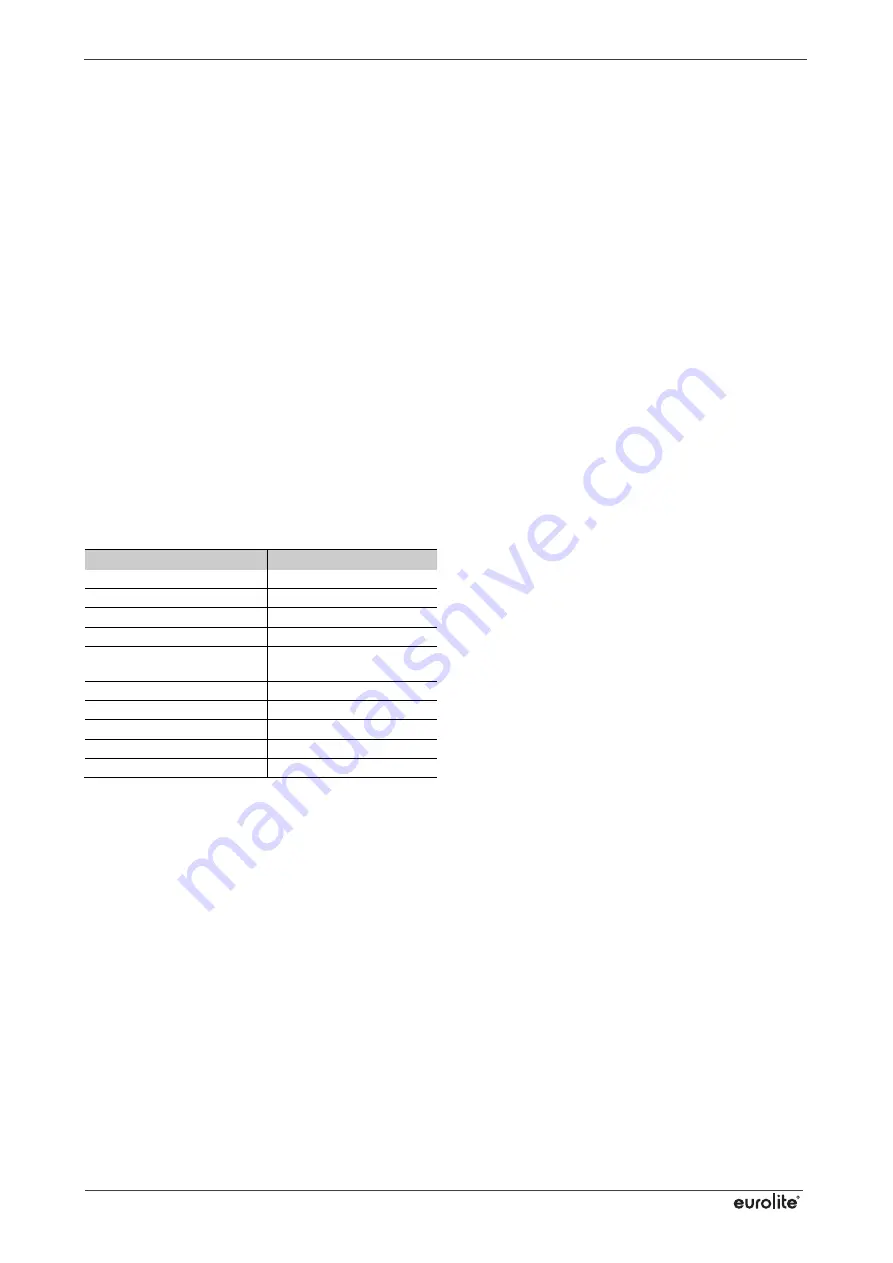
The following adjustments are possible: 


Display 

Function 

01. Patch fixture 

DMX configuration 

#1


02. Reset factory 

Reset to factory settings 

03. Delete all Fixture patch 

Delete all DMX assignments 

04. Fade mode 

Fade function 

05. RDM DMX Address 
setup 

RDM DMX address 
assignments 

06. Data backup 

Data backup 

07. Data load 

Data import 

08. Send fixture Update file 

Firmware update 

#2


09. Black-out mode 

Blackout function 

10. Fog machine 

Fog machine 


#1 

This menu item is covered in chapter 6. 

#2 

This function is not available.


11.2 Reset to Factory Settings 
[Reset factory] 

It is possible to reset the controller to factory setting. All 
programs and fixture patches will be deleted. 

Call the menu item [

Reset factory

]. 

Select  the  setting  [

YES

]  with  the 

PAN

  wheel


and 

confirm with 

ENTER

● 

The display shortly indicates ”Reset factory Please 
wait  Y.“  and  then  “OK“  as  soon  as  the  factory 
settings are loaded. 


11.3 Delete all DMX assignments 
[Delete all Fixture patch] 

All  address  assignments  and  control  channel  options 
made can be deleted and reset to the presettings. 

Call the menu item [

Delete all Fixture patch

]. 

Select the setting [

YES

] with the 

PAN

 wheel


if a 

reset is to be made. Confirm with 

ENTER

● 

The  display  shortly  indicates  “SAVE  OK“  and 
returns to the main menu level. 


11.4 Fade Function [Fade mode] 

This  menu  allows  adjusting  the  fade  function  for  the 
individual  steps  of  the  chases.  It  is  possible  to  define 
whether  only  the  movements  will  be  faded  or  all 
functions. 

Call the menu item [

Fade mode

]. 

Use  the 

PAN

  wheel


to  select  the  setting  [

ALL 

CHANNELS

]  if  the  fade function  is possible for all 

control channels or select [

ONLY PAN/TILT

] if it is 

only  possible  for  the  pan  and  tilt  wheels.  Confirm 
with 

ENTER

● 

The  display  shortly  indicates  “SAVE  OK“  and 
returns to the main menu level. 


Summary of Contents for DMX Move Control 512 PRO

Page 1: ...www eurolite de www eurolite de www eurolite de DMX Move Control 512 PRO DMX Controller Bedienungsanleitung Bedienungsanleitung Bedienungsanleitung Bedienungsanleitung User Manual User Manual User Man...

Page 2: ......

Page 3: ...DMX MoveControl 512PRO Bedienungsanleitung Version 1 0...

Page 4: ...nen dann einfach wieder ver ndert werden Eine Eigenschaft die sonst nur bei weitaus teureren und gr eren Pulten zu finden ist Beleuchtete Schalter Komfortabel ist auch die farbige Beleuchtung der einz...

Page 5: ...utzt werden 30 programmierbare Chases Chaser Wiedergabe manuell musik oder zeitgesteuert m glich 30 programmierbare Szenen 3 DMX Ger teebenen steuerbar 8 motorisierte DMX Kanal Fader sorgen f r anwend...

Page 6: ...en 19 8 LICHT PROGRAMMIEREN 20 8 1 Programmiermodus aktivieren 20 8 2 Szenen programmieren 20 8 3 Lauflichter programmieren 21 8 4 Schritte hinzuf gen 22 9 PROGRAMME AUFRUFEN 23 9 1 Szenen aufrufen 23...

Page 7: ...des Produkts betrachten die Bedienungsanleitung w hrend der Lebensdauer des Produkts behalten die Bedienungsanleitung an jeden nachfolgenden Besitzer oder Benutzer des Produkts weitergeben sich die le...

Page 8: ...en auf Besch digungen Werden Verl ngerungsleitungen verwendet muss sichergestellt werden dass der Adernquerschnitt f r die ben tigte Stromzufuhr des Ger tes zugelassen ist Alle Warnhinweise f r die Ne...

Page 9: ...ebungstemperatur muss zwischen 5 C und 45 C liegen Halten Sie das Ger t von direkter Sonneneinstrahlung auch beim Transport in geschlossenen W gen und Heizk rpern fern Die relative Luftfeuchte darf 50...

Page 10: ...Bedienelemente und Anschl sse www eurolite de 10 4 BEDIENELEMENTE UND ANSCHL SSE...

Page 11: ...nden gedr ckt um die HSV Funktion f r die Schieberegler 6 bis 8 zu aktivieren Die Farben der RGB Farbmischung lassen sich dann mittels HSV einstellen Mit dem H Regler wird der Farbwert Hue angegeben m...

Page 12: ...18 Taste PAGE Zum Umschalten der Zifferntasten 20 im Modus CHASE und SCENE zwischen den beiden Speicherseiten LED A leuchtet Seite A Speicherplatz 1 15 ist angew hlt LED B leuchtet Seite B Speicherpla...

Page 13: ...XLR Stecker und Kupplungen Bei Verwendung von anderen Steckverbindungen k nnen Adapterkabel eingesetzt werden 1 Verbinden Sie den DMX Ausgang DMX OUT 26 des Controllers mit dem DMX Eingang des ersten...

Page 14: ...Ihres Ger ts Nr Ger t Startadresse Nr Ger t Startadresse Nr Ger t Startadresse A 1 1 B 9 273 C 17 2 35 10 307 18 3 69 11 341 19 4 103 12 375 20 5 137 13 409 21 6 171 14 443 22 7 205 15 447 23 8 239 16...

Page 15: ...X Kanal des Scheinwerfers Da die ersten vier Kan le f r die Grundfarben vorgesehen sind geben Sie bitte f r den ersten Kanal des Pults 1 R mit dem Tilt Rad den Kanal des Scheinwerfers f r Rot ein 3 Be...

Page 16: ...sma 8 15 Null Null Null Null Null 14 Prisma rot Null Null Null Null Null Null Null 15 Focus 7 Null Null Null Null Null Null 16 Zoom Null Null 1 Null 1 Null Null 17 Reset 11 16 12 Null Null Null 15 18...

Page 17: ...Nutzen Sie diese Funktion z B wenn bei einigen Scheinwerfern der Shutter Kanal bei Null offen ist jedoch bei anderen erst beim Wert 255 Auf diese Weise kann eine unterschiedliche Funktionsweise einze...

Page 18: ...dern f r Pan und Tilt die gew nschten DMX Werte f r die Lichtstimmung zu Sobald ein Motorfader bewegt wird zeigt das Display in der unteren Zeile die Nummer des Steuerkanals und den aktuellen Ausgabe...

Page 19: ...zwischen 1 und 100 einstellen Anzeige Movement Speed Die Effektparameter im berblick Bewegungsradius Movement Range Hier definieren Sie jeweils f r Pan und Tilt getrennt wie gro der Bewegungsradius d...

Page 20: ...eren Sie den Programmiermodus 2 Erstellen Sie eine Szene wie im Kapitel 7 beschrieben Es k nnen auch Bewegungen und Farbeffekte enthalten sein 3 Dr cken Sie die Taste SCENE Taste leuchtet und kurz die...

Page 21: ...Taste PAGE zwischen den Speicherpl tzen 1 bis 15 LED A leuchtet und 16 bis 30 LED B leuchtet 4 Erstellen Sie die erste Szene wie im Kapitel 7 beschrieben Alternativ kann aber auch eine bereits gespeic...

Page 22: ...um einen weiteren Schritt erg nzen Erzeugen Sie dazu die gew nschte Szene oder w hlen Sie eine bereits programmierte Szene aus Dr cken Sie kurz die Taste REC zum Speichern Zur Best tigung des Speicher...

Page 23: ...blinkt Bei Szenen verh lt es sich anders Auch hier erh lt der h here Wert Vorrang allerdings sind die Bewegungseffekte den Positionen unterlegen Bei zwei Szenen w rden die Scheinwerfer daher die progr...

Page 24: ...te sodass deren LED erlischt Die Ablaufmodi im berblick MANUAL Es kann manuell mit einem der Encoder R der von einem zum n chsten Schritt weitergeschaltet werden F r diese Funktion muss die PAN TILT T...

Page 25: ...en zu m ssen W hlen Sie dazu einfach den oder die gew nschten Scheinwerfer an und nehmen Sie mit Hilfe der Motorfader und Encoder R der Speed Funktion muss deaktiviert sein Einstellungen vor Sobald mi...

Page 26: ...Die berblendfunktion l sst sich f r jedes Ger t individuell festlegen Die Einstellung erfolgt in den Systemeinstellungen im Men 01 Patch fixture Abschnitt 6 7 10 2 Blackout Funktion Dunkelschaltung M...

Page 27: ...punkt wird im Kapitel 6 beschrieben 2 Diese Funktion ist nicht verf gbar 11 2 Zur cksetzen auf Werkseinstellungen Reset factory Hier l sst sich das Ger t auf die Werkseinstellungen zur cksetzen Jeglic...

Page 28: ...ard XLR Polen 1 und 2 neue DMX Kabel sind daher nicht erforderlich RDM f hige und konventionelle DMX Ger te k nnen gemeinsam in einer DMX Reihe betrieben werden Werden DMX Splitter verwendet m ssen di...

Page 29: ...al den Wert Null 3 Best tigen Sie Ihre Einstellung mit ENTER Das Display zeigt kurz SAVE OK und wechselt zur zur ck zur Hauptebene 11 9 Nebelmaschine Fog machine control Das Lichtpult kann eine DMX Ne...

Page 30: ...Laden Sie die Firmware aus dem Internet herunter www eurolite de Downloadbereich des Artikels 2 Legen Sie einen Ordner mit dem Namen DMX MOVE CONTROLLER 512 PRO auf der Hauptebene ROOT eines USB Spei...

Page 31: ...lersatzteile Sollten Sie noch weitere Fragen haben steht Ihnen Ihr Fachh ndler jederzeit gerne zur Verf gung 13 1 Sicherungswechsel Wenn die Feinsicherung des Ger ts defekt ist darf diese nur durch ei...

Page 32: ...ckeinbau mit 3 HE Gewicht 3 9 kg Technische Daten k nnen im Zuge der Weiterentwicklung des Produkts ohne vorherige Ank ndigung ge ndert werden Steckerbelegung 14 1 Zubeh r Best Nr Artikel 30111570 ROA...

Page 33: ...Notizen www eurolite de 33...

Page 34: ......

Page 35: ...DMX Move Control 512 PRO User Manual Version 1 0...

Page 36: ...heir programmed position and can thus easily be changed again an amazing feature only to be found in far more expensive and larger lighting consoles Illuminated Buttons One particularly convenient com...

Page 37: ...be used simultaneously 30 programmable chases with 100 scenes each can be stored Manual time controlled or sound controlled chase running mode 30 programmable scenes 4 DMX fixture levels can be contro...

Page 38: ...Motions and Color Effects 51 8 PROGRAMMING 52 8 1 Activating the Programming Mode 52 8 2 Programming Scenes 52 8 3 Programming Chases 53 8 4 Inserting Steps 54 9 CALLING PROGRAMS 55 9 1 Calling Scenes...

Page 39: ...to be part of the total product keep this manual for the entire service life of the product pass this manual on to every further owner or user of the product download the latest version of the user m...

Page 40: ...ed or damaged by sharp edges Check the device and the power cord from time to time If extension cords are used make sure that the core diameter is sufficient for the required power consumption of the...

Page 41: ...sional operation Ambient Conditions The ambient temperature must always be between 5 C and 45 C Keep away from direct insulation particularly in cars and heaters The relative humidity must not exceed...

Page 42: ...Operating Determinations www eurolite de 42 4 OPERATING ELEMENTS CONNECTIONS...

Page 43: ...be used for all fixtures for which the RGB channels have been correctly assigned to the control elements of the DMX MOVE PRO 7 Master fader To adjust the brightness This fader controls all dimmer chan...

Page 44: ...erent functions depending on the selected mode and have a dual occupancy the button PAGE 18 allows switching between the two memory pages in CHASE or SCENE mode MOVEMENT To activate and deactivate mov...

Page 45: ...ou wish to connect fixtures with other XLR outputs you need to use adapter cables 1 Connect the DMX output of the controller to the DMX input of the first light effect unit 2 Connect the DMX output of...

Page 46: ...tarting address of the fixtures 6 3 Step 3 Assign the DMX Start Addresses Manually It is possible to operate up to 24 spotlights with the controller However the fixtures have to be split to the 512 av...

Page 47: ...4 to white and channel 5 to dimmer The channels for the pan tilt movement can be found in at the very end on the list These must also be assigned to the appropriate channels If your spots dispose of 8...

Page 48: ...not necessarily be created for each special function In the example table shown here different functions hide behind Effect 1 and Effect 2 After all 32 sliders 8 motorized faders on 4 levels and 2 enc...

Page 49: ...Adjust the desired control element with the PAN wheel and use the TILT wheel to select the setting YES if the output value of the control channel is to be inverted or NO if not 3 Press the ENTER butt...

Page 50: ...s for the DMX channels using the motor faders and if necessary the PAN and TILT wheels As soon as a fader is moved the display indicates the number of the control channel in the lower line and the cur...

Page 51: ...10 15 Use the TILT wheel to adjust the running speed between 1 and 100 indication Movement Speed Overview of all parameters Movement Range Here you can define for pan and tilt separately how large the...

Page 52: ...as described in chapter 7 Movements and color effects can be integrated as desired 3 Press the SCENE button button lights and then the ENTER REC button to memorize the scene 4 Select the desired memo...

Page 53: ...use the PAGE button to switch between the memory banks 1 15 LED A lights and 16 30 LED B lights 4 Adjust the first scene with the motor faders the encoder wheels and the effect generator as described...

Page 54: ...4 You can now add an additional step to the chase Simply create a scene or call a scene previously memorized Shortly press the REC button to memorize the revised chase To confirm the memory procedure...

Page 55: ...e movement button blinks Scenes behave differently Again the higher priority is given However the motion effects are inferior to the positions When dealing with two scenes the spots would assume the p...

Page 56: ...nding number button so that its LED extinguishes Overview of running modes MANUAL The chase can be manually advanced step by step with the PAN TILT wheel The PAN TILT button must be engaged for this f...

Page 57: ...thout the need for reprogramming scenes Simply select one or several fixtures and make your adjustments with the motor faders and encoder wheels speed function must be deactivated Once a value higher...

Page 58: ...ade in lasting 8 5 seconds The fade in feature can be assigned to each fixture individually The assignment can be made in the system settings under 01 Patch fixture section 6 7 10 2 Blackout Function...

Page 59: ...is covered in chapter 6 2 This function is not available 11 2 Reset to Factory Settings Reset factory It is possible to reset the controller to factory setting All programs and fixture patches will be...

Page 60: ...uencing the connections RDM data is transmitted via the standard XLR pins 1 and 2 and does not require a new cable type RDM ready and conventional DMX devices can be operated in one DMX line If DMX sp...

Page 61: ...has the value zero 3 Confirm your setting with ENTER The display shortly indicates SAVE OK and returns to the main menu level 11 9 Fog Machine Fog machine control The controller can operate a DMX fog...

Page 62: ...he firmware 1 Download the firmware from the internet www eurolite de download section of the product 2 Create a folder DMX MOVE CONTROLLER 512 PRO on the root directory of a USB memory device 3 Copy...

Page 63: ...damaged it has to be replaced by a special power supply cable available at your dealer Should you have further questions please contact your dealer 13 1 Replacing the Fuse If the fine wire fuse of th...

Page 64: ...Rack installation with 3 U Weight 3 9 kg Specifications are subject to change without notice due to product improvements Pin connection 14 1 Accessories Order no Item 30111570 ROADINGER Mixer case Pro...

Page 65: ...Notes www eurolite de 65...

Page 66: ...Notes www eurolite de 66...

Page 67: ......

Page 68: ...EUROLITE EUROLITE EUROLITE EUROLITE 201 201 201 2016 6 6 6 Technische nderungen und Irrtum vorbehalten Every information is subject to change without prior notice 00099567 DOCX Version 1 0...

Reviews: