


Disassembly
Removing the Floppy Disk Drive Assembly 2 - 15
2.Disassembly
Removing the Floppy Disk Drive Assembly
1. Remove the battery (
page 2 - 6
), keyboard (
page 2 - 8
), hard disk assembly (
page 2 - 9
), CPU (
page 2 - 10
), modem
(
page 2 - 12
), CD device (
page 2 - 12
) and bottom case (
page 2 - 13
).
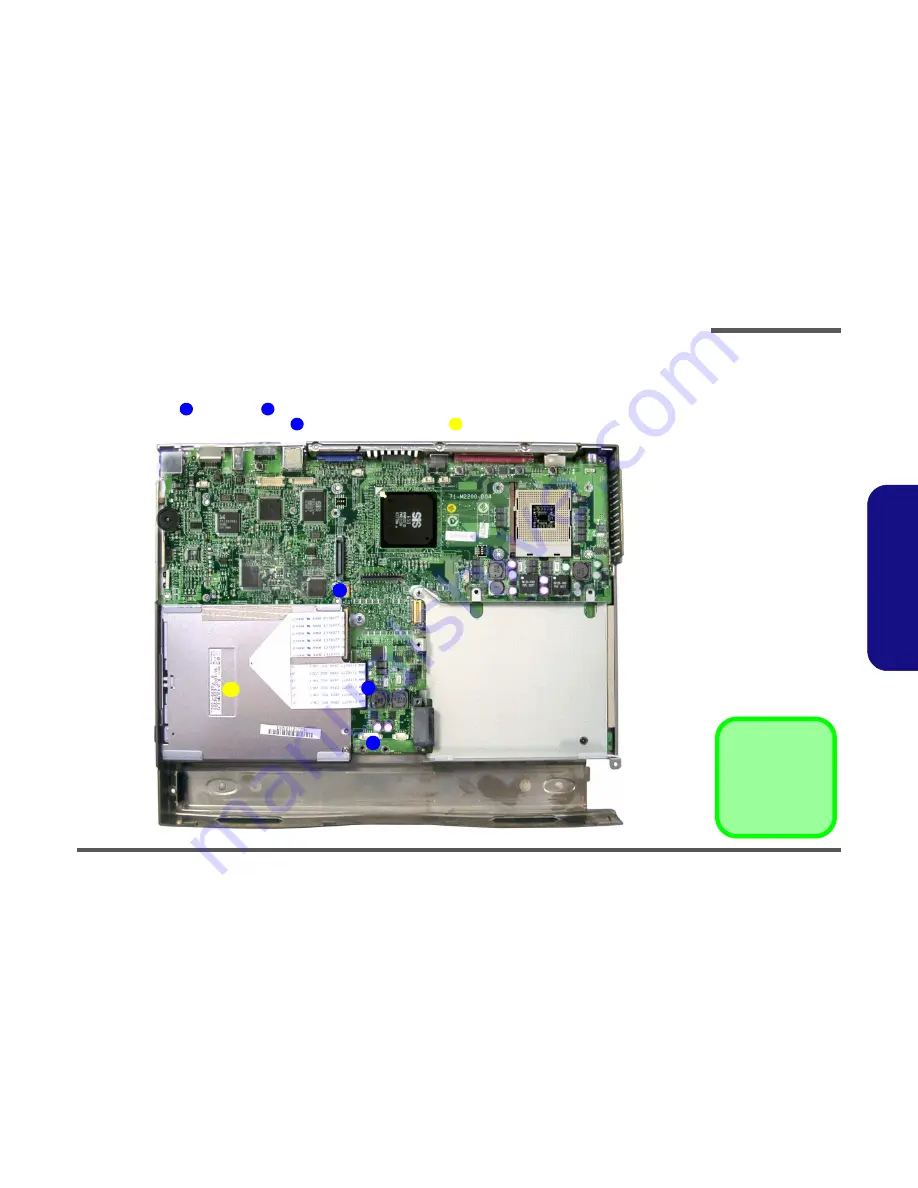
2. Remove screw and hex nut from the FDD assembly.
3. Carefully disconnect the FDD cable and lift the FDD assembly off the mainboard (
Figure 2 - 12
).
4. FDD Assembly
• 1 Screw
• 1 Hex nut
Figure 2 - 12
Floppy Disk
Drive Assembly
Removal
Sequence
Remove the screw
and hex nut, discon-
nect the FDD cable
and lift the FDD as-
sembly off the main-
board.
1
2
3
4
4
1
3
2
Summary of Contents for D220S
Page 1: ......
Page 2: ...Preface I Preface Notebook Computer M220S M270S D220S D270S Service Manual...
Page 10: ...Preface IX Preface Inverter Board B 32...
Page 11: ...Preface X Preface...
Page 25: ...Introduction 1 14 1 Introduction...
Page 46: ...Part Lists Top M220S A 3 Part Lists Top M220S Figure 1 Top M220S...
Page 47: ...Part Lists A 4 Bottom M220S Part Lists Bottom M220S Figure 2 Bottom M220S...
Page 48: ...Part Lists LCD 14 M220S A 5 Part Lists LCD 14 M220S Figure 3 LCD 14 M220S...
Page 55: ...Part Lists A 12 Top D220S Part Lists Top D220S Figure 1 Top D220S...
Page 56: ...Part Lists Bottom D220S A 13 Part Lists Bottom D220S Figure 2 Bottom D220S...
Page 57: ...Part Lists A 14 LCD 14 D220S Part Lists LCD 14 D220S Figure 3 LCD 14 D220S...
Page 64: ...Part Lists Top M270S A 21 Part Lists Top M270S Figure 1 Top M270S...
Page 65: ...Part Lists A 22 Bottom M270S Part Lists Bottom M270S Figure 2 Bottom M270S...
Page 66: ...Part Lists LCD 14 M270S A 23 Part Lists LCD 14 M270S Figure 3 LCD 14 M270S...
Page 73: ...Part Lists A 30 Top D270S Part Lists Top D270S Figure 1 Top D270S...
Page 74: ...Part Lists Bottom D270S A 31 Part Lists Bottom D270S Figure 2 Bottom D270S...
Page 75: ...Part Lists A 32 LCD 14 D270S Part Lists LCD 14 D270S Figure 3 LCD 14 D270S...