Eureka E 46 B Instruction Manual Download Page 8


RICARICA BATTERIE 

Effettuare un ciclo di carica delle batterie prima dell’utilizzo della 
macchina. Nel caso di sostituzione della batteria accertarsi di utilizzare 
batterie adatte al caricabatteria installato (utilizzare solo batterie 12V  
AGM o GEL).Dopo aver spento la macchina inserire la spina del 
caricabatteria ( C ) nella presa di rete.  
Seguire le istruzioni del libretto allegato per il corretto uso del 
caricabatteria. 

ATTENZIONE: 

La macchina è predisposta di un sistema automatico 

che toglie la tensione dall’impianto elettrico quando è in fase di 
ricarica delle Batterie. 

ATTENZIONE: 

Per non provocare danni permanenti alle batterie, è 

indispensabile evitare la scarica completa delle stesse, provvedendo 
alla ricarica entro pochi minuti dall’entrata in funzione del segnale 
lampeggiante di batterie scariche. 

ATTENZIONE: 

Non lasciare mai le batterie completamente scariche, 

anche se la macchina non viene usata. 

ATTENZIONE: 

Per la carica giornaliera delle batterie è necessario 

attenersi scrupolosamente alle indicazioni fornite dal costruttore o dal 
suo rivenditore. Tutte le operazioni di installazione e manutenzione 
devono essere eseguite da personale specializzato.  
Pericolo di esalazione di gas e fuoriuscita di liquidi corrosivi.  
Pericolo di incendio: non avvicinarsi con fiamme libere. 

ATTENZIONE: E’ indispensabile completare il ciclo di ricarica 
delle batterie (CR > 8 h). Una interruzione prematura del ciclo 
stesso comprometterebbe la durata e l’autonomia delle batterie. 
  
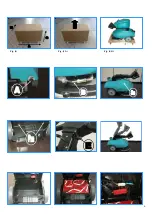
SEGNALATORE BATTERIE 

Nella parte posteriore della macchina sul caricabatterie si trova un 
segnalatore del livello di carica delle batterie(D) che e' diviso nei 
seguenti colori: Verde- batterie cariche.  
Giallo- batterie a fine carica. Rosso- batterie da ricaricare. Queste fasi 
sono associate alla emissione di segnalazioni luminose intermittenti, 
dopodiché il sistema di controllo toglierà corrente al motore delle 
spazzole, lasciando invece in funzione il motore di aspirazione per un 
minuto, al fine di completare il recupero dei residui sul pavimento 
prima di procedere alla ricarica. 

BATTERY CHARGE  

Do first a complete charge cycle of the battery before using the 
machine.  When replacing the battery make sure you use suitable 
batteries to the charger installed (use only 12V - AGM or GEL Type).  
Ensure the machine has been turned off, then insert the charger plug 
into the mains socket (C). 
Follow the instructions of the attached manual for the correct use of 
the charger.


WARNING: 

The machine is designed with automatic security system 

that cuts off power when battery is under charge. 

WARNING: 

To avoid permanent damage to the batteries, it is 

essential to avoid complete discharge of the same, even if the machine 
is not used. The recharge must begin within a few minutes at the 
beginning of the flashing warning light for low battery.. 

CAUTION: 

Never leave the battery completely discharged, even if 

the machine is not in use 

CAUTION: 

For the battery daily recharge, it is necessary to follow 

strictly the instructions provided by the manufacturer or its dealer. All 
installations and maintenance must be performed by qualified 
personnel.


Danger of leaking of gas, fumes and corrosive liquids.  
Risk of fire: do not approach with open flames

.  

CAUTION: It’s essential to complete the charging cycle UP TO 
FULL CHARGE (> 8 h).  . A premature termination of the life 
cycle itself compromise life and the autonomy of the batteries

.


CHARGE CONTROLLER 

The charge controller is (D) on  the battery charger which is on back of 
the machine and it is divided in three colored LEDs, which indicate the 
level of power: 
Green 

- full charged battery;  

Yellow  - low battery 
Red 

- recharge.  

These phases are associated to warning flashing lights, after which the 
control system will cut power to the brush motor, allowing the vacuum 
motor to run for a further minute to complete the recovery of remains 
on the floor, before the recharge. 


SERBATOIO RECUPERO 

Il timone che per motivi di imballaggio viene fornito piegato, dovrà 
essere messo in posizione di lavoro. Per fare ciò procedere come 
segue: 
1.


Alzare il timone tirando verso l’alto l’apposita leva (E).  

2.


Posizionare la macchina in posizione di lavoro.  

3.


Applicare il serbatoio recupero al timone  e fissarlo per mezzo del 

gancio (F). 

 ATTENZIONE : 

Controllare che il serbatoio recupero sia inserito 

correttamente e verificare che il tappo sia chiuso correttamente. 

RECOVERY TANK 

The rudder comes folded up for reasons of packaging -it must be put in 
position before operating.   
To do this, follow these steps:  
1. Lift the rudder by pulling up the lever (E).  
2. Place the machine in working position.  
3. Apply the recovery tank at the helm and secure it with the hook (F). 

WARNING: Verify the correct positioning of the recovery tank 
and check that the cap is closed properly.


Summary of Contents for E 46 B

Page 1: ...MANUAL DE INSTRUCCIONES BEDIENUNGSANLEITUNG E46 _______________________________________________ EUREKA S r l Via dell Industria 32 35013 CITTADELLA PD ITALY Tel 39 049 9481800 Fax 39 049 9481899 INTE...

Page 2: ...2 MANUALE ISTRUZIONI ITALIANO 3 INSTRUCTION MANUAL ENGLISH 3 MANUEL DE L EMPLOI FRAN AIS 21 MANUAL DE INSTRUCCIONES ESPA OL 21 BEDIENUNGSANLEITUNG DEUTSCH 39...

Page 3: ...SERBATOIO FILTRO BRUSH REPLACEMENT SOLUTION TANK FILTER CLEANING 12 SOSTITUZIONE CARICA BATTERIE CBHD1 CBHD1 BATTERY CHARGER REPLACEMENT 12 CARICA BATTERIE CBHD1 PRINCIPIO DI FUNZIONAMENTO CBHD1 BATTE...

Page 4: ...NZA DI QUESTE SEMPLICI PRECAUZIONI E INDISPENSABILE PER LA VALIDITA DELLA GARANZIA CHE IN CASO CONTRARIO SARA AUTOMATICAMENTE INVALIDATA WARNING INSTRUCTIONS FOR THE PROPER USE OF THE BATTERY IN ORDER...

Page 5: ...delle sue caratteristiche tecniche a fornire istruzioni su trasporto spostamento messa in funzione assemblaggio regolazioni utilizzo interventi di manutenzione parti di ricambio rischi Il Costruttore...

Page 6: ...6 Fig 1 A Fig 1 Fig 1 B...

Page 7: ...r raccomandata informare il corriere ed il costruttore La macchina contenuta in uno specifico imballo Fig1 Non possono essere sovrapposti pi di due imballi La massa complessiva di kg 110 Le dimensioni...

Page 8: ...sure the machine has been turned off then insert the charger plug into the mains socket C Follow the instructions of the attached manual for the correct use of the charger WARNING The machine is desig...

Page 9: ...rata tramite l apposito rubinetto A 7 Premere l interruttore elettrovalvola L Macchina a CAVO 1 Rilasciare la leva di sollevamento della ruota anteriore Ls per procedere al lavoro 2 Abbassare la leva...

Page 10: ...ascinare la macchina in avanti ATTENZIONE Nell effettuare spostamenti anche brevi in retromarcia assicurarsi che il tergi pavimento sia sollevato Fig 3 OVERFLOW DEVICE The machine is equipped with a b...

Page 11: ...re il tubo N sulla parte posteriore della macchina 3 Aprire il tappo di scarico e svuotare il serbatoio di recupero 4 Rimuovere il tappo per accedere al serbatoio 5 Sciacquare il serbatoio e pulire co...

Page 12: ...opening the rudder hook F 2 Close the control valve of the cleaning solution A 3 Remove the solution pipe B 4 Remove the cleaning solution tank 5 Unscrew the cap on the detergent solution tank 6 Remov...

Page 13: ...f during the process the battery is disconnected after a few seconds the charger resets and prepares starting a new charging process The charging progress is shown by three LED s RED YELLOW and GREEN...

Page 14: ...14...

Page 15: ...he main functions of the machine follow these steps BRUSHES MOTOR 1 Remove the recovery tank from the stem by the hook F 2 Turn the tap of the regulation of the detergent solution off A 3 Disconnect t...

Page 16: ...azione V Hz 24 DC Power supply Tergipavimento mm 540 Squeegee Pressione Spazzola Kg 35 Brush pressure Serbatoio Soluzione Lt 28 Solution tank Serbatoio Recupero Lt 30 Recovery tank Depressione Mm H2O...

Page 17: ...emere il pulsante RESET Sostituire il fusibile TROUBLESHOOTING FAULT CAUSE SOLUTION No cleaning solution flowing out The solution carrying pipes are clogged Filters are clogged Solution tank is empty...

Page 18: ...ore Spazzole Brush motor switch MSP Motore Spazzole Brush Motor Bl 1 Cavo Elett Blu 1mm Blue electric cable 1 mm R 6 Cavo Elett Rosso 6 mm Red electric cable 6 mm TAS Tasto Motore Aspiraz RAS Rel Moto...

Page 19: ...lettrovalvola Solenoid Valve GR 1 Cavo Elett Grigio 1mm Grey electric cable 1 mm TEL Tasto Elettrovalvola Solenoid Valve switch MCR1 Microinterruttore Sicurezza Safety Micro Switch Bi 1 Cavo Elett Bia...

Page 20: ...20...

Page 21: ...N GOMAS DEL LIMPIAPAVIMIENTOS 29 SUBSTITUTION DE LA BROSSE NETTOYAGE RESERVOIR FILTRE SOSTITUCI N DEL CEPILLO NETTOYAGE TANQUE FILTRO 30 REMPLACEMENT DU CHARGEUR DE BATTERIE CBHD1 REEMPLAZO DEL CARGAD...

Page 22: ...ATIONS EST ESSENTIEL POUR LA VALIDITE DE LA GARANTIE DANS LE CAS CONTRAIRE ELLE EST AUTOMATIQUEMENT ANNULEE ATENCI N INSTRUCCI NES PARA EL USO CORRECTO DE LA BATER A PARA PRESERVAR LA LARGA DURACI N D...

Page 23: ...r avant de commencer toute op rationsur la machine Les informations crites dans ce manuel sont finalis es la description de l utilisation de la machine et de ses caract ristiques techniques fournir de...

Page 24: ...24 Fig 1 A Fig 1 Fig 1 B...

Page 25: ...e au transporteur et informez imm diatement l exp ditionnaire par lettre recommand e ainsi que le constructeur La machine se trouve dans un emballage sp cifique Fig 1 Il est impossible de superposer p...

Page 26: ...en el toma de la red Seguir las instrucciones del manual adjunto para el uso correcto del cargador de bater as ATENCI N La m quina cuenta con un sistema autom tico que corta la tensi n del sistema el...

Page 27: ...oue ant rieure Ls pour proc der au travail 2 Abaisser le levier de commande suceur G 3 Brancher la fiche dans la prise de courant 4 Appuyer sur l interrupteur brosses H 5 Appuyer sur l interrupteur as...

Page 28: ...nclin e r ussit tracter la machine en avant ATTENTION Ne pas effectuer de d placements m mes brefs en marche arri re contr ler que le suceur soit bien soulev Fig 3 DISPOSITIVO DEMASIADO LLENO La m qui...

Page 29: ...plac sur la partie arri re de la machine 3 Ouvrir le bouchon de vidange et vider le r servoir de r cup ration 4 Enlever le bouchon pour acc der au r servoir 5 Rincer le r servoir et nettoyer l aide d...

Page 30: ...car el tanque de recuperaci n de su asiento por medio del gancho F 2 Cerrar el grifo de ajuste del flujo de soluci n detergente A 3 Desconectar el tubo de soluci n detergente B 4 Quitar el tanque de s...

Page 31: ...un xito positivo despu s de un segundo se iniciar la carga de la bater a se encende el LED rojo El rel de salida se cierra y la corriente sube lentamente hasta el valor programado Si durante el proces...

Page 32: ...32...

Page 33: ...MOTOR DE LOS CEPILLOS 1 Sacar el tanque de recuperaci n del tim n por medio del gancho F 2 Cerrar el grifo de ajuste del flujo de soluci n detergente A 3 Desconectar el tubo de soluci n detergente B...

Page 34: ...Hz 24 DC Power supply Tergipavimento mm 540 Squeegee Pressione Spazzola Kg 35 Brush pressure Serbatoio Soluzione Lt 28 Solution tank Serbatoio Recupero Lt 30 Recovery tank Depressione Mm H2O 800 Depre...

Page 35: ...es en los conductos de la soluci n Filtro atascado Tanque de soluci n vac o Grifo de ajuste cerrado Remover las obstrucciones controlar la electrov lvula Limpiar o sustituir el filtro Rellenar el tanq...

Page 36: ...ore Spazzole Brush motor switch MSP Motore Spazzole Brush Motor Bl 1 Cavo Elett Blu 1mm Blue electric cable 1 mm R 6 Cavo Elett Rosso 6 mm Red electric cable 6 mm TAS Tasto Motore Aspiraz RAS Rel Moto...

Page 37: ...lettrovalvola Solenoid Valve GR 1 Cavo Elett Grigio 1mm Grey electric cable 1 mm TEL Tasto Elettrovalvola Solenoid Valve switch MCR1 Microinterruttore Sicurezza Safety Micro Switch Bi 1 Cavo Elett Bia...

Page 38: ...38...

Page 39: ...IGUNGS DES SCHMUTZWASSERTANKS SAUGFUSS REINIGUNG ERSATZ VON SAUGFUSS GUMMI 47 ERSATZ DER B RSTE TANKS FILTER REINIGUNG 48 CBHD1 LADEGER T ERSETZEN 48 CBHD1 BATTERIE LADEGER T BETRIEB DES CBHD1 LADEGER...

Page 40: ...EITENZUSTANDEN ZU HALTEN MUSS MAN EINIGE EINFACHE VORSICHTMASSNAHMEN BEWAHREN MASCHINE NIE MIT LEERER GANZ ODER TEILWEISE BATTERIE EINLAGERN BATTERIE NIE TEILWEISE LADEN JEDES MAL WARTEN BIS DEM LADEV...

Page 41: ...Anweisungen in diesem Handbuch zu befolgen und insbesondere die eigens daf r geltenden Vorschriften zu beachten Dieses Handbuch sollte als Teil der Maschine betrachtet und f r Empfehlungen in der Zuku...

Page 42: ...42 Fig 1 A Fig 1 Fig 1 B...

Page 43: ...r D mpfen Treibstoffe L sungsmittel usw eingesetzt wird Nicht in Gegenwart von gesundheitssch dlichem Staub arbeiten Zur Wartung und zum Aufladen der Batterien lesen Sie die entsprechenden Anweisungen...

Page 44: ...n Fachpersonal ausgef hrt werden Gefahr des Ausstr mens von Gas und des Austritts von korrosiven Fl ssigkeiten Brandgefahr sich nicht offenen Flammen n hern ACHTUNG Es ist notwendig jeden Ladezyklus b...

Page 45: ...e Hebung von Vorderrad Ls freigeben um mit der Arbeit zu beginnen 2 Saugfu Hebel G senken 3 Schalter K drehen und berpr fen dass die gr ne Led D eingeschaltet ist 4 B rstenschalter H dr cken 5 Absaugs...

Page 46: ...der Saugleitung Die Maschine abschalten und den Beh lter leeren ACHTUNG Mit Schutzhandschuhen arbeiten Kontakte mit gef hrlichen L sungen m glich ANTRIEB Der Antrieb dieser Maschinen erfolgt mithilfe...

Page 47: ...IGUNG DES SCHMUTZWASSERTANKS 1 R ckgewinnungstank mithilfe des Hakens F vom Steuer l sen 2 Schlauch N auf der hinteren Seite der Maschine in der Hand halten 3 Abflussverschluss ffnen und den R ckgewin...

Page 48: ...schluss am Frischwassertank losschrauben 6 Filter P entnehmen und reinigen 7 Verschluss und den Filter erneut montieren 8 Alle Teile erneut montieren wobei die oben genannten Vorg nge in umgekehrter R...

Page 49: ...40V 4 Ladevorgang Soft Start 5 Automatischer R cksetzen bei neuer Batterie und automatischem Start des Ladezyklus 6 Ausgang relais gegen Verpolung Kurzschluss berspannung oder Anomalien 7 Anschlu der...

Page 50: ...50...

Page 51: ...ng B abtrennen 4 Frischwassertank entfernen 5 Auf das Elektroventil der Reinigungsl sung S eingreifen B RSTENANTRIEB 1 R ckgewinnungstank mithilfe des Hakens F vom Steuer l sen 2 Hahn zur Regulierung...

Page 52: ...ion Alimentazione V Hz 24 DC Power supply Tergipavimento mm 540 Squeegee Pressione Spazzola Kg 35 Brush pressure Serbatoio Soluzione Lt 28 Solution tank Serbatoio Recupero Lt 30 Recovery tank Depressi...

Page 53: ...Neigung oder Druck perfekt verstellt Klingen ersetzen Saugfu korrekt stellen Die Maschine reinigt ungleichm ig B rsten sind abgenutzt B rsten ersetzen Der B rstenmotor funktioniert nicht Wechselstrom...

Page 54: ...ore Spazzole Brush motor switch MSP Motore Spazzole Brush Motor Bl 1 Cavo Elett Blu 1mm Blue electric cable 1 mm R 6 Cavo Elett Rosso 6 mm Red electric cable 6 mm TAS Tasto Motore Aspiraz RAS Rel Moto...

Page 55: ...lettrovalvola Solenoid Valve GR 1 Cavo Elett Grigio 1mm Grey electric cable 1 mm TEL Tasto Elettrovalvola Solenoid Valve switch MCR1 Microinterruttore Sicurezza Safety Micro Switch Bi 1 Cavo Elett Bia...

Page 56: ...56...

Reviews: