


13
S EGNALAZIONE -
SIGNAL
S IGNIFICATO -
MEANING
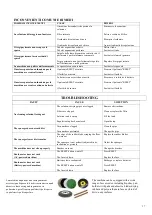
LED rosso fisso
Red led ON
Prima fase di carica Normale
First phase of charge in progress
LED giallo fisso
Yellow led ON
Second a fase di carica Normale
Second phase of charge in progress
LED verde fisso
Green led ON
Termine car ica o f ase di mantenimento
End of charge or maintenan ce phase
S EGNALAZIONE ANOMALIE -
ANOMALIES SIGNAL
LED giallo lamp eggiante
Yellow led flashing
Batteria errata o non connessa
Unsuitable battery or not connected ba ttery
LED rosso lamp eggiante
Red led flashing
Timer di sicurezza sup erato, cortocircuito interno
Safety Timer exceedeed, internal short circuit
LED verde con 2 lamp eggi
Green led with 2 flashings
Configur ato p er la ricarica di b atterie al Gel o AGM
Configured for recharging Gel or AGM batteries
LED rosso con 2 lamp eggi
Red led w ith 2 flashings
Configur ato p er la ricarica di b atterie al Pb-acido
Configured for recharging Lead-acid batteries
TES T INIZIALE -
INITIAL TEST
CBHD1 BATTERY CHARGER
The machine is equipped with on-board battery charger model CBHD1
with the following technical specifications:
1. Advanced technology High Frequency System.
2. Charging process entirely under microprocessor control.
3. Universal Input from 100V to 240V.
4. "Soft Start" operating mode.
5. Automatic reset when mounted a new battery and start the
automatic charging cycle.
6. Output relay protection against polarity reverse, short circuits,
overvoltage or any anomaly.
7. Charger Connection without sparks risks at the output terminals,
with obvious advantages in terms of active safety, thanks to the
recognition of the battery tensions by the relay output, normally open.
8. Visual indication of any anomalies by RED/ YELLOW
FLASHING LEDS.
9. Charging parameters independent from voltage changes up to ±10%
10. Efficiency >85%.
11. Output ripple less than 100mV at maximum load.
12. Charge cycle still staring at only 2V battery charge.
CBHD1 OPERATING PRINCIPLES
When turning on the new CBHD1 series, the charger performs a test
on battery voltage to determine whether or not to start charging
routine.
By unconnected battery, the red LED starts flashing.
By successful test, the battery charging starts within one second and
red led will be steady lit.
The output relay closes and the first phase of the current slowly rises
to the set nominal value.
If during the process the battery is disconnected, after a few seconds,
the charger resets and prepares starting a new charging process.
The charging progress is shown by three LED’s : RED, YELLOW and
GREEN, as in the whole range of the battery chargers.
The GREEN led shows the end of the charging or the last phase in
case of deep charging process; in the former case, the relay is opened
to disconnect galvanically the battery from the battery charger.
CARICA BATTERIA CBHD1
La macchina viene fornita di caricabatteria elettronico incorporato
modello CBHD1 avente le seguenti caratteristiche tecniche :
1.
Sistema ad alta frequenza con tecnologia avanzata.
2.
Processo di carica interamente controllato da microprocessore.
3.
Ingresso universale da 100V a 240V.
4.
Inizio del processo di carica in modalità “soft start”.
5.
Reset automatico all’inserimento di una nuova batteria ed inizio
automatico del ciclo di carica.
6.
Protezione con relè in uscita contro l’inversione di polarità, corto
circuiti, sovra tensioni o anomalie.
7.
Connessione della batteria al caricatore senza scintille ai morsetti
d’uscita con ovvi vantaggi in termini di sicurezza attiva, grazie
al riconoscimento della tensione di batteria a valle del relè
d’uscita, normalmente aperto.
8.
Segnalazione visiva di eventuali anomalie mediante LED ROSSO
LAMPEGGIANTE o LED GIALLO LAMPEGGIANTE.
9.
Parametri di carica insensibili alle variazioni di rete ±10%.
10.
Rendimento >85%.
11.
Ripple di uscita a massimo carico inferiore a 100mV.
12.
Inizio del ciclo di carica anche con batterie a 2V.
PRINCIPIO DI FUNZIONAMENTO CBHD1
All’accensione i nuovi caricabatteria della serie CBHD1 eseguono un
test sulla tensione di batteria per decidere se iniziare o meno il
processo di carica.
Se la batteria non è connessa al caricabatteria lampeggerà il led rosso.
Se il test ha dato esito positivo, trascorso 1 secondo avrà inizio la
carica della batteria, con il led rosso acceso.
Il relè di uscita si chiude e lentamente sale la corrente della prima fase
fino al valore nominale programmato.
Se, durante il processo di carica della batteria, l’utente scollega la
batteria stessa dal caricabatteria, dopo pochi secondi, il caricabatteria
si azzera e si prepara ad iniziare un nuovo processo di carica.
Durante il processo di carica l’avanzamento della stessa è segnalato
tramite tre indicatori luminosi a led : ROSSO, GIALLO e VERDE.
Il led VERDE segnala lo stop della carica o l’ultima fase in tampone;
nel primo caso si ha l’apertura del relè a scollegare galvanicamente la
batteria dal caricatore.
Summary of Contents for E 46 B
Page 6: ...6 Fig 1 A Fig 1 Fig 1 B...
Page 14: ...14...
Page 20: ...20...
Page 24: ...24 Fig 1 A Fig 1 Fig 1 B...
Page 32: ...32...
Page 38: ...38...
Page 42: ...42 Fig 1 A Fig 1 Fig 1 B...
Page 50: ...50...
Page 56: ...56...


